Canon SELPHY DS700 DS700 Photo Print Guide - Page 51
Printing with the computer - software
 |
View all Canon SELPHY DS700 manuals
Add to My Manuals
Save this manual to your list of manuals |
Page 51 highlights
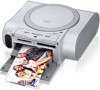
Printing with the computer Printing with the computer Installing the Printer Driver „ Installing the Printer Driver-Windows note • Use a computer equipped on which Windows XP or Windows 2000 can operate. • Do not disconnect the cable or remove the CD-ROM during the installation. The driver cannot be correctly installed. • The screens below refer to Windows XP installation. Screens may differ depending on the operating system you are using. • When installing the printer driver in Windows XP or Windows 2000, log on to the system as a member of the Administrators group. • If the following screen appears automatically, click Cancel to quit the screen and turn off the printer. Next, remove and replace the USB cable connected to your computer. Then follow steps 3 to 12 to install the printer driver. 1 Prepare the Printer. See "Easy Setup Instructions" on page 3. 2 Ensure that the printer and computer are turned off. OFF 3 Turn on the computer and start Windows. If any applications automatically run, quit them. Disable any anti-virus programs. Do NOT turn the printer on at this stage. 4 Place the Setup Software & User's Guide CD-ROM in the CD-ROM drive. 49
-
 1
1 -
2
-
3
-
4
-
5
-
6
-
7
-
8
-
9
-
10
-
11
-
12
-
13
-
14
-
15
-
16
-
17
-
18
-
19
-
20
-
21
-
22
-
23
-
24
-
25
-
26
-
27
-
28
-
29
-
30
-
31
-
32
-
33
-
34
-
35
-
36
-
37
-
38
-
39
-
40
-
41
-
42
-
43
-
44
-
45
-
 46
46 -
 47
47 -
 48
48 -
 49
49 -
 50
50 -
 51
51 -
 52
52 -
 53
53 -
 54
54 -
 55
55 -
 56
56 -
57
-
58
-
59
-
60
-
61
-
62
-
63
-
64
-
65
-
66
-
67
-
68
-
69
-
70
-
71
-
72
-
73
-
74
-
75
-
76
-
77
-
78
-
79
-
80
-
81
-
82
-
83
-
84
-
85
-
86
-
87
 |
 |
