Canon VIXIA HF M50 VIXIA HF M50 / HF M52 / HF M500 Instruction Manual - Page 156
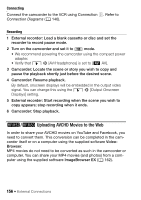
Uploading AVCHD Movies to the Web
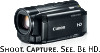 |
View all Canon VIXIA HF M50 manuals
Add to My Manuals
Save this manual to your list of manuals |
Page 156 highlights
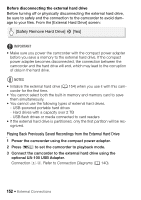
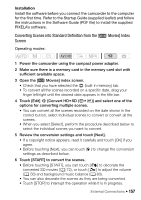
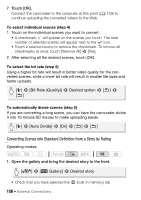
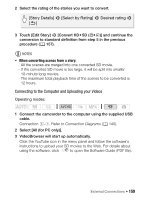
Connecting Connect the camcorder to the VCR using Connection ". Refer to Connection Diagrams (A 140). Recording 1 External recorder: Load a blank cassette or disc and set the recorder to record pause mode. 2 Turn on the camcorder and set it to mode. • We recommend powering the camcorder using the compact power adapter. • Verify that q > [AV/Headphones] is set to [Ò AV]. 3 Camcorder: Locate the scene or story you wish to copy and pause the playback shortly just before the desired scene. 4 Camcorder: Resume playback. By default, onscreen displays will be embedded in the output video signal. You can change this using the q > [Output Onscreen Displays] setting. 5 External recorder: Start recording when the scene you wish to copy appears; stop recording when it ends. 6 Camcorder: Stop playback. -/, Uploading AVCHD Movies to the Web In order to share your AVCHD movies on YouTube and Facebook, you need to convert them. This conversion can be completed in the camcorder itself or on a computer using the supplied software VideoBrowser. MP4 movies do not need to be converted as such in the camcorder or computer. You can share your MP4 movies (and photos) from a computer using the supplied software ImageBrowser EX (A 162). 156 Š External Connections
-
 1
1 -
2
-
3
-
4
-
5
-
6
-
7
-
8
-
9
-
10
-
11
-
12
-
13
-
14
-
15
-
16
-
17
-
18
-
19
-
20
-
21
-
22
-
23
-
24
-
25
-
26
-
27
-
28
-
29
-
30
-
31
-
32
-
33
-
34
-
35
-
36
-
37
-
38
-
39
-
40
-
41
-
42
-
43
-
44
-
45
-
46
-
47
-
48
-
49
-
50
-
51
-
52
-
53
-
54
-
55
-
56
-
57
-
58
-
59
-
60
-
61
-
62
-
63
-
64
-
65
-
66
-
67
-
68
-
69
-
70
-
71
-
72
-
73
-
74
-
75
-
76
-
77
-
78
-
79
-
80
-
81
-
82
-
83
-
84
-
85
-
86
-
87
-
88
-
89
-
90
-
91
-
92
-
93
-
94
-
95
-
96
-
97
-
98
-
99
-
100
-
101
-
102
-
103
-
104
-
105
-
106
-
107
-
108
-
109
-
110
-
111
-
112
-
113
-
114
-
115
-
116
-
117
-
118
-
119
-
120
-
121
-
122
-
123
-
124
-
125
-
126
-
127
-
128
-
129
-
130
-
131
-
132
-
133
-
134
-
135
-
136
-
137
-
138
-
139
-
140
-
141
-
142
-
143
-
144
-
145
-
146
-
147
-
148
-
149
-
150
-
 151
151 -
 152
152 -
 153
153 -
 154
154 -
 155
155 -
 156
156 -
 157
157 -
 158
158 -
 159
159 -
 160
160 -
 161
161 -
162
-
163
-
164
-
165
-
166
-
167
-
168
-
169
-
170
-
171
-
172
-
173
-
174
-
175
-
176
-
177
-
178
-
179
-
180
-
181
-
182
-
183
-
184
-
185
-
186
-
187
-
188
-
189
-
190
-
191
-
192
-
193
-
194
-
195
-
196
-
197
-
198
-
199
-
200
-
201
-
202
-
203
-
204
-
205
-
206
-
207
-
208
-
209
-
210
-
211
-
212
-
213
-
214
-
215
-
216
-
217
-
218
-
219
-
220
-
221
-
222
-
223
-
224
-
225
-
226
-
227
-
228
-
229
-
230
-
231
-
232
-
233
-
234
-
235
-
236
-
237
-
238
-
239
-
240
-
241
-
242
-
243
-
244
-
245
-
246
 |
 |
