Canon ZR 800 ZR800 Instruction Manual - Page 23
Basic Functions, Recording - cleaning
 |
UPC - 013803078190
View all Canon ZR 800 manuals
Add to My Manuals
Save this manual to your list of manuals |
Page 23 highlights
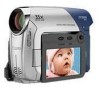
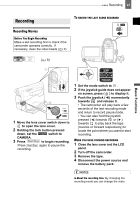
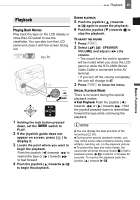
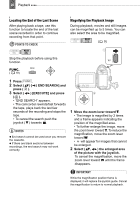
Recording 23 Basic Functions Basic Functions Recording Recording TO REVIEW THE LAST SCENE RECORDED Recording Movies Before You Begin Recording Make a test recording first to check if the camcorder operates correctly. If necessary, clean the video heads ( 2). ( 9) EXP 1 Move the lens cover switch down to to open the lens cover. 2 Holding the lock button pressed down, set the switch to CAMERA. 3 Press Start/Stop to begin recording. Press Start/Stop again to pause the recording. FOCUS 1 Set the mode switch to . 2 If the joystick guide does not appear on screen, press ( ) to display it. 3 Push the joystick ( ) momentarily towards and release it. • The camcorder will play back a few seconds of the last recording made and return to record pause mode. • You can also hold the joystick pressed ( ) towards or ( ) towards to play back the tape (reverse or forward respectively) to locate the point where you want to start recording. WHEN YOU HAVE FINISHED RECORDING 1 Close the lens cover and the LCD panel. 2 Turn off the camcorder. 3 Remove the tape. 4 Disconnect the power source and remove the battery pack. NOTES About the recording time: By changing the recording mode you can change the video
-
 1
1 -
2
-
3
-
4
-
5
-
6
-
7
-
8
-
9
-
10
-
11
-
12
-
13
-
14
-
15
-
16
-
17
-
 18
18 -
 19
19 -
 20
20 -
 21
21 -
 22
22 -
 23
23 -
 24
24 -
 25
25 -
 26
26 -
 27
27 -
 28
28 -
29
-
30
-
31
-
32
-
33
-
34
-
35
-
36
-
37
-
38
-
39
-
40
-
41
-
42
-
43
-
44
-
45
-
46
-
47
-
48
-
49
-
50
-
51
-
52
-
53
-
54
-
55
-
56
-
57
-
58
-
59
-
60
-
61
-
62
-
63
-
64
-
65
-
66
 |
 |