Canon ZR200 DV NETWORK SOLUTION DISK Ver.2 Software Instruction Manual - Page 69
Canon USB Video Driver - cassette
 |
View all Canon ZR200 manuals
Add to My Manuals
Save this manual to your list of manuals |
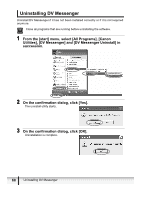
Page 69 highlights
Canon USB Video Driver Capturing/Recording Movies E If your camcorder is listed under category A in Camcorder Categories ( 13), you can perform the followings by connecting the camcorder to a computer with Hi-Speed USB 2.0 using a USB cable. Set the camcorder to PLAY (VCR) mode. - Capturing movies from the tape to the computer. - Recording movies that have been edited on a computer to the tape. - Converting analog signals from a connected VCR or 8mm camcorder to digital signals and transferring them to the computer. For details, refer to the camcorder instruction manual. Above three operations can be performed with Windows Movie Maker 2 (version 2.1.4026.0). Make sure to connect the camcorder to a computer with Hi-Speed USB 2.0. Capturing movies from tape to the computer and recording edited movies to the tape using the Canon USB Video Driver will not work when connecting to a computer with USB 1.1 port. Do not change the position of the POWER switch or TAPE/CARD switch while capturing movies to the computer or recording movies to the tape. Proper operation is not guaranteed on all editing softwares (including Windows Movie Maker 2). Capturing movies from the tape to the computer 1 Set the camcorder to PLAY (VCR) mode. 2 Load a recorded cassette. Make sure that "AV DV" is not displayed. 3 Connect the camcorder to the computer using the USB cable ( 23). Start DV Messenger and capture movies to the computer. For details, refer to the Windows Movie Maker 2 Help menu. Canon USB Video Driver Capturing/Recording Movies 69
-
 1
1 -
2
-
3
-
4
-
5
-
6
-
7
-
8
-
9
-
10
-
11
-
12
-
13
-
14
-
15
-
16
-
17
-
18
-
19
-
20
-
21
-
22
-
23
-
24
-
25
-
26
-
27
-
28
-
29
-
30
-
31
-
32
-
33
-
34
-
35
-
36
-
37
-
38
-
39
-
40
-
41
-
42
-
43
-
44
-
45
-
46
-
47
-
48
-
49
-
50
-
51
-
52
-
53
-
54
-
55
-
56
-
57
-
58
-
59
-
60
-
61
-
62
-
63
-
 64
64 -
 65
65 -
 66
66 -
 67
67 -
 68
68 -
 69
69 -
 70
70 -
 71
71 -
 72
72 -
 73
73 -
 74
74 -
75
-
76
-
77
-
78
-
79
-
80
-
81
-
82
-
83
-
84
-
85
-
86
-
87
-
88
-
89
-
90
-
91
-
92
-
93
 |
 |
