Canon iP3300 Quick Start Guide - Page 18
Loading Envelopes, Envelope, Media Type, DL Env., Comm. Env. #10, Size - mac
 |
UPC - 013803066265
View all Canon iP3300 manuals
Add to My Manuals
Save this manual to your list of manuals |
Page 18 highlights
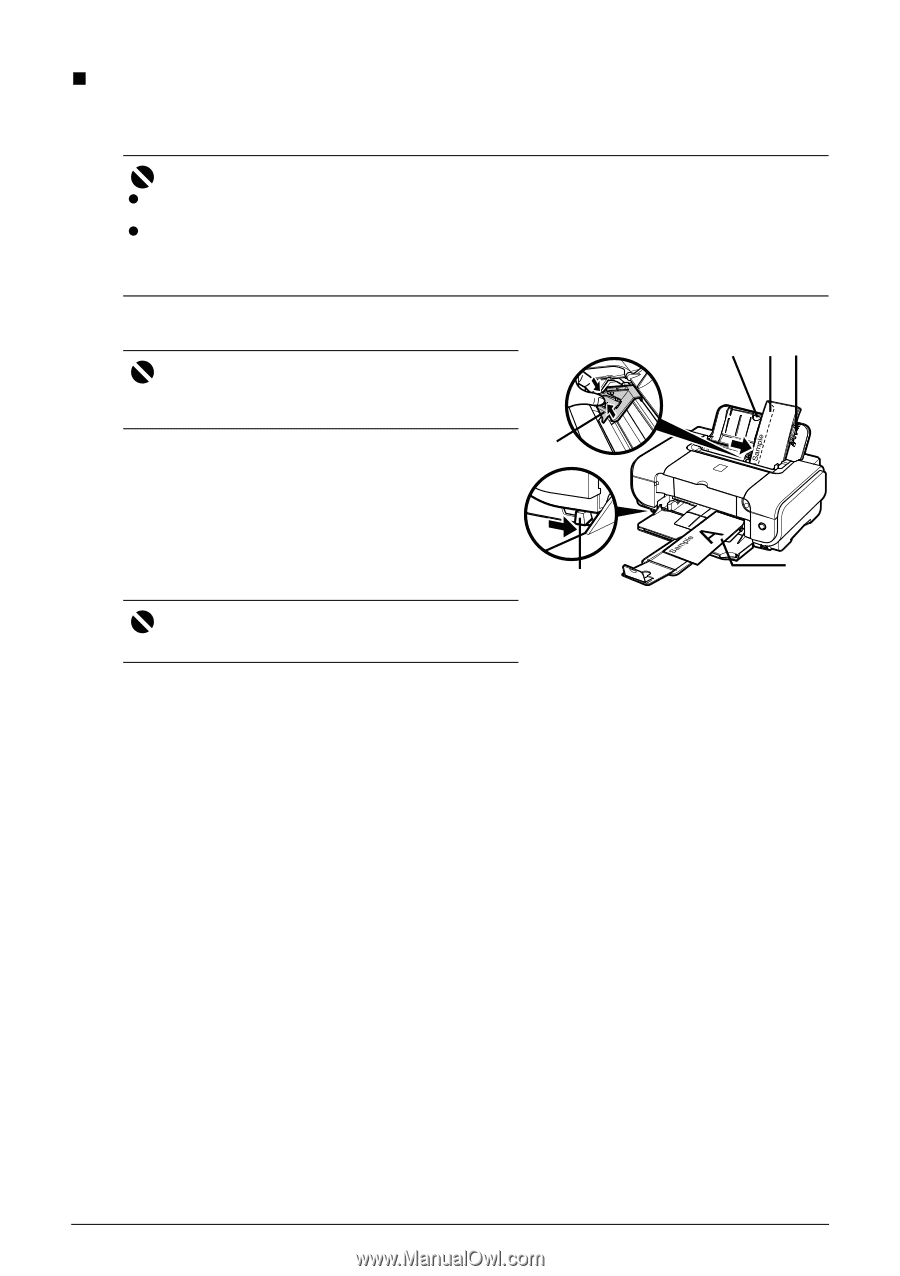
„ Loading Envelopes Envelopes must be fed from the Auto Sheet Feeder. Use either European DL or US Comm. Env. #10-sized envelope. Important z Do not use envelopes with embossed or treated surfaces, a double flap, pressure seals, or sticker flaps. z Select either DL Env. (Windows)/ DL Envelope (Mac OS X v.10.4.x or 10.3.x)/ Long Envelope (Mac OS X v.10.2.8) or Comm.Env. #10 (Windows)/ #10 Envelope (Macintosh) in the printer driver according to the envelope size you are using. If you do not, the address will be printed in the wrong direction. 1 Retract the Paper Support. Important Envelopes may not be fed properly if the Paper Support is extended. 1 *2 2 2 Load the envelope against the Cover Guide (the right side of the Paper Support). Load with the front face UP and the rear flaps DOWN on the left. A maximum of 10 envelopes can be loaded at once. Important Make sure that the Cover Guide is set upright. 3 *1 4 *1 Printing orientation *2 Make sure the flaps are folded. 3 Pinch the Paper Guide and slide it against the left side of the envelope. 4 Set the Paper Thickness Lever to the right. 5 Specify the settings in the printer driver. (1) Select Envelope in Media Type. (2) Select the size for envelopes. In Windows, select DL Env. or Comm. Env. #10 in Page Size. In Macintosh, select DL Envelope (Mac OS X v.10.4.x or 10.3.x), Long Envelope (Mac OS X v.10.2.8), or #10 Envelope in Paper Size. For details on printer driver settings, see "Printing with Windows" on page 15 or "Printing with Macintosh" on page 16. 14 Before Printing
-
 1
1 -
2
-
3
-
4
-
5
-
6
-
7
-
8
-
9
-
10
-
11
-
12
-
 13
13 -
 14
14 -
 15
15 -
 16
16 -
 17
17 -
 18
18 -
 19
19 -
 20
20 -
 21
21 -
 22
22 -
 23
23 -
24
-
25
-
26
-
27
-
28
-
29
-
30
-
31
-
32
-
33
-
34
-
35
-
36
-
37
-
38
-
39
-
40
-
41
-
42
-
43
-
44
-
45
-
46
-
47
-
48
-
49
-
50
-
51
-
52
-
53
-
54
-
55
-
56
-
57
-
58
-
59
-
60
-
61
-
62
-
63
-
64
-
65
-
66
-
67
-
68
-
69
-
70
-
71
-
72
-
73
-
74
-
75
-
76
-
77
-
78
-
79
-
80
-
81
-
82
-
83
-
84
-
85
-
86
-
87
-
88
-
89
-
90
-
91
-
92
 |
 |