Canon imageCLASS MF5750 imageCLASS MF5700 Series Software Guide - Page 146
Determining Resolution, Images for Display on a Monitor, Images for Printing
 |
View all Canon imageCLASS MF5750 manuals
Add to My Manuals
Save this manual to your list of manuals |
Page 146 highlights
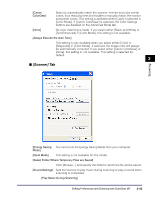
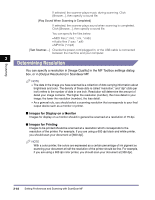
Scanning If selected, the scanner plays music during scanning. Click [Browse...], then specify a sound file. [Play Sound When Scanning is Completed] If selected, the scanner plays sound when scanning is completed. Click [Browse...], then specify a sound file. You can specify the files below. • MIDI files (*.mid, *.rmi, *.midi) • Audio files (*.wav, *.aiff) • MP3 file (*.mp3) [Test Scanner...] Checks the power cord plugged in, or the USB cable is connected between the machine and your computer. 3 Determining Resolution You can specify a resolution in [Image Quality] in the MF Toolbox settings dialog box, or in [Output Resolution] in ScanGear MF. NOTE • The data in the image you have scanned is a collection of dots carrying information about brightness and color. The density of these dots is called "resolution," and "dpi" (dots per inch) refers to the number of dots in one inch. Resolution will determine the amount of detail your image contains. The higher the resolution (number), the more detail in your image; the lower the resolution (number), the less detail. • As a general rule, you should select a scanning resolution that corresponds to your final output device such as a monitor or printer. ■ Images for Display on a Monitor Images for display on a monitor should in general be scanned at a resolution of 75 dpi. ■ Images for Printing Images to be printed should be scanned at a resolution which corresponds to the resolution of the printer. For example, if you are using a 600 dpi black and white printer, you should scan your document at [600 dpi]. NOTE With a color printer, the colors are expressed as a certain percentage of ink pigment so scanning your document at half the resolution of the printer should be fine. For example, if you are using a 600 dpi color printer, you should scan your document at [300 dpi]. 3-44 Setting Preferences and Scanning with ScanGear MF
-
 1
1 -
2
-
3
-
4
-
5
-
6
-
7
-
8
-
9
-
10
-
11
-
12
-
13
-
14
-
15
-
16
-
17
-
18
-
19
-
20
-
21
-
22
-
23
-
24
-
25
-
26
-
27
-
28
-
29
-
30
-
31
-
32
-
33
-
34
-
35
-
36
-
37
-
38
-
39
-
40
-
41
-
42
-
43
-
44
-
45
-
46
-
47
-
48
-
49
-
50
-
51
-
52
-
53
-
54
-
55
-
56
-
57
-
58
-
59
-
60
-
61
-
62
-
63
-
64
-
65
-
66
-
67
-
68
-
69
-
70
-
71
-
72
-
73
-
74
-
75
-
76
-
77
-
78
-
79
-
80
-
81
-
82
-
83
-
84
-
85
-
86
-
87
-
88
-
89
-
90
-
91
-
92
-
93
-
94
-
95
-
96
-
97
-
98
-
99
-
100
-
101
-
102
-
103
-
104
-
105
-
106
-
107
-
108
-
109
-
110
-
111
-
112
-
113
-
114
-
115
-
116
-
117
-
118
-
119
-
120
-
121
-
122
-
123
-
124
-
125
-
126
-
127
-
128
-
129
-
130
-
131
-
132
-
133
-
134
-
135
-
136
-
137
-
138
-
139
-
140
-
 141
141 -
 142
142 -
 143
143 -
 144
144 -
 145
145 -
 146
146 -
 147
147 -
 148
148 -
 149
149 -
 150
150 -
 151
151 -
152
-
153
-
154
-
155
-
156
-
157
-
158
-
159
-
160
-
161
-
162
-
163
-
164
-
165
-
166
-
167
-
168
-
169
-
170
-
171
-
172
-
173
-
174
-
175
-
176
-
177
-
178
-
179
-
180
-
181
-
182
-
183
-
184
-
185
-
186
-
187
-
188
-
189
-
190
-
191
-
192
-
193
-
194
-
195
-
196
-
197
-
198
-
199
-
200
-
201
-
202
-
203
-
204
-
205
-
206
-
207
-
208
-
209
-
210
-
211
-
212
-
213
-
214
-
215
-
216
-
217
-
218
-
219
-
220
-
221
-
222
-
223
-
224
-
225
-
226
-
227
-
228
-
229
-
230
-
231
-
232
-
233
-
234
-
235
-
236
-
237
-
238
-
239
-
240
-
241
-
242
-
243
-
244
-
245
-
246
-
247
-
248
-
249
-
250
-
251
-
252
-
253
-
254
-
255
 |
 |