Canon imageFORMULA DR-3010C Compact Workgroup Scanner User Manual - Page 33
Practical Examples, Saving the Text Data of Documents as Search Keywords
 |
View all Canon imageFORMULA DR-3010C Compact Workgroup Scanner manuals
Add to My Manuals
Save this manual to your list of manuals |
Page 33 highlights
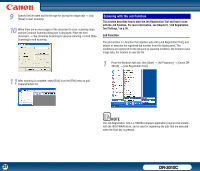
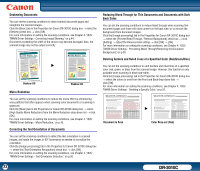
Enhancing the Red color for Black-and-White Scanning You can set the scanning conditions to enhance the color red when performing black-and-white scanning. Click the [Image processing] tab in the Properties for Canon DR-3010C dialog box → select [Red Enhance] from the Front and Back drop-down lists → click [OK]. For more information on setting the scanning conditions, see Chapter 4, "ISIS/ TWAIN Driver Settings - Enhancing the Red Color," on p.51. Creating Smaller Files You can set the scanning conditions to save the scanned image as a PDF file with a high-compression rate, so that the file size is smaller. Select [PDF File] from the [Options] menu in CapturePerfect 3.0 → click [High compression] in → click [OK]. For more information on setting the scanning conditions, see the CapturePerfect3.0 Operation Guide. Saving the Text Data of Documents as Search Keywords You can set the scanning conditions to convert the text information of a document into text data when creating a PDF file, to be used when searching the text on a computer. Select [OCR Settings] from the [Options] menu in CapturePerfect 3.0 → select the [Enable] check box → select the language to apply OCR from the Language for OCR drop-down list → click [OK]. For more information on setting the scanning conditions, see the CapturePerfect3.0 Operation Guide. Specifying Security Settings for PDF Files You can specify security settings to restrict the viewing, printing, and editing of PDF files created with CapturePerfect 3.0. For more information on specifying security settings, see the CapturePerfect3.0 Operation Guide. 5. Practical Examples This section provides examples of settings when scanning with the DR-3010C. Refer to these examples when specifying ISIS/TWAIN driver settings. For descriptions of particular setting items, see Chapter 4, "ISIS/TWAIN Driver Settings," on p.38. Scanning Both Sides of Pages • To scan both sides of pages Select [Duplex] from the Scanning Side drop-down list. Scanning Non-Standard Size Documents • To scan irregular size documents If irregular size documents are scanned with a standard size selected for the Page Size setting, black areas may appear around the scanned document image. To scan irregular size documents, select [Auto-detection] from the Page Size drop-down list. The page size is then detected automatically. • To register an irregular page size for scanning documents An irregular document size not already registered as a page size selection can be saved as a custom page size. (See "Adjusting the Scan Area," on p.45.) • To scan only part of the document page You can specify the scanning area. However, you cannot set the scan area when [Auto-detection] is selected from the Page Size drop-down list. (See "Adjusting the Scan Area," on p.45.) Scanning Multiple Batches as One Document • To scan a document that has too many pages to be loaded all at once as separate batches Select [Automatic Feeding] from the Feeding Option dialog box. When this option is selected, the scanner detects documents and starts scanning as they are loaded, so continuous scanning is possible by loading the document batches repeatedly. If you select [Panel-Feeding] from the Feeding Option dialog box, scanning does not start until you press the Scan button. This is useful if you want to straighten documents after you have placed them in the scanner. 33 DR-3010C
-
 1
1 -
2
-
3
-
4
-
5
-
6
-
7
-
8
-
9
-
10
-
11
-
12
-
13
-
14
-
15
-
16
-
17
-
18
-
19
-
20
-
21
-
22
-
23
-
24
-
25
-
26
-
27
-
 28
28 -
 29
29 -
 30
30 -
 31
31 -
 32
32 -
 33
33 -
 34
34 -
 35
35 -
 36
36 -
 37
37 -
 38
38 -
39
-
40
-
41
-
42
-
43
-
44
-
45
-
46
-
47
-
48
-
49
-
50
-
51
-
52
-
53
-
54
-
55
-
56
-
57
-
58
-
59
-
60
-
61
-
62
-
63
-
64
-
65
-
66
-
67
-
68
-
69
-
70
-
71
-
72
-
73
-
74
-
75
-
76
-
77
-
78
-
79
-
80
-
81
-
82
-
83
-
84
-
85
-
86
-
87
 |
 |