Casio EX S600 Owners Manual - Page 117
Specifying ISO Sensitivity, In the REC mode, press [MENU]., Select the Quality tab, select ISO
 |
UPC - 079767684433
View all Casio EX S600 manuals
Add to My Manuals
Save this manual to your list of manuals |
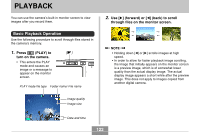
Page 117 highlights
OTHER RECORDING FUNCTIONS Specifying ISO Sensitivity You can change the ISO sensitivity setting for better images in places where lighting is dim or when you are using faster shutter speeds. • ISO sensitivity is expressed in terms of values that originally indicated the sensitivity to light for photographic film. A larger value indicates higher sensitivity, which is better for recording when available lighting is dim. 1. In the REC mode, press [MENU]. 2. Select the "Quality" tab, select "ISO", and then press [̈]. 3. Use [̆] and [̄] to select the setting you want and then press [SET]. To get this: Automatic sensitivity selection Lower sensitivity Higher sensitivity Select this setting: Auto ISO 50 ISO 100 ISO 200 ISO 400 IMPORTANT! • Under certain conditions, a high shutter speed in combination with a high ISO sensitivity setting can cause digital noise (graininess), which makes an image appear rough. For clean, good-quality images, use the lowest ISO sensitivity setting possible. • Using a high ISO sensitivity setting along with the flash to shoot a nearby subject may result in improper illumination of the subject. • "Auto" ISO sensitivity always is used for movie recording, regardless of the current ISO sensitivity setting. NOTE • You can use the key customization feature (page 112) to configure the camera so the ISO sensitivity setting changes whenever you press [̇] and [̈] while in the REC mode. 117 B
-
 1
1 -
2
-
3
-
4
-
5
-
6
-
7
-
8
-
9
-
10
-
11
-
12
-
13
-
14
-
15
-
16
-
17
-
18
-
19
-
20
-
21
-
22
-
23
-
24
-
25
-
26
-
27
-
28
-
29
-
30
-
31
-
32
-
33
-
34
-
35
-
36
-
37
-
38
-
39
-
40
-
41
-
42
-
43
-
44
-
45
-
46
-
47
-
48
-
49
-
50
-
51
-
52
-
53
-
54
-
55
-
56
-
57
-
58
-
59
-
60
-
61
-
62
-
63
-
64
-
65
-
66
-
67
-
68
-
69
-
70
-
71
-
72
-
73
-
74
-
75
-
76
-
77
-
78
-
79
-
80
-
81
-
82
-
83
-
84
-
85
-
86
-
87
-
88
-
89
-
90
-
91
-
92
-
93
-
94
-
95
-
96
-
97
-
98
-
99
-
100
-
101
-
102
-
103
-
104
-
105
-
106
-
107
-
108
-
109
-
110
-
111
-
 112
112 -
 113
113 -
 114
114 -
 115
115 -
 116
116 -
 117
117 -
 118
118 -
 119
119 -
 120
120 -
 121
121 -
 122
122 -
123
-
124
-
125
-
126
-
127
-
128
-
129
-
130
-
131
-
132
-
133
-
134
-
135
-
136
-
137
-
138
-
139
-
140
-
141
-
142
-
143
-
144
-
145
-
146
-
147
-
148
-
149
-
150
-
151
-
152
-
153
-
154
-
155
-
156
-
157
-
158
-
159
-
160
-
161
-
162
-
163
-
164
-
165
-
166
-
167
-
168
-
169
-
170
-
171
-
172
-
173
-
174
-
175
-
176
-
177
-
178
-
179
-
180
-
181
-
182
-
183
-
184
-
185
-
186
-
187
-
188
-
189
-
190
-
191
-
192
-
193
-
194
-
195
-
196
-
197
-
198
-
199
-
200
-
201
-
202
-
203
-
204
-
205
-
206
-
207
-
208
-
209
-
210
-
211
-
212
-
213
-
214
-
215
-
216
-
217
-
218
-
219
-
220
-
221
-
222
-
223
-
224
-
225
-
226
-
227
-
228
-
229
-
230
-
231
-
232
-
233
-
234
-
235
-
236
-
237
-
238
-
239
-
240
-
241
-
242
-
243
-
244
-
245
 |
 |
