Casio P600 User Manual - Page 55
Recording an Image, Align the mode dial
 |
UPC - 079767683573
View all Casio P600 manuals
Add to My Manuals
Save this manual to your list of manuals |
Page 55 highlights
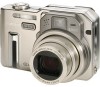
BASIC IMAGE RECORDING Recording an Image Your camera automatically adjusts shutter speed and aperture values in accordance with the brightness of the subject. Images you record are stored in the camera's builtin memory, or to a memory card if you have one loaded in the camera. • When an optionally available SD memory card or MultiMediaCard (MMC) is loaded in the camera, images are stored on the card (page 182). 1. Press the power button to turn on the camera. • This causes an image or a message to appear on the monitor screen. Power button 2. Align the mode dial with (Snapshot Mode). • This enters the Snapshot mode for image recording. Mode dial 3. Compose the image on the monitor screen so the main subject is within the focus frame. • The focusing range of the camera in the Auto Focus mode is approximately 40cm (1.3 feet) to infinity (∞) (page 74). 10 1600 1200N IN ISO100 F2.8 1/1000 04/ 12 / 24 12 : 58 Focus frame • You can compose images using either the monitor screen or the optical viewfinder (page 61). • When using the optical viewfinder to compose images, you can use the [DISP] button to turn off the monitor screen and conserve battery power. 55
-
 1
1 -
2
-
3
-
4
-
5
-
6
-
7
-
8
-
9
-
10
-
11
-
12
-
13
-
14
-
15
-
16
-
17
-
18
-
19
-
20
-
21
-
22
-
23
-
24
-
25
-
26
-
27
-
28
-
29
-
30
-
31
-
32
-
33
-
34
-
35
-
36
-
37
-
38
-
39
-
40
-
41
-
42
-
43
-
44
-
45
-
46
-
47
-
48
-
49
-
 50
50 -
 51
51 -
 52
52 -
 53
53 -
 54
54 -
 55
55 -
 56
56 -
 57
57 -
 58
58 -
 59
59 -
 60
60 -
61
-
62
-
63
-
64
-
65
-
66
-
67
-
68
-
69
-
70
-
71
-
72
-
73
-
74
-
75
-
76
-
77
-
78
-
79
-
80
-
81
-
82
-
83
-
84
-
85
-
86
-
87
-
88
-
89
-
90
-
91
-
92
-
93
-
94
-
95
-
96
-
97
-
98
-
99
-
100
-
101
-
102
-
103
-
104
-
105
-
106
-
107
-
108
-
109
-
110
-
111
-
112
-
113
-
114
-
115
-
116
-
117
-
118
-
119
-
120
-
121
-
122
-
123
-
124
-
125
-
126
-
127
-
128
-
129
-
130
-
131
-
132
-
133
-
134
-
135
-
136
-
137
-
138
-
139
-
140
-
141
-
142
-
143
-
144
-
145
-
146
-
147
-
148
-
149
-
150
-
151
-
152
-
153
-
154
-
155
-
156
-
157
-
158
-
159
-
160
-
161
-
162
-
163
-
164
-
165
-
166
-
167
-
168
-
169
-
170
-
171
-
172
-
173
-
174
-
175
-
176
-
177
-
178
-
179
-
180
-
181
-
182
-
183
-
184
-
185
-
186
-
187
-
188
-
189
-
190
-
191
-
192
-
193
-
194
-
195
-
196
-
197
-
198
-
199
-
200
-
201
-
202
-
203
-
204
-
205
-
206
-
207
-
208
-
209
-
210
-
211
-
212
-
213
-
214
-
215
-
216
-
217
-
218
-
219
-
220
-
221
-
222
-
223
-
224
-
225
-
226
-
227
-
228
-
229
-
230
-
231
-
232
-
233
-
234
-
235
-
236
-
237
-
238
-
239
-
240
-
241
-
242
-
243
-
244
-
245
-
246
-
247
 |
 |
