Cisco ASR1002 Installation Guide - Page 24
Chassis Rack-Mount Bracket Ear Holes for the Cable-Management Brackets, Step 1 - rack mount
 |
UPC - 882658196416
View all Cisco ASR1002 manuals
Add to My Manuals
Save this manual to your list of manuals |
Page 24 highlights
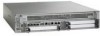
Attaching the Cable-Management Bracket Chapter 8 Cisco ASR 1002 Router Overview and Installation Note Make certain that the cable-management bracket "U" type feature is facing upwards when you attach it to the chassis. Follow these steps to attach the cable-management brackets to both sides of the Cisco ASR 1002 Router in the rack: Step 1 Step 2 Align the cable-management bracket to the rack-mount bracket on one side of the Cisco ASR 1002 Router. The cable-management bracket aligns to the top hole of the chassis rack-mount bracket. Using a Phillips screwdriver, insert the screw through cable-management bracket and into the chassis rack-mount and tighten the screw. Note Use the package of four screws. Figure 8-16 shows the locations at which to attach the front rack-mount brackets to the Cisco ASR 1002 Router in a rack. Figure 8-16 Chassis Rack-Mount Bracket Ear Holes for the Cable-Management Brackets 1 STATUS A/L C/A A/L C/A A/L C/A STATUS 3 2 ASR 1002 stat min pwr maj crit STAT QE0 QE1 QE2 QE3 BOOT CARRIER MTS LINK MGMT AUX CON PWR STAT SPA-4XOC3-POS 0 0 A/L C/A A/L C/A 1 1 A/L C/A 2 2 A/L C/A 3 3 A/L C/A SPA-4XOC3-POS SPA-4XOC3-POS 0 A/L C/A 1 A/L C/A 2 A/L C/A 3 A/L C/A STATUS 280280 1 1 Secure the cable-management top screw and 3 Front rack-mount bracket bottom to this ear hole 2 Cable-management bracket Step 3 Using the bottom rack-mount ear hole, insert the screw through cable-management bracket and into the chassis rack-mount (see Figure 8-16). This completes the procedure for installing the cable-management brackets on the chassis. 8-24 Cisco ASR 1000 Series Aggregation Services Routers Hardware Installation Guide OL-13208-09
-
 1
1 -
2
-
3
-
4
-
5
-
6
-
7
-
8
-
9
-
10
-
11
-
12
-
13
-
14
-
15
-
16
-
17
-
18
-
 19
19 -
 20
20 -
 21
21 -
 22
22 -
 23
23 -
 24
24 -
 25
25 -
 26
26 -
 27
27 -
 28
28 -
 29
29 -
30
-
31
-
32
-
33
-
34
-
35
-
36
-
37
-
38
-
39
-
40
-
41
-
42
-
43
-
44
-
45
-
46
 |
 |
