Cisco RV042 Administration Guide - Page 59
Subnet Mask IPv4 only, Dynamic Routing for IPv6
 |
UPC - 745883560530
View all Cisco RV042 manuals
Add to My Manuals
Save this manual to your list of manuals |
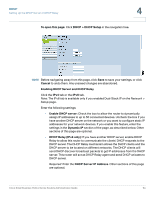
Page 59 highlights
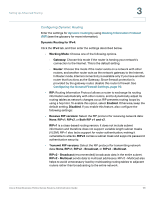
Setting Up Advanced Routing 3 Dynamic Routing for IPv6: NOTE The IPv6 tab is available if you enabled Dual-Stack IP on the Setup > Network page. Check the box to enable RIPng (RIP next generation), or uncheck the box to disable it. (See the Glossary for more information.) Configuring Static Routing Enter the settings for static routing (see the Glossary for more information). WARNING Static routing is an advanced feature. Create these routes with care. Add or edit entries as needed. Remember that the settings are not saved until you click the Save button. • To add a new static route: Enter the following settings, and then click Add to List. You can enter up to 30 routes. - Destination IP: Enter the network address of the remote LAN segment. For a standard Class C IP domain, the network address is the first three fields of the Destination LAN IP, while the last field should be 0. - Subnet Mask (IPv4 only): Enter the subnet mask used on the destination LAN IP domain. For Class C IP domains, the subnet mask is 255.255.255.0. - Prefix Length (Pv6 only): Enter the prefix length. - Default Gateway: Enter the IP address of the router of the network, for which this static route is created. For example, if this network is connected to the local router's LAN port through another router, use the WAN IP address of that router. - Hop Count: Enter the appropriate value (maximum is 15). This indicates the number of nodes that a data packet passes through before reaching its destination. A node is any device on the network, such as a computer or router. - Interface: Select the interface to use for this route. Select a WAN interface if this router provides Internet connectivity for your network. Select LAN if this router gets Internet connectivity from a gateway router on your LAN. Cisco Small Business RV0xx Series Routers Administration Guide 59
-
 1
1 -
2
-
3
-
4
-
5
-
6
-
7
-
8
-
9
-
10
-
11
-
12
-
13
-
14
-
15
-
16
-
17
-
18
-
19
-
20
-
21
-
22
-
23
-
24
-
25
-
26
-
27
-
28
-
29
-
30
-
31
-
32
-
33
-
34
-
35
-
36
-
37
-
38
-
39
-
40
-
41
-
42
-
43
-
44
-
45
-
46
-
47
-
48
-
49
-
50
-
51
-
52
-
53
-
 54
54 -
 55
55 -
 56
56 -
 57
57 -
 58
58 -
 59
59 -
 60
60 -
 61
61 -
 62
62 -
 63
63 -
 64
64 -
65
-
66
-
67
-
68
-
69
-
70
-
71
-
72
-
73
-
74
-
75
-
76
-
77
-
78
-
79
-
80
-
81
-
82
-
83
-
84
-
85
-
86
-
87
-
88
-
89
-
90
-
91
-
92
-
93
-
94
-
95
-
96
-
97
-
98
-
99
-
100
-
101
-
102
-
103
-
104
-
105
-
106
-
107
-
108
-
109
-
110
-
111
-
112
-
113
-
114
-
115
-
116
-
117
-
118
-
119
-
120
-
121
-
122
-
123
-
124
-
125
-
126
-
127
-
128
-
129
-
130
-
131
-
132
-
133
-
134
-
135
-
136
-
137
-
138
-
139
-
140
-
141
-
142
-
143
-
144
-
145
-
146
-
147
-
148
-
149
-
150
-
151
-
152
-
153
-
154
-
155
-
156
-
157
-
158
-
159
-
160
-
161
-
162
-
163
-
164
-
165
-
166
-
167
-
168
-
169
-
170
-
171
-
172
-
173
-
174
-
175
-
176
-
177
-
178
-
179
-
180
-
181
-
182
-
183
-
184
-
185
-
186
-
187
-
188
-
189
-
190
-
191
-
192
-
193
-
194
-
195
-
196
-
197
-
198
-
199
 |
 |