Compaq AP250 Compaq Deskpro Workstation AP250 Hardware Reference Guide - Page 29
Removing a Drive, Disconnect the drive power and signal cables and, if it is
 |
UPC - 720591308469
View all Compaq AP250 manuals
Add to My Manuals
Save this manual to your list of manuals |
Page 29 highlights
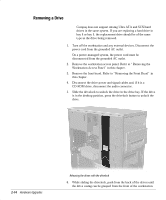
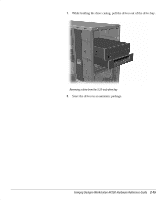
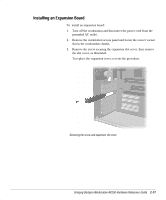
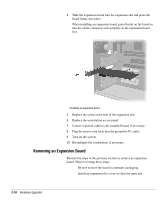
Removing a Drive ✎ Compaq does not support mixing Ultra ATA and SCSI hard drives in the same system. If you are replacing a hard drive in bay 4 or bay 5, the replacement drive should be of the same type as the drive being removed. 1. Turn off the workstation and any external devices. Disconnect the power cord from the grounded AC outlet. On a power-managed system, the power cord must be disconnected from the grounded AC outlet. 2. Remove the workstation access panel. Refer to “ Removing the Workstation Access Panel” in this chapter. 3. Remove the front bezel. Refer to “ Removing the .ront Bezel” in this chapter. 4. Disconnect the drive power and signal cables and, if it is a CD-ROM drive, disconnect the audio connector. 5. Slide the drivelock to unlock the drive in the drive bay. If the drive is in the desktop position, press the drivelock button to unlock the drive. 2-14 Hardware Upgrades Releasing the drives with the drivelock 6. While sliding the drivelock, push from the back of the drives until the drive casing can be grasped from the front of the workstation.
-
 1
1 -
2
-
3
-
4
-
5
-
6
-
7
-
8
-
9
-
10
-
11
-
12
-
13
-
14
-
15
-
16
-
17
-
18
-
19
-
20
-
21
-
22
-
23
-
 24
24 -
 25
25 -
 26
26 -
 27
27 -
 28
28 -
 29
29 -
 30
30 -
 31
31 -
 32
32 -
 33
33 -
 34
34 -
35
-
36
-
37
-
38
-
39
-
40
-
41
-
42
-
43
-
44
-
45
-
46
-
47
-
48
-
49
-
50
-
51
-
52
-
53
-
54
-
55
-
56
-
57
-
58
-
59
-
60
-
61
-
62
-
63
-
64
-
65
-
66
-
67
-
68
-
69
-
70
-
71
-
72
-
73
-
74
-
75
 |
 |
