Compaq Elite 8300 Maintenance & Service Guide Elite 8300 Touch All-in-One - Page 64
Removing the hard disc drive from the cage
 |
View all Compaq Elite 8300 manuals
Add to My Manuals
Save this manual to your list of manuals |
Page 64 highlights
3. Pull the latch next to the lower side of the hard disc drive cage away from the cage to release it, then slide the cage toward the edge of the chassis and lift it out. Figure 7-17 Removing the hard disc drive cage 4. Lift the latch on one side of the hard disc drive cage and pull the hard disc drive out of the cage. Figure 7-18 Removing the hard disc drive from the cage 54 Chapter 7 Removal and Replacement Procedures All-in One (AIO) Chassis
-
 1
1 -
2
-
3
-
4
-
5
-
6
-
7
-
8
-
9
-
10
-
11
-
12
-
13
-
14
-
15
-
16
-
17
-
18
-
19
-
20
-
21
-
22
-
23
-
24
-
25
-
26
-
27
-
28
-
29
-
30
-
31
-
32
-
33
-
34
-
35
-
36
-
37
-
38
-
39
-
40
-
41
-
42
-
43
-
44
-
45
-
46
-
47
-
48
-
49
-
50
-
51
-
52
-
53
-
54
-
55
-
56
-
57
-
58
-
 59
59 -
 60
60 -
 61
61 -
 62
62 -
 63
63 -
 64
64 -
 65
65 -
 66
66 -
 67
67 -
 68
68 -
 69
69 -
70
-
71
-
72
-
73
-
74
-
75
-
76
-
77
-
78
-
79
-
80
-
81
-
82
-
83
-
84
-
85
-
86
-
87
-
88
-
89
-
90
-
91
-
92
-
93
-
94
-
95
-
96
-
97
-
98
-
99
-
100
-
101
-
102
-
103
-
104
-
105
-
106
-
107
-
108
-
109
-
110
-
111
-
112
-
113
-
114
-
115
-
116
-
117
-
118
-
119
-
120
-
121
-
122
-
123
-
124
-
125
-
126
-
127
-
128
-
129
-
130
-
131
-
132
-
133
-
134
-
135
-
136
-
137
-
138
-
139
-
140
-
141
-
142
-
143
-
144
-
145
-
146
-
147
-
148
-
149
-
150
-
151
-
152
-
153
-
154
-
155
-
156
-
157
-
158
-
159
-
160
-
161
-
162
-
163
-
164
-
165
-
166
-
167
-
168
-
169
-
170
-
171
-
172
-
173
-
174
-
175
-
176
-
177
-
178
-
179
-
180
-
181
-
182
-
183
-
184
-
185
-
186
-
187
-
188
-
189
-
190
-
191
-
192
-
193
-
194
-
195
-
196
-
197
-
198
-
199
-
200
-
201
-
202
-
203
-
204
-
205
-
206
-
207
-
208
 |
 |

3.
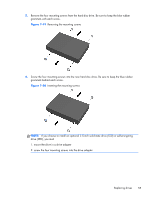
Pull the latch next to the lower side of the hard disc drive cage away from the cage to release it,
then slide the cage toward the edge of the chassis and lift it out.
Figure 7-17
Removing the hard disc drive cage
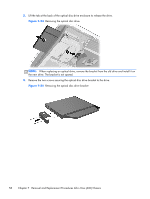
4.
Lift the latch on one side of the hard disc drive cage and pull the hard disc drive out of the cage.
Figure 7-18
Removing the hard disc drive from the cage
54
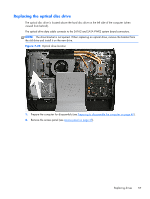
Chapter 7
Removal and Replacement Procedures All-in One (AIO) Chassis