Compaq Elite 8300 Maintenance & Service Guide Elite 8300 Touch All-in-One - Page 69
and slide it down into place.
 |
View all Compaq Elite 8300 manuals
Add to My Manuals
Save this manual to your list of manuals |
Page 69 highlights
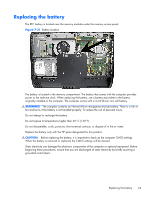
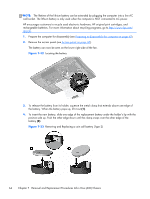
5. Secure the optical disc drive bracket to the new drive with the two screws. Figure 7-26 Attaching the optical disc drive bracket 6. Align the new optical disc drive with the opening in the side of the computer. Push the drive in firmly until it snaps into place. NOTE: The optical disc drive can be installed in only one way. Figure 7-27 Installing the optical disc drive 7. To replace the access panel, set the panel on the back of the computer, slightly above the stand, and slide it down into place. 8. Reconnect the power cord and external devices. 9. Lock any security devices that were disengaged when the access panel was removed. 10. Turn on the computer. Replacing drives 59
-
 1
1 -
2
-
3
-
4
-
5
-
6
-
7
-
8
-
9
-
10
-
11
-
12
-
13
-
14
-
15
-
16
-
17
-
18
-
19
-
20
-
21
-
22
-
23
-
24
-
25
-
26
-
27
-
28
-
29
-
30
-
31
-
32
-
33
-
34
-
35
-
36
-
37
-
38
-
39
-
40
-
41
-
42
-
43
-
44
-
45
-
46
-
47
-
48
-
49
-
50
-
51
-
52
-
53
-
54
-
55
-
56
-
57
-
58
-
59
-
60
-
61
-
62
-
63
-
 64
64 -
 65
65 -
 66
66 -
 67
67 -
 68
68 -
 69
69 -
 70
70 -
 71
71 -
 72
72 -
 73
73 -
 74
74 -
75
-
76
-
77
-
78
-
79
-
80
-
81
-
82
-
83
-
84
-
85
-
86
-
87
-
88
-
89
-
90
-
91
-
92
-
93
-
94
-
95
-
96
-
97
-
98
-
99
-
100
-
101
-
102
-
103
-
104
-
105
-
106
-
107
-
108
-
109
-
110
-
111
-
112
-
113
-
114
-
115
-
116
-
117
-
118
-
119
-
120
-
121
-
122
-
123
-
124
-
125
-
126
-
127
-
128
-
129
-
130
-
131
-
132
-
133
-
134
-
135
-
136
-
137
-
138
-
139
-
140
-
141
-
142
-
143
-
144
-
145
-
146
-
147
-
148
-
149
-
150
-
151
-
152
-
153
-
154
-
155
-
156
-
157
-
158
-
159
-
160
-
161
-
162
-
163
-
164
-
165
-
166
-
167
-
168
-
169
-
170
-
171
-
172
-
173
-
174
-
175
-
176
-
177
-
178
-
179
-
180
-
181
-
182
-
183
-
184
-
185
-
186
-
187
-
188
-
189
-
190
-
191
-
192
-
193
-
194
-
195
-
196
-
197
-
198
-
199
-
200
-
201
-
202
-
203
-
204
-
205
-
206
-
207
-
208
 |
 |

5.
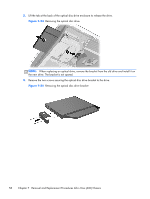
Secure the optical disc drive bracket to the new drive with the two screws.
Figure 7-26
Attaching the optical disc drive bracket
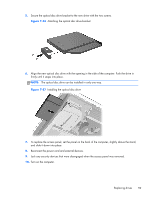
6.
Align the new optical disc drive with the opening in the side of the computer. Push the drive in
firmly until it snaps into place.
NOTE:
The optical disc drive can be installed in only one way.
Figure 7-27
Installing the optical disc drive
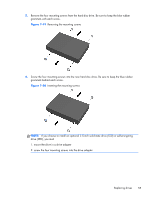
7.
To replace the access panel, set the panel on the back of the computer, slightly above the stand,
and slide it down into place.
8.
Reconnect the power cord and external devices.
9.
Lock any security devices that were disengaged when the access panel was removed.
10.
Turn on the computer.
Replacing drives
59