Compaq Elite 8300 Maintenance & Service Guide Elite 8300 Touch All-in-One - Page 68
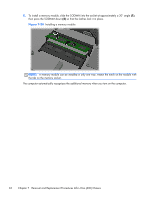
Remove the two screws securing the optical disc drive bracket to the drive.
 |
View all Compaq Elite 8300 manuals
Add to My Manuals
Save this manual to your list of manuals |
Page 68 highlights
3. Lift the tab at the back of the optical disc drive enclosure to release the drive. Figure 7-24 Removing the optical disc drive NOTE: When replacing an optical drive, remove the bracket from the old drive and install it on the new drive. The bracket is not spared. 4. Remove the two screws securing the optical disc drive bracket to the drive. Figure 7-25 Removing the optical disc drive bracket 58 Chapter 7 Removal and Replacement Procedures All-in One (AIO) Chassis
-
 1
1 -
2
-
3
-
4
-
5
-
6
-
7
-
8
-
9
-
10
-
11
-
12
-
13
-
14
-
15
-
16
-
17
-
18
-
19
-
20
-
21
-
22
-
23
-
24
-
25
-
26
-
27
-
28
-
29
-
30
-
31
-
32
-
33
-
34
-
35
-
36
-
37
-
38
-
39
-
40
-
41
-
42
-
43
-
44
-
45
-
46
-
47
-
48
-
49
-
50
-
51
-
52
-
53
-
54
-
55
-
56
-
57
-
58
-
59
-
60
-
61
-
62
-
 63
63 -
 64
64 -
 65
65 -
 66
66 -
 67
67 -
 68
68 -
 69
69 -
 70
70 -
 71
71 -
 72
72 -
 73
73 -
74
-
75
-
76
-
77
-
78
-
79
-
80
-
81
-
82
-
83
-
84
-
85
-
86
-
87
-
88
-
89
-
90
-
91
-
92
-
93
-
94
-
95
-
96
-
97
-
98
-
99
-
100
-
101
-
102
-
103
-
104
-
105
-
106
-
107
-
108
-
109
-
110
-
111
-
112
-
113
-
114
-
115
-
116
-
117
-
118
-
119
-
120
-
121
-
122
-
123
-
124
-
125
-
126
-
127
-
128
-
129
-
130
-
131
-
132
-
133
-
134
-
135
-
136
-
137
-
138
-
139
-
140
-
141
-
142
-
143
-
144
-
145
-
146
-
147
-
148
-
149
-
150
-
151
-
152
-
153
-
154
-
155
-
156
-
157
-
158
-
159
-
160
-
161
-
162
-
163
-
164
-
165
-
166
-
167
-
168
-
169
-
170
-
171
-
172
-
173
-
174
-
175
-
176
-
177
-
178
-
179
-
180
-
181
-
182
-
183
-
184
-
185
-
186
-
187
-
188
-
189
-
190
-
191
-
192
-
193
-
194
-
195
-
196
-
197
-
198
-
199
-
200
-
201
-
202
-
203
-
204
-
205
-
206
-
207
-
208
 |
 |

3.
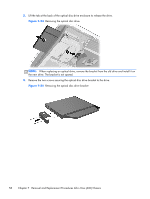
Lift the tab at the back of the optical disc drive enclosure to release the drive.
Figure 7-24
Removing the optical disc drive
NOTE:
When replacing an optical drive, remove the bracket from the old drive and install it on
the new drive. The bracket is not spared.
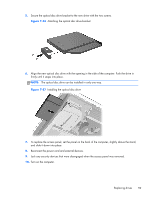
4.
Remove the two screws securing the optical disc drive bracket to the drive.
Figure 7-25
Removing the optical disc drive bracket
58
Chapter 7
Removal and Replacement Procedures All-in One (AIO) Chassis