Compaq Elite 8300 Hardware Reference Guide Elite 8300 Touch All-in-One Busines - Page 15
Additional Information, Installing the Rear Port Cover, Removing the Rear Port Cover
 |
View all Compaq Elite 8300 manuals
Add to My Manuals
Save this manual to your list of manuals |
Page 15 highlights
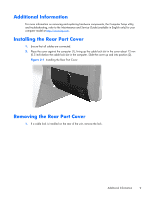
Additional Information For more information on removing and replacing hardware components, the Computer Setup utility, and troubleshooting, refer to the Maintenance and Service Guide (available in English only) for your computer model at http://www.hp.com. Installing the Rear Port Cover 1. Ensure that all cables are connected. 2. Place the cover against the computer (1), lining up the cable lock slot in the cover about 12 mm (0.5 inch) below the cable lock slot in the computer. Slide the cover up and into position (2). Figure 2-1 Installing the Rear Port Cover Removing the Rear Port Cover 1. If a cable lock is installed on the rear of the unit, remove the lock. Additional Information 9
-
 1
1 -
2
-
3
-
4
-
5
-
6
-
7
-
8
-
9
-
 10
10 -
 11
11 -
 12
12 -
 13
13 -
 14
14 -
 15
15 -
 16
16 -
 17
17 -
 18
18 -
 19
19 -
 20
20 -
21
-
22
-
23
-
24
-
25
-
26
-
27
-
28
-
29
-
30
-
31
-
32
-
33
-
34
-
35
-
36
-
37
-
38
-
39
-
40
-
41
-
42
-
43
-
44
-
45
-
46
-
47
-
48
-
49
-
50
-
51
-
52
-
53
-
54
-
55
-
56
-
57
 |
 |

Additional Information
For more information on removing and replacing hardware components, the Computer Setup utility,
and troubleshooting, refer to the
Maintenance and Service Guide
(available in English only) for your
computer model at
.
Installing the Rear Port Cover
1.
Ensure that all cables are connected.
2.
Place the cover against the computer (1), lining up the cable lock slot in the cover about 12 mm
(0.5 inch) below the cable lock slot in the computer. Slide the cover up and into position (2).
Figure 2-1
Installing the Rear Port Cover
Removing the Rear Port Cover
1.
If a cable lock is installed on the rear of the unit, remove the lock.
Additional Information
9