Compaq Elite 8300 Hardware Reference Guide Elite 8300 Touch All-in-One Busines - Page 16
Connecting Power
 |
View all Compaq Elite 8300 manuals
Add to My Manuals
Save this manual to your list of manuals |
Page 16 highlights
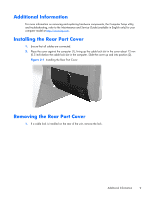
2. Grasp the rear port cover, then pull it down and off the computer. Figure 2-2 Removing the Rear Port Cover Connecting Power 1. If the rear port cover is installed, remove the cover. 2. Route the power connector through the opening in the stand to take advantage of the cable management feature. 3. Plug the power cord into the power connection on the rear of the computer (1). 4. Plug the three-pronged power plug into a power outlet (2). Figure 2-3 Connecting Power 5. Route all peripheral cables through the stand opening and plug them into the appropriate ports as needed. 10 Chapter 2 Hardware Repair and Upgrade
-
 1
1 -
2
-
3
-
4
-
5
-
6
-
7
-
8
-
9
-
10
-
 11
11 -
 12
12 -
 13
13 -
 14
14 -
 15
15 -
 16
16 -
 17
17 -
 18
18 -
 19
19 -
 20
20 -
 21
21 -
22
-
23
-
24
-
25
-
26
-
27
-
28
-
29
-
30
-
31
-
32
-
33
-
34
-
35
-
36
-
37
-
38
-
39
-
40
-
41
-
42
-
43
-
44
-
45
-
46
-
47
-
48
-
49
-
50
-
51
-
52
-
53
-
54
-
55
-
56
-
57
 |
 |

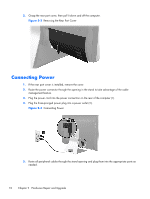
2.
Grasp the rear port cover, then pull it down and off the computer.
Figure 2-2
Removing the Rear Port Cover
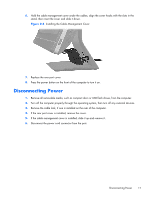
Connecting Power
1.
If the rear port cover is installed, remove the cover.
2.
Route the power connector through the opening in the stand to take advantage of the cable
management feature.
3.
Plug the power cord into the power connection on the rear of the computer (1).
4.
Plug the three-pronged power plug into a power outlet (2).
Figure 2-3
Connecting Power
5.
Route all peripheral cables through the stand opening and plug them into the appropriate ports as
needed.
10
Chapter 2
Hardware Repair and Upgrade