Compaq Evo D510 Compaq Evo D510 Convertible Minitowerr Hardware Reference Guid - Page 3
Contents, Product Features, Hardware Upgrades - memory upgrade
 |
View all Compaq Evo D510 manuals
Add to My Manuals
Save this manual to your list of manuals |
Page 3 highlights
Contents 1 Product Features Standard Configuration Features 1-1 Front Panel Components 1-2 Rear Panel Components 1-3 Easy Access Keyboard Components 1-4 Customizing the Easy Access Buttons 1-5 Using the Windows Logo Key 1-6 Special Mouse Functions 1-6 Serial Number Location 1-7 Changing from a Minitower to a Desktop Configuration 1-7 Changing from a Desktop to a Minitower Configuration 1-10 2 Hardware Upgrades Installation Sequence 2-1 Smart Cover Lock 2-2 Using the Smart Cover FailSafe Key 2-2 Removing the Computer Access Panel 2-4 Removing the Front Bezel 2-5 Removing Bezel Blanks 2-7 Installing Additional Memory 2-8 DIMMs 2-8 DDR-SDRAM DIMMs 2-8 Installing DDR-SDRAM DIMMs 2-9 Hardware Reference Guide iii
-
 1
1 -
 2
2 -
 3
3 -
 4
4 -
 5
5 -
 6
6 -
 7
7 -
 8
8 -
 9
9 -
10
-
11
-
12
-
13
-
14
-
15
-
16
-
17
-
18
-
19
-
20
-
21
-
22
-
23
-
24
-
25
-
26
-
27
-
28
-
29
-
30
-
31
-
32
-
33
-
34
-
35
-
36
-
37
-
38
-
39
-
40
-
41
-
42
-
43
-
44
-
45
-
46
-
47
-
48
-
49
-
50
-
51
-
52
-
53
-
54
-
55
-
56
-
57
-
58
-
59
-
60
-
61
-
62
-
63
-
64
-
65
-
66
-
67
-
68
-
69
-
70
 |
 |

Hardware Reference Guide
iii
Contents
1
Product Features
Standard Configuration Features. . . . . . . . . . . . . . . . . . . . . . . . . . . . . . . . . . . . . . . . . .
1–1
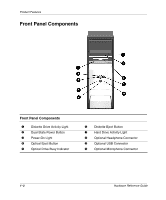
Front Panel Components . . . . . . . . . . . . . . . . . . . . . . . . . . . . . . . . . . . . . . . . . . . . . . . .
1–2
Rear Panel Components . . . . . . . . . . . . . . . . . . . . . . . . . . . . . . . . . . . . . . . . . . . . . . . .
1–3
Easy Access Keyboard Components. . . . . . . . . . . . . . . . . . . . . . . . . . . . . . . . . . . . . . .
1–4
Customizing the Easy Access Buttons . . . . . . . . . . . . . . . . . . . . . . . . . . . . . . . . . . . . .
1–5
Using the Windows Logo Key . . . . . . . . . . . . . . . . . . . . . . . . . . . . . . . . . . . . . . . . . . .
1–6
Special Mouse Functions. . . . . . . . . . . . . . . . . . . . . . . . . . . . . . . . . . . . . . . . . . . . . . . .
1–6
Serial Number Location . . . . . . . . . . . . . . . . . . . . . . . . . . . . . . . . . . . . . . . . . . . . . . . .
1–7
Changing from a Minitower to a Desktop Configuration . . . . . . . . . . . . . . . . . . . . . . .
1–7
Changing from a Desktop to a Minitower Configuration . . . . . . . . . . . . . . . . . . . . . .
1–10
2
Hardware Upgrades
Installation Sequence. . . . . . . . . . . . . . . . . . . . . . . . . . . . . . . . . . . . . . . . . . . . . . . . . . .
2–1
Smart Cover Lock . . . . . . . . . . . . . . . . . . . . . . . . . . . . . . . . . . . . . . . . . . . . . . . . . . . . .
2–2
Using the Smart Cover FailSafe Key . . . . . . . . . . . . . . . . . . . . . . . . . . . . . . . . . . .
2–2
Removing the Computer Access Panel. . . . . . . . . . . . . . . . . . . . . . . . . . . . . . . . . .
2–4
Removing the Front Bezel . . . . . . . . . . . . . . . . . . . . . . . . . . . . . . . . . . . . . . . . . . .
2–5
Removing Bezel Blanks . . . . . . . . . . . . . . . . . . . . . . . . . . . . . . . . . . . . . . . . . . . . .
2–7
Installing Additional Memory . . . . . . . . . . . . . . . . . . . . . . . . . . . . . . . . . . . . . . . . . . . .
2–8
DIMMs . . . . . . . . . . . . . . . . . . . . . . . . . . . . . . . . . . . . . . . . . . . . . . . . . . . . . . . . . .
2–8
DDR-SDRAM DIMMs. . . . . . . . . . . . . . . . . . . . . . . . . . . . . . . . . . . . . . . . . . . . . .
2–8
Installing DDR-SDRAM DIMMs . . . . . . . . . . . . . . . . . . . . . . . . . . . . . . . . . . . . .
2–9