Craftsman 18178 Operation Manual - Page 4
Nailing Operation - nails
 |
View all Craftsman 18178 manuals
Add to My Manuals
Save this manual to your list of manuals |
Page 4 highlights
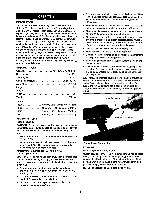
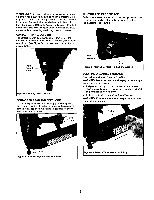
• Insert one or two nail strips intothe slot located on the end of the magazine. Feed strig(s) past nail stop (see Figure 2). Nail Stop Figure 2 - Insert Nail Strip S_idene;_Lstriptowards the frontof the magazine untilthe nail strip is in the nose (see Figure 3). Pusher Housing NAILING OPERATION Refer to Figures 5-11 (pages 4, 5 and 6). WARNING: Read and follow all safety rules and operating instructions in this manual and on warning label of tool before using this tool. Keep this manual with the tool. WARNING; Do not use this tool without safety warning label, If label is missing, damaged or unreadable, contact Sears to obtain a new label. WARNING; Never operate tool unless contact trip is in contact with wotkpiece. Do not operate tool without fasteners or damage to tool may result. Never fire fasteners into the air because fasteners may injure operator or others and damage to tool may result. • Perform =Safety Mechanism Check" as described in the Maintenance section (see page 6) prior to first use of tool and on a daily basis thereafter. • The tool is equipped with a rotating switch that can be set to rapid-fire or sir_Le-fira mode (see Figure 5). When the switch is set to single-fire mode, the tool will not drive a second fastener until the trigger is fully released and pulled again. • When the switch is rotated to rapid-fire mode, the tool can drive fasteners continuously. A fastener will be fired each time the contact trip is pressed against the workpiece, as long as the trigger is maintained in the pulled position. Latch Figure 3 - Slide Nail Strip Forward • Grasp pusher housing, depress latch and pull the pusher housing back until the pusher is completely behind the nail strip. Then release the latch ar,,d housing. The housing will travel forward and the pusher wW apply pressure to the nail strip, pushing it into the driving mechanism (see Figure 4). Figure 4 - Pull Pusher Housing Back and Release Figure 5 - Push and Rotate Switch to Select Operation Mode SINGLE-FIRE OPERATION: • The air tool is equipped with a contact trip safety mechanism that disables tool unless contact trip is pushed against work. To drive e fastener hold body firmly and press contact trip on workpiece where fastener is to be applied. Pull trigger to drive fastener into workpiece. To fire a second fastener liftthe tool from the workplace, release the trigger and then repeat the above sequence. RAPID-FIRE OPERATION: • The tool can also be operated by holding trigger depressed and pushing contact trip against workpiece. A fastener will be driven each time the contact trip is pushed against the workplace. This operating procedure provides rapid-fire fastener driving. Never operate tool unless contact trip is in contact with workpiece. 4
-
 1
1 -
 2
2 -
 3
3 -
 4
4 -
 5
5 -
 6
6 -
 7
7 -
 8
8 -
 9
9 -
 10
10 -
11
-
12
-
13
-
14
-
15
-
16
-
17
-
18
-
19
-
20
 |
 |