Creative 70EM896106000 Owners Manual - Page 46
Managing Your Inserts, To Delete an Insert, To Bypass an Insert
 |
UPC - 054651126893
View all Creative 70EM896106000 manuals
Add to My Manuals
Save this manual to your list of manuals |
Page 46 highlights
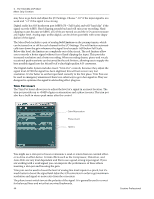
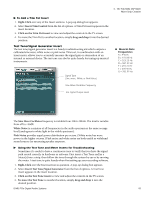
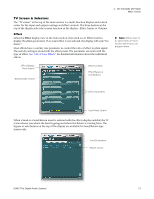
4 - The PatchMix DSP Mixer Mixer Strip Creation Managing Your Inserts To Delete an Insert: 1. Right-Click over the Insert you wish to delete. A yellow line around the insert location indicates that it is selected. A pop-up dialog box appears. 2. Select Delete Insert to remove the selected insert or select Delete All Inserts to remove all inserts. 3. The insert(s) are deleted from the insert chain. Tip: Select the Insert and press the Delete key to delete the plug-in from the strip. To Bypass an Insert: Inserts can be bypassed if you want to temporarily hear the audio without the effect or insert. Bypass can also be used to turn off a Send Insert. Method #1 1. Click on the Effect (in the Insert section) and select Effect in the TV display. 2. Click the Bypass button. Method #2 1. Right-Click over the Effect you want to bypass (in the Insert section). A pop-up dialog box appears. 2. Select Bypass Insert from the list of options. To Bypass All Inserts: All Inserts in a strip can also be bypassed with a single command. 1. Right-Click over the Effect you want to bypass (in the Insert section). A pop-up dialog box appears. 2. Select Bypass All Inserts from the list of options. To Solo an Insert: Inserts can also be soloed. Solo bypasses all the other inserts in the strip and allows you to hear only the soloed effect. This feature is very useful when adjusting the effect parameters. Method #1 1. Click on the Effect (in the Insert section) and select Effect in the TV display. 2. Click the Solo button. Method #2 1. Right-Click over the Effect you want to Solo (in the Insert section). A pop-up dialog box appears. 2. Select Solo Insert from the list of options. 46 Creative Professional
-
 1
1 -
2
-
3
-
4
-
5
-
6
-
7
-
8
-
9
-
10
-
11
-
12
-
13
-
14
-
15
-
16
-
17
-
18
-
19
-
20
-
21
-
22
-
23
-
24
-
25
-
26
-
27
-
28
-
29
-
30
-
31
-
32
-
33
-
34
-
35
-
36
-
37
-
38
-
39
-
40
-
 41
41 -
 42
42 -
 43
43 -
 44
44 -
 45
45 -
 46
46 -
 47
47 -
 48
48 -
 49
49 -
 50
50 -
 51
51 -
52
-
53
-
54
-
55
-
56
-
57
-
58
-
59
-
60
-
61
-
62
-
63
-
64
-
65
-
66
-
67
-
68
-
69
-
70
-
71
-
72
-
73
-
74
-
75
-
76
-
77
-
78
-
79
-
80
-
81
-
82
-
83
-
84
-
85
-
86
-
87
-
88
-
89
-
90
-
91
-
92
-
93
-
94
-
95
-
96
-
97
-
98
-
99
-
100
-
101
-
102
-
103
-
104
-
105
-
106
-
107
-
108
-
109
-
110
-
111
-
112
-
113
-
114
-
115
-
116
-
117
-
118
-
119
-
120
-
121
-
122
-
123
-
124
-
125
-
126
-
127
-
128
-
129
-
130
-
131
-
132
 |
 |
