Cub Cadet Z-Force SX 54 Operation Manual - Page 13
Cold Weather Starting, Using Jumper Cables To Start Engine, Stopping the Engine, Driving The Tractor
 |
View all Cub Cadet Z-Force SX 54 manuals
Add to My Manuals
Save this manual to your list of manuals |
Page 13 highlights
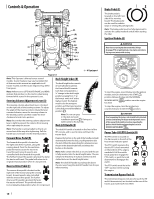
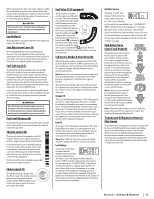
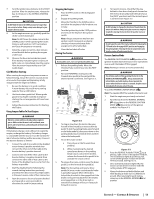
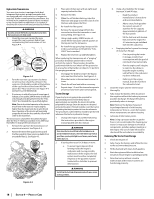
7. Turn the ignition key clockwise to the START position. After the engine starts, release the key. It will return to the NORMAL MOWING position. CAUTION Do NOT hold the key in the START position for longer than ten seconds at a time. Doing so may cause damage to your engine's electric starter. 8. As the engine warms up, gradually push the choke control downward. Note: Do NOT leave the choke control in the CHOKE position while operating the tractor. Doing so will result in a "rich" fuel mixture and cause the engine to run poorly. 9. Allow the engine to run for a few minutes at mid throttle before putting the engine under load. 10. Observe the hour meter/indicator panel. If the battery indicator light or oil pressure light come on, immediately stop the engine. Have the tractor inspected by your Cub Cadet dealer. Cold Weather Starting When starting the engine at temperatures near or below freezing, ensure the correct viscosity motor oil is used in the engine and the battery is fully charged. Start the engine as follows: 1. Be sure the battery is in good condition. A warm battery has much more starting capacity than a cold battery. 2. Use fresh winter grade fuel. Winter grade gasoline has higher volatility to improve starting. Do not use gasoline left over from summer. 3. Follow the previous instruction for Starting the Engine. Using Jumper Cables To Start Engine WARNING Batteries contain sulfuric acid and produce explosive gasses. Make certain the area is well ventilated, wear gloves and eye protection, and avoid sparks or flames near the battery. If the battery charge is not sufficient to crank the engine, recharge the battery. If a battery charger is unavailable and the tractor must be started, the aid of a booster battery will be necessary. Connect the booster battery as follows: 1. Connect the end of one cable to the disabled tractor battery's positive terminal; then connect the other end of that cable to the booster battery's positive terminal. 2. Connect one end of the other cable to the booster battery's negative terminal; then connect the other end of that cable to the frame of the disabled tractor, as far from the battery as possible. 3. Start the disabled tractor following the normal starting instructions previously provided; then disconnect the jumper cables in the exact reverse order of their connection. 4. Have the tractor's electrical system checked and repaired as soon as possible to eliminate the need for jump starting. Stopping the Engine 1. Place the PTO switch in the disengaged position. 2. Engage the parking brake. 3. Move the throttle to the SLOW position and allow the engine to idle for about one minute. 4. Turn the ignition key to the STOP position and remove the key from the ignition switch. Note: Always remove the key from the ignition switch to prevent accidental starting or battery discharge if the equipment is left unattended. 5. Close the fuel shut-off valve. Driving The Tractor WARNING Avoid sudden starts, excessive speed and sudden stops. 1. Release the parking brake. Move the throttle/choke control lever into the FAST position. 2. To travel FORWARD, slowly press the forward drive pedal (a) forward until the desired speed is achieved. See Figure 3-2. (c) (a) (b) (d) Figure 3-2 3. To stop or slow down the tractor, take your foot off of the forward (a) or reverse drive (b) pedal. To lock the parking brake, press forward on the brake pedal (c), then press down on the parking break/cruise control (d) lever and then release the brake pedal. 4. To use the cruise control: a. Press down on the forward drive pedal (a). b. While maintaining the desired speed press down on the parking break/cruise control lever (d) then release the forward drive pedal (a) to activate the cruise control. 5. To release the cruise control, press the brake pedal (c) or the forward drive pedal (a). Note: The forward (a) and reverse drive pedals (b) must not be used when the brake is partially engaged. When the brake is locked the drive belt is disengaged but if the brake is only part way back then the brakes are engaged but so is the drive belt so transmission damage will occur if you push forward or reverse. 6. To travel in reverse, check that the area behind is clear then slowly push forward on the reverse drive pedal with the ball of your foot (NOT your heel) until the desired speed is achieved. See Figure 3-2. CAUTION Do NOT attempt to change the direction of travel when the tractor is in motion. Always bring the tractor to a complete stop before moving the tractor from forward to reverse or vice versa WARNING Do not leave the seat of the tractor without first placing the PTO knob in the disengaged (OFF) position and engaging the parking brake. If leaving the tractor unattended, also turn the engine off and remove the key. Reverse Caution Mode The REVERSE CAUTION MODE position of the ignition module allows the tractor to be operated in reverse with the blades (PTO) engaged. Note: Mowing in reverse is not recommended. WARNING Use extreme caution while operating the tractor in the REVERSE CAUTION MODE . Always look down and behind before and while backing. Do not operate the tractor when children or others are around. Stop the tractor immediately if someone enters the area. To use the REVERSE CAUTION MODE : Note: The operator MUST be seated in the tractor seat. 1. Start the engine as previously instructed. 2. Turn the key from the NORMAL MOWING (a) position to the REVERSE CAUTION MODE (b) position of the ignition module. See Figure 3-3. (d) (c) (e) (a) (b) Figure 3-3 3. Press the REVERSE PUSH BUTTON (c) at the top, right corner of the ignition module. The red indicator light (d) at the top, left corner of the ignition module will be ON while activated. See Figure 3-3. 4. Once activated (indicator light ON), the tractor can be driven in reverse with the cutting blades (PTO) engaged. 5. Always look down and behind before and while backing to make sure no children are around. After resuming forward motion, return key to the NORMAL MOWING (a) position. Section 3 - Controls & Operation 13
-
 1
1 -
2
-
3
-
4
-
5
-
6
-
7
-
 8
8 -
 9
9 -
 10
10 -
 11
11 -
 12
12 -
 13
13 -
 14
14 -
 15
15 -
 16
16 -
 17
17 -
 18
18 -
19
-
20
-
21
-
22
-
23
-
24
-
25
-
26
-
27
-
28
-
29
-
30
-
31
-
32
-
33
-
34
-
35
-
36
-
37
-
38
-
39
-
40
-
41
-
42
-
43
-
44
 |
 |