Cub Cadet ZTS1 42 Operation Manual
Cub Cadet ZTS1 42 Manual
 |
View all Cub Cadet ZTS1 42 manuals
Add to My Manuals
Save this manual to your list of manuals |
Cub Cadet ZTS1 42 manual content summary:
- Cub Cadet ZTS1 42 | Operation Manual - Page 1
pan. This information will be necessary, should you seek technical support via our web site or with your local authorized service dealer. Model Number Serial Number WARNING Read and follow all safety rules and instructions in this manual before attempting to operate this machine. Failure to comply - Cub Cadet ZTS1 42 | Operation Manual - Page 2
or attachment. 4. Never allow adults to operate this tractor without proper instruction. 5. If situations occur which are not covered in this manual, use care and good judgment. Contact your customer service representative for assistance. 6. According to the U.S. Consumer Products Safety Commission - Cub Cadet ZTS1 42 | Operation Manual - Page 3
. Allow the tractor to cool for five minutes before attempting any service. 22. Never run an engine indoors or in a poorly ventilated Children 14 and over should read and understand the instructions and safe operation practices in this manual and on the tractor and should be trained and supervised - Cub Cadet ZTS1 42 | Operation Manual - Page 4
STEEP FOR SAFE OPERATION! To check the slope, proceed as follows: 1. Open manual to page and fold along the dashed line. 2. Locate a vertical object on , or other debris build-up. Follow the Post-Operation Tractor Care instructions in the Product Care section. 9. Your tractor is designed to cut - Cub Cadet ZTS1 42 | Operation Manual - Page 5
condition. Review the Maintenance Schedule chart in this manual for service interval information. 12. After striking a foreign object 15. Maintain or replace safety and instruction labels, as necessary. 16. Observe canister. Please contact Customer Support for information regarding the evaporative - Cub Cadet ZTS1 42 | Operation Manual - Page 6
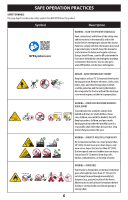
safety symbols that MAY APPEAR on this product. Symbol Description OPESymbol.com WARNING - READ THE OPERATOR'S MANUAL(S) Read, understand, and follow all the safety rules and instructions in the manual(s) and on the tractor before attempting to operate this tractor. Failure to comply with this - Cub Cadet ZTS1 42 | Operation Manual - Page 7
injure body parts. WARNING - AVOID CRUSH/PINCH POINT INJURY Read, understand, and follow all the safety rules and instructions in the manual(s) and on the tractor before attempting to service this tractor. The deck lift system is spring-assisted and under tension. Always use the provided multi-tool - Cub Cadet ZTS1 42 | Operation Manual - Page 8
Figure 1 2. After moving tractor, reverse Step 1 to disengage the transmission bypass. 3. Remove the deck wash system nozzle adapter (if equipped) from the manual bag, store for future use. INSTALL HITCH (IF NECESSARY) 1. Locate hitch (a) and install on the rear of the frame using the two hex washer - Cub Cadet ZTS1 42 | Operation Manual - Page 9
procedures as required until all conditions are met. Steering Wheel Column INSTALLING THE TILT LOCKING CYLINDER (IF NECESSARY) 1. Remove hardware from manual bag. 2. Sit in operator's seat. 3. With one hand, lift steering wheel column into a raised position. 4. While holding steering wheel column in - Cub Cadet ZTS1 42 | Operation Manual - Page 10
deck wheels are an anti-scalp feature of the deck and are not designed to support the weight of the cutting deck. 1. Move the tractor to a level surface, pitched. See the Product Care section for deck leveling information and instructions. 4. Place deck lift lever or knob in the desired mowing - Cub Cadet ZTS1 42 | Operation Manual - Page 11
of the wiring harness or in the bag with this manual. Retain the hardware for later instructions. See Figure 12. 2. Remove the plastic cover (c), : If the battery is put into service after date shown on top/ side of battery, charge the battery as instructed in Charging the Battery, prior to - Cub Cadet ZTS1 42 | Operation Manual - Page 12
sooner than a charged battery. A fully charged battery will store longer in cold temperatures than hot. • Recharge the battery before returning to service. Although the tractor may start, the engine charging system may not fully recharge the battery. BATTERY REMOVAL WARNING Battery posts, terminals - Cub Cadet ZTS1 42 | Operation Manual - Page 13
The forward drive pedal is located on the right differ from yours. side of the tractor, along the running board. NOTE: All references in this manual to the left or right side and front or back of the tractor are from the operating position only. Exceptions, if any, will be specified - Cub Cadet ZTS1 42 | Operation Manual - Page 14
lever. It is used to engage the parking brake when the tractor is at rest. Refer to the Driving the Tractor section of this manual for detailed instructions regarding the parking brake. NOTE: The parking brake must be set if the operator leaves the seat with the engine running or the engine - Cub Cadet ZTS1 42 | Operation Manual - Page 15
a charge or the engine's charging system is not generating sufficient amperage. Charge the battery as instructed in the Assembly section of this manual or have the charging system checked by your local service dealer. The choke control determines the position of the engine choke. Pull the knob out - Cub Cadet ZTS1 42 | Operation Manual - Page 16
If a safety circuit is not working as designed, contact an authorized service dealer to have the tractor inspected. Do NOT operate the tractor starting the engine. NOTE: Refer to the Engine Operator's Manual for gasoline and oil fill-up instructions. 1. Operator must be sitting in the tractor seat. - Cub Cadet ZTS1 42 | Operation Manual - Page 17
to the frame of the disabled tractor, as far from the battery as possible. 3. Start the disabled tractor following the normal starting instructions previously provided; then disconnect the jumper cables in the exact reverse order of their connection. 4. Have the tractor's electrical system checked - Cub Cadet ZTS1 42 | Operation Manual - Page 18
enters the area. To use the REVERSE CAUTION MODE : NOTE: The operator MUST be seated in the tractor seat. 1. Start the engine as previously instructed. 2. Turn the key from the NORMAL MOWING (a) position to the REVERSE CAUTION MODE (b) position of the ignition module. See Figure 19. OPERATING THE - Cub Cadet ZTS1 42 | Operation Manual - Page 19
OPERATION WARNING Be careful when crossing gravel paths or driveways. Disengage the PTO and raise the deck to the highest position before crossing. NOTE: Do not engage the mower deck when lowered in grass. Premature wear and possible failure of the 'V' belt and PTO clutch will result. Fully raise - Cub Cadet ZTS1 42 | Operation Manual - Page 20
performing an adjustment or repair to protect your eyes. Follow the maintenance schedule given below. This chart describes service guidelines only. Refer to the Engine Operator's Manual for engine maintenance items listed in the table below. NOTE: Maintenance schedule continues onto the next page - Cub Cadet ZTS1 42 | Operation Manual - Page 21
Have Valve Lash Checked & Adjusted* * -- Have this item performed by an authorized service dealer NOTE: This Operator's Manual covers several models. Tractor features may vary by model. Not all features in this manual are applicable to all tractor models and the tractor depicted may differ from - Cub Cadet ZTS1 42 | Operation Manual - Page 22
damage to electrical components, spindles, pulleys, bearings or the engine. The use of water will result in shortened life and reduce serviceability. • Keep both sides of transmission cooling slots, exhaust manifold, around fuses, all wiring and harnesses, muffler pipe, muffler shield, engine intake - Cub Cadet ZTS1 42 | Operation Manual - Page 23
floor panel removed. The floor panel can be removed for maintenance, service and cleaning. To remove the floor panel: 1. Using the multi-tool oil filter (d) and refill the engine with new oil as instructed in the Engine Operator's Manual. See Figure 25. NOTE: Place an absorbent towel beneath the - Cub Cadet ZTS1 42 | Operation Manual - Page 24
to be checked. Changing the Transmission Oil Please see your authorized service dealer for transmission oil changes. Off-Season Storage If your oil and filter following the instructions provided in this manual as well as the Engine Operator's Manual provided with this tractor. Steering problems. 24 - Cub Cadet ZTS1 42 | Operation Manual - Page 25
fuel in the carburetor has been exhausted. • Referring to the Engine Operator's Manual, drain the fuel from the carburetor bowl. 3. Clean the engine and the are sharp. Wrap the blade or wear gloves, and use extra caution when servicing them. LEVELING THE DECK (SIDE-TO-SIDE) 1. Place the deck lift knob - Cub Cadet ZTS1 42 | Operation Manual - Page 26
problem with blown fuses, have the tractor's electrical system checked by your authorized service of the deck and are not designed to support the weight of the cutting deck. The deck the deck wheels, see the Assembly section for instructions. WARNING Use caution to avoid pinching your fingers - Cub Cadet ZTS1 42 | Operation Manual - Page 27
beneath the tractor to grasp the belt at the front of the PTO pulley. c. Pull the left side of the belt rearward and downward while manually turning the PTO pulley to the right until the belt rides out onto the edge of the lower sheave of the pulley. NOTE: If pulling - Cub Cadet ZTS1 42 | Operation Manual - Page 28
PRODUCT CARE DECK INSTALLATION Install the deck on the tractor as follows: 1. Carefully maneuver the deck under the tractor from the right side, lining up the deck hanger brackets and the deck lift arms on deck lift rod/deck release pin tractors and align the lift link brackets and front deck - Cub Cadet ZTS1 42 | Operation Manual - Page 29
60" Decks (d) (d) (c) (c) (a) (b) Figure 40 Tractor Blade Care WARNING Tractor blades are sharp. Wrap the blade or wear gloves and use extra caution when servicing them. The cutting blades must be kept sharp at all times. Sharpen the cutting edges of the blades evenly so that the blades remain - Cub Cadet ZTS1 42 | Operation Manual - Page 30
PRODUCT CARE Troubleshooting WARNING Before cleaning, repairing, or inspecting, make certain the blade . THIS SECTION ADDRESSES MINOR SERVICE ISSUES. TO LOCATE THE NEAREST AUTHORIZED SERVICE CENTER CONSULT THE SEPARATE SUPPLEMENT SHEET FOR CONTACT INFORMATION. PROBLEM Engine fails to start Engine - Cub Cadet ZTS1 42 | Operation Manual - Page 31
NOTES 31 - Cub Cadet ZTS1 42 | Operation Manual - Page 32
causan cáncer y problemas reproductivos. Lávese las manos después de estar en contacto con estos componentes. www.p65warnings.ca.gov NOTA: Este Manual del Operador corresponde a varios modelos. Las características pueden variar según el modelo. No todas las características que se incluyen en este - Cub Cadet ZTS1 42 | Operation Manual - Page 33
, ¡PRESTE ATENCIÓN A LA ADVERTENCIA! PELIGRO Esta máquina está diseñada para ser utilizada respetando las prácticas de operación seguras contenidas en este manual. Al igual que con cualquier tipo de equipo eléctrico, un descuido o un error por parte del operador puede provocar lesiones graves. Esta - Cub Cadet ZTS1 42 | Operation Manual - Page 34
utilicen este tractor. Los niños de 14 años en adelante deben leer y entender las instrucciones y las medidas de seguridad contenidas en este manual y sobre el tractor, y deben ser entrenados y supervisados por un adulto. 8. No permita que se transporte a ningún niño por diversión en el tractor. El - Cub Cadet ZTS1 42 | Operation Manual - Page 35
tractor en el lugar inclinado. Use un dispositivo de medición de pendientes además del indicador de pendiente que se incluye como parte de este manual para medir las pendientes antes de operar este tractor sobre una zona inclinada o con pendientes. Para medir las pendientes, también se pueden usar - Cub Cadet ZTS1 42 | Operation Manual - Page 36
desconexión de las cuchillas según el intervalo que figura en la tabla del programa de mantenimiento dentro de la sección Cuidado del producto de este manual. Mida el tiempo hasta la detención con un cronómetro. Si las cuchillas no se detienen completamente en menos de cinco segundos, su tractor - Cub Cadet ZTS1 42 | Operation Manual - Page 37
PRÁCTICAS DE OPERACIÓN SEGURAS 13. Nunca intente hacer ajustes o arreglos en el tractor con el motor en marcha. 14. Los componentes del colector de césped y el deflector del canal están sujetos a desgaste y daños lo que podrían dejar expuestas las piezas móviles o permitir que se arrojaran objetos. - Cub Cadet ZTS1 42 | Operation Manual - Page 38
de intentar utilizar este tractor. Si no cumple con lo que indica esta información, se pueden provocar lesiones personales o la muerte. Conserve este manual en un lugar seguro para usarlo como referencia futura habitual. Con un teléfono inteligente, escanee el símbolo del código de QR para obtener - Cub Cadet ZTS1 42 | Operation Manual - Page 39
- EVITE LAS LESIONES POR PUNTOS DE APLASTAMIENTO/COMPRESIÓN Lea, comprenda y siga todas las reglas e instrucciones de seguridad que se incluyen en el manual y en el tractor antes de intentar realizar el mantenimiento de este tractor. La elevación de la plataforma se acciona por resorte y está bajo - Cub Cadet ZTS1 42 | Operation Manual - Page 40
Operador corresponde a varios modelos. Las características del tractor pueden variar según los modelos. No todas las características que se incluyen en este manual se aplican a todos los modelos de tractor y la máquina que se ilustra aquí puede diferir de la suya. NOTA: Todas las referencias en este - Cub Cadet ZTS1 42 | Operation Manual - Page 41
se cumplan todas las condiciones. Columna del volante INSTALACIÓN DEL CILINDRO DE CIERRE BASCULANTE (SI ES NECESARIO) 1. Extraiga los herrajes de la bolsa manual. 2. Siéntese en el asiento del operador. 3. Con una mano, levante la columna del volante a una posición elevada. 4. Mientras sostiene la - Cub Cadet ZTS1 42 | Operation Manual - Page 42
MONTAJE AJUSTE DEL VOLANTE 1. Para inclinar la columna del volante (a) hacia delante, levante la palanca de ajuste de la columna del volante de dirección (b), coloque la columna del volante (a) en la posición deseada y luego suelte la palanca de ajuste de la columna del volante de dirección(b) para - Cub Cadet ZTS1 42 | Operation Manual - Page 43
1. Extraiga los tornillos de cabeza hexagonal (a) y las tuercas cuadradas (b) situados en el extremo del mazo de cables o en la bolsa que acompaña a este manual. Guarde las piezas para uso posterior. Consulte la Figura 12. 2. Extraiga la cubierta de plástico (c), si la hay, del borne positivo de la - Cub Cadet ZTS1 42 | Operation Manual - Page 44
MONTAJE MANTENIMIENTO DE LA BATERÍA • Algunas baterías se llenan de ácido de batería y luego se sellan en la fábrica. Sin embargo, para asegurar un ciclo de vida adecuado es necesario realizar cierto mantenimiento, aún en las baterías 'sin mantenimiento'. • Rocíe los bornes y el cable expuesto con - Cub Cadet ZTS1 42 | Operation Manual - Page 45
. Las características del tractor pueden variar según los modelos. 3 Pedal de marcha adelante No todas las características que se incluyen en este manual se El pedal de marcha adelante está ubicado aplican a todos los modelos de tractor y la máquina que se ilustra del lado derecho del tractor - Cub Cadet ZTS1 42 | Operation Manual - Page 46
ón de la transmisión. Se usa para poner el freno de mano cuando el tractor está inactivo. Consulte la sección Conducción del tractor de este manual para ver instrucciones detalladas sobre el freno de mano. NOTA: Si el operador abandona el asiento y deja el motor en funcionamiento, deberá colocar el - Cub Cadet ZTS1 42 | Operation Manual - Page 47
la batería o que el sistema de carga del motor no genera suficiente amperaje. Cargue la batería como se indica en la sección Montaje de este manual o haga controlar el sistema de carga por su distribuidor de servicio local. REVISIÓN DEL FILTRO DE AIRE En la pantalla LCD aparecen las letras "CLN - Cub Cadet ZTS1 42 | Operation Manual - Page 48
ANTES DE HACER FUNCIONAR EL TRACTOR • Antes de la operación, consulte la tabla del programa de mantenimiento que aparecen en este manual para las revisiones programadas habitualmente. • Se certifica que este motor funciona únicamente con gasolina normal sin plomo, nueva y limpia. Cargue únicamente - Cub Cadet ZTS1 42 | Operation Manual - Page 49
para verificar que funcionen adecuadamente. ADVERTENCIA El operador debe estar sentado en el asiento del tractor al arrancar el motor. NOTA: Consulte el manual del operador del motor para ver las instrucciones de llenado de gasolina y aceite. 1. El operador debe estar sentado en el asiento del - Cub Cadet ZTS1 42 | Operation Manual - Page 50
FUNCIONAMIENTO 4. Gire la llave de encendido a la posición STOP (parada) y quite la llave del interruptor de encendido. NOTA: Siempre quite la llave del interruptor de encendido para evitar el arranque accidental o la descarga de la batería si el equipo queda sin supervisión. Conducción del tractor - Cub Cadet ZTS1 42 | Operation Manual - Page 51
FUNCIONAMIENTO 6. El MODO DE PRECAUCIÓN DE RETROCESO (b) permanecerá activado hasta que (consulte la Figura 19 en la página 50): a. La llave se coloca ya sea en la posición CORTE NORMAL (a) o STOP (e), o bien b. El operador abandone el asiento. FUNCIONAMIENTO DE LA TOMA DE FUERZA (PTO) Opere el - Cub Cadet ZTS1 42 | Operation Manual - Page 52
de las primeras 5 horas Cada 10 horas Cada 25 horas Cada 50 horas Cada 100 horas Cada 200 horas Antes de almacenar Consulte el Manual del Motor P P P P Verifique/limpie la parte de arriba y de abajo P de la plataforma, debajo y alrededor de las P cubiertas del husillo y del área de la - Cub Cadet ZTS1 42 | Operation Manual - Page 53
Después de las primeras 5 horas Cada 10 horas Cada 25 horas Cada 50 horas Cada 100 horas Cada 200 horas Antes de almacenar Consulte el Manual del Motor P Verifique que todos los herrajes están en su lugar y asegurados P Verifique el par de ajuste del perno montaje del motor (ajuste hasta - Cub Cadet ZTS1 42 | Operation Manual - Page 54
CUIDADO DEL PRODUCTO 3. Tire del collarín de ajuste (a) del adaptador del pico (b) hacia atrás y empuje el adaptador del pico sobre el pico de lavado de la plataforma (c). Suelte el collarín de ajuste para trabar el adaptador del pico en el pico de lavado de la plataforma. Consulte la Figura 20. • - Cub Cadet ZTS1 42 | Operation Manual - Page 55
al menos cinco minutos antes de almacenarla o de volver a cargarle combustible. Consulte las instrucciones y procedimientos de mantenimiento del motor en el Manual del Operador del Motor. NOTA: El mantenimiento, la reparación o el reemplazo de los dispositivos y los sistemas del control de emisiones - Cub Cadet ZTS1 42 | Operation Manual - Page 56
. Consulte la Figura 25 en la página 55. 6. Vuelva a colocar el filtro de aceite (d) y cargue el motor con aceite nuevo según las instrucciones del Manual del Operador del Motor. Consulte la Figura 25 en la página 55. NOTA: Coloque una toalla absorbente debajo del filtro de aceite para mantener el - Cub Cadet ZTS1 42 | Operation Manual - Page 57
a detenerse. Use el cebador para mantener el motor en funcionamiento hasta que se haya agotado todo el combustible del carburador. • Consulte el manual del operador del motor para drenar el combustible del recipiente del carburador. 3. Limpie perfectamente el motor y todo el tractor. NOTA: No se - Cub Cadet ZTS1 42 | Operation Manual - Page 58
CUIDADO DEL PRODUCTO NIVELACIÓN DE LA PLATAFORMA (DE LADO A LADO) 1. Coloque la manija de elevación de la plataforma o la perilla de elevación de la plataforma en la posición intermedia de corte y gire ambas cuchillas exteriores para que queden perpendiculares al tractor. 2. Mida la distancia desde - Cub Cadet ZTS1 42 | Operation Manual - Page 59
CUIDADO DEL PRODUCTO RETIRO DE LA PLATAFORMA Retire la plataforma de corte del tractor de la siguiente forma: 1. Coloque el tractor en una superficie plana, desconecte la toma de fuerza, detenga el motor, coloque los pedales de accionamiento en posición neutral y ponga el freno de mano. 2. Hay dos - Cub Cadet ZTS1 42 | Operation Manual - Page 60
CUIDADO DEL PRODUCTO a. Extraiga los dos pasadores con unión curva (a) de los pasadores de horquilla (b) que sujetan los soportes del varillaje de elevación (c) a los soportes traseros de elevación de la plataforma (d) en la plataforma. Extraiga los pasadores de horquilla (b). Consulte la Figura 35 - Cub Cadet ZTS1 42 | Operation Manual - Page 61
CUIDADO DEL PRODUCTO 5. Coloque la correa alrededor de las poleas locas que extrajo en el paso 3 con el lado 'V' orientado hacia adentro. Una vez que todo esté en su lugar, vuelva a colocar los elementos de herraje y ajuste la tuerca de seguridad con reborde para sujetar el montaje. 6. Pase la - Cub Cadet ZTS1 42 | Operation Manual - Page 62
CUIDADO DEL PRODUCTO 3. Cuando reinstale las cuchillas, asegúrese de lo siguiente (consulte la Figura 41 en la página 61): a. Las cuchillas (b) se instalan de modo que las aletas se orienten hacia arriba hacia la parte superior de la plataforma. NOTA: Cuando reemplace o instale las cuchillas, asegú - Cub Cadet ZTS1 42 | Operation Manual - Page 63
CUIDADO DEL PRODUCTO PROBLEMA CAUSA SOLUCIÓN El motor funciona de manera errática 1. La unidad está funcionando con el cebador activado. 2. El cable de la bujía está flojo. 1. Compruebe el ajuste del cable del acelerador/cebador. Acuda a un distribuidor de servicio autorizado. 2. Conecte y - Cub Cadet ZTS1 42 | Operation Manual - Page 64
NOTAS 64 - Cub Cadet ZTS1 42 | Operation Manual - Page 65
numéros de modèle et de série de l'appareil, se trouve sous le support du siège. Il est important de conserver ces références car elles vous seront demand d'écarter tout risque d'accident et de blessure. CONSERVEZ CES INSTRUCTIONS. AVERTISSEMENT PROPOSITION 65 DE LA CALIFORNIE Les gaz d'échappement - Cub Cadet ZTS1 42 | Operation Manual - Page 66
ée dans des conditions normales. À ce terme, faites impérativement vérifier les mécanismes et dispositifs de sécurité tous les ans par un centre de service agréé. Vous risquez un accident grave, voire mortel, si vous ne le faites pas. AVANT D'UTILISER LA TONDEUSE 1. Examinez soigneusement la zone de - Cub Cadet ZTS1 42 | Operation Manual - Page 67
son déflecteur d'éjection ou sans un sac à herbe. 15. Attention : les bacs récupérateurs et autres accessoires affectent l'équilibre de l'appareil. Suivez les instructions du fabricant. 16. Débrayez les lames dès que vous cessez de tondre et avant de vous engager sur le trottoir, sur la route ou sur - Cub Cadet ZTS1 42 | Operation Manual - Page 68
le moteur. 8. Pour limiter les risques d'incendie, retirez les brins d'herbe, feuilles et autres débris accumulés sur le moteur. Suivez les instructions du sous-chapitre Entretien de l'appareil après son utilisation du chapitre Entretien du manuel. 9. Cet appareil est conçu pour une utilisation - Cub Cadet ZTS1 42 | Operation Manual - Page 69
agréé ou en 10. Attention, pour obtenir le meilleur de votre équipement et éviter les accidents, n'utilisez que des pièces d'origine. contactant le service à la clientèle (MTD Products Limited, 97 Kent Avenue, Kitchener, Ontario, N2G 4J1). 11. Vérifiez régulièrement que les écrous, boulons et vis - Cub Cadet ZTS1 42 | Operation Manual - Page 70
20 >10in (25cm) Description AVERTISSEMENT - LISEZ LE(S) MANUEL(S) DE L'UTILISATEUR Veuillez lire toutes les consignes de sécurité et toutes les instructions de ce manuel avant d'utiliser l'appareil afin d'écarter tout risque d'accident et de blessure. Conservez ce manuel pour pouvoir le relire ou - Cub Cadet ZTS1 42 | Operation Manual - Page 71
la fusée de la lame. AVERTISSEMENT - RISQUE DE BLESSURE PAR ÉCRASEMENT OU PAR PINCEMENT Veuillez lire toutes les consignes de sécurité et toutes les instructions de ce manuel avant d'utiliser l'appareil. Le système de relevage est doté d'un ressort qui est sous tension. Placez ce système de relevage - Cub Cadet ZTS1 42 | Operation Manual - Page 72
(a) (a) Figure 1 2. Après avoir déplacé l'appareil, effectuez les instructions de l'étape 1 dans l'ordre inverse pour désengager les deux tiges de le faisceau de fils du siège. 2. Fixez le siège au support (c) avec la quincaillerie fournie. Voir Figure 4. a. Utilisez les écrous autobloquants - Cub Cadet ZTS1 42 | Operation Manual - Page 73
ASSEMBLAGE (b) (b) (a) (a) Figure 5 NOTE : Vous ne pourrez pas utiliser l'appareil si le faisceau de l'interrupteur du siège n'est pas connecté. Volant de direction (le cas échéant) IMPORTANT! N'utilisez pas d'outils de frappe pour installer ou retirer le volant. 1. La quincaillerie qui sert à - Cub Cadet ZTS1 42 | Operation Manual - Page 74
égazonnement (b) et le boulon à épaulement (c) du plateau de coupe. Voir Figure 11. (c) (b) (a) Figure 11 7. Insérez le boulon (c) dans un des quatre trous du support de roue. Il faut un dégagement de 6,35 mm (1/4 po) à 12,7 mm (1/2 po) entre la roue et le sol. Voir Figure 11. 8. Prenez note du - Cub Cadet ZTS1 42 | Operation Manual - Page 75
Figure 12. (c) (e) (a) (c) (b) (d) (a) (f) (b) (g) Figure 12 NOTE : Si la batterie est mise en service après la date indiquée sur le dessus ou sur le côté de la batterie, rechargez-la selon les instructions du sous-chapitre Recharge de la batterie avant d'utiliser l'appareil. ENTRETIEN DE LA - Cub Cadet ZTS1 42 | Operation Manual - Page 76
ASSEMBLAGE REMISAGE DE LA BATTERIE • Lorsque vous remisez l'appareil pour une longue période, débranchez le câble négatif de la batterie. Il n'est pas nécessaire de retirer la batterie. • Toutes les batteries se déchargent pendant le remisage. Gardez l'extérieur de la batterie (surtout la partie - Cub Cadet ZTS1 42 | Operation Manual - Page 77
16a 9 16b 17 13 12 15 7 6 16 20 8 19 UTILISATION 1 14 11 10 2 5 18 4 3 Figure 15 NOTE : Ce manuel est commun à plusieurs modèles Les caractéristiques peuvent varier selon le modèle. Certaines caractéristiques décrites dans ce manuel peuvent ne pas s'appliquer à tous les modèles. Votre - Cub Cadet ZTS1 42 | Operation Manual - Page 78
, consultez les sous-chapitres Système de verrouillage de sécurité de sécurité et Démarrage du moteur du chapitre Utilisation de ce manuel pour plus d'instructions sur le module du commutateur d'allumage et le mode de tonte en marche arrière . NOTE : Retirez la clé de contact lorsque vous n'utilisez - Cub Cadet ZTS1 42 | Operation Manual - Page 79
utilisation. Changez l'huile à moteur dans le délai indiqué, selon les instructions de la notice d'utilisation du moteur. NIVEAU D'HUILE BAS NOTE : La les directives du chapitre Assemblage de ce manuel ou visitez le centre de service de votre région pour faire vérifier le système de charge. - Cub Cadet ZTS1 42 | Operation Manual - Page 80
Si un circuit ne fonctionne pas comme prévu, contactez un centre de service agréé pour faire inspecter l'appareil. N'utilisez PAS l'appareil si un circuit . NOTE : Consultez la notice d'utilisation du moteur pour plus d'instructions pour remplir le réservoir d'essence. 1. L'utilisateur doit être - Cub Cadet ZTS1 42 | Operation Manual - Page 81
immédiatement le moteur. Faites vérifier votre appareil dans un centre de service agréé. DÉMARRAGE PAR TEMPS FROID Pour démarrer le moteur lorsque la de la batterie. 3. Démarrez le moteur de l'appareil selon les instructions de démarrage normal précédentes. Débranchez ensuite les câbles de démarrage - Cub Cadet ZTS1 42 | Operation Manual - Page 82
. Pour utiliser l'appareil en mode de tonte en marche arrière : NOTE : L'utilisateur DOIT être en position assise. 1. Démarrez le moteur selon les instructions précédentes. 2. Tournez la clé de la position de tonte normale (a) à la position de tonte en marche arrière (b) (b) à la position d'allumage - Cub Cadet ZTS1 42 | Operation Manual - Page 83
UTILISATION Tonte de l'herbe AVERTISSEMENT Pour éviter tout contact avec les lames et toute blessure causée par une projection, ne permettez à personne (en particulier les enfants et les animaux) de s'approcher à moins de 23 mètres (75 pieds). Coupez le moteur dès que quelqu'un s'approche. - Cub Cadet ZTS1 42 | Operation Manual - Page 84
Respectez le calendrier ci-dessous. Ce tableau décrit seulement des directives générales d'entretien. Consultez la notice d'utilisation du moteur pour toutes les instructions sur l'entretien des éléments du moteur ci-dessous. NOTE : Le calendrier se trouve sur cette page et la suivante. Avant Apr - Cub Cadet ZTS1 42 | Operation Manual - Page 85
les soupapes* P * -- Cet entretien doit être effectué par un centre de service agréé # -- Vérifier et nettoyer plus fréquemment en cas d'utilisation dans des bon état de fonctionnement. AVERTISSEMENT Le non-respect de ces instructions peut entraîner de graves blessures et endommager l'appareil. - Cub Cadet ZTS1 42 | Operation Manual - Page 86
èrement les accumulations de débris sous l'appareil pour maintenir son bon fonctionnement et pour réduire les risques d'incendie. Suivez les instructions ci-dessous et communiquez avec votre concessionnaire si vous avez des questions. • Laissez refroidir l'appareil pendant au moins cinq minutes dans - Cub Cadet ZTS1 42 | Operation Manual - Page 87
faire le plein. Consultez la notice d'utilisation du moteur pour les instructions et les procédures d'entretien du moteur. NOTE : L'entretien, le cadre de la garantie doivent être effectuées dans un centre de service agréé. CHANGEMENT DE L'HUILE À MOTEUR AVERTISSEMENT Lorsque l'appareil vient d'être - Cub Cadet ZTS1 42 | Operation Manual - Page 88
filtre à huile (d) et remplissez le moteur avec de l'huile neuve selon les instructions de la notice d'utilisation du moteur. Voir Figure 25 à la page 87. NOTE de la garantie doivent être effectuées dans un centre de service agréé. LUBRIFICATION Lubrifiez tous les points de pivotement avec une huile - Cub Cadet ZTS1 42 | Operation Manual - Page 89
essence soit vide. • Consultez la notice d'utilisation du moteur pour les instructions sur la vidange d'essence. 3. Nettoyez bien le moteur et l'appareil rieure à zéro. 5. Lubrifiez tous les points de lubrification. Remise en service de l'appareil 1. Vérifiez l'huile à moteur. 2. Chargez la batterie - Cub Cadet ZTS1 42 | Operation Manual - Page 90
¼ à ½ po) du sol. Consultez le chapitre Assemblage pour plus d'instructions sur le réglage des roues du plateau de coupe. Entretien COMPOSANTS ÉLECTRIQUES pas, faites examiner le système électrique dans un centre de service agréé. RÉGLAGE DU FREIN DE STATIONNEMENT Si l'appareil ne s'immobilise - Cub Cadet ZTS1 42 | Operation Manual - Page 91
prise de force soit aussi horizontale que possible (sous le moteur). Voir Figure 32. b. Placez-vous à côté de l'appareil de façon à faire pivoter le support (a) de la poulie de tension et la poulie de tension (b) vers l'arrière jusqu'à ce que vous puissiez soulever la courroie par-dessus la poulie - Cub Cadet ZTS1 42 | Operation Manual - Page 92
de coupe se trouve sous l'appareil, placez le bouton de relevage dans la position de coupe la plus basse. NOTE : Pour bien aligner les supports, il est parfois nécessaire de placer un petit bloc de bois sous chaque côté du plateau. 3. Replacez la quincaillerie appropriée à votre modèle. 4. Assurez - Cub Cadet ZTS1 42 | Operation Manual - Page 93
être démontées et des outils spéciaux sont nécessaires pour remplacer la courroie d'entraînement de la transmission. Contactez un centre de service agréé pour faire remplacer la courroie d'entraînement. Mouvement de l'appareil à l'arrêt Si l'appareil se déplace vers l'avant ou vers l'arrière lorsque - Cub Cadet ZTS1 42 | Operation Manual - Page 94
utilisez l'appareil ou lorsque vous effectuez un réglage ou une réparation. CETTE SECTION TRAITE DES PROBLÈMES MINEURS. POUR TROUVER LE CENTRE DE SERVICE AGRÉÉ DANS VOTRE RÉGION, CONSULTEZ LE DOCUMENT PIÈCES ET GARANTIE POUR AVOIR LEURS COORDONNÉES. PROBLÈME CAUSE SOLUTION Le moteur ne démarre - Cub Cadet ZTS1 42 | Operation Manual - Page 95
NOTES 95 - Cub Cadet ZTS1 42 | Operation Manual - Page 96
SLOPE GAUGE (INDICADOR DE PENDIENTE) (INCLINOMÈTRE) 20°/35% SLOPE (PENDIENTE DE 20°/35%) (PENTE DE 20°/35 %) OK STOP 20°/35% SLOPE TOO STEEP (PENDIENTE DE 20°/35%) (DEMASIADO EMPINADA) (PENTE DE 20°/35 %) (PENTE TROP RAIDE) (LÍNEA DE GUIO2N0E°/S3A5%20D°/A3S5H%E)D(PLEINNTEE DE 20°/35 %)
-
 1
1 -
 2
2 -
 3
3 -
 4
4 -
 5
5 -
 6
6 -
 7
7 -
8
-
9
-
10
-
11
-
12
-
13
-
14
-
15
-
16
-
17
-
18
-
19
-
20
-
21
-
22
-
23
-
24
-
25
-
26
-
27
-
28
-
29
-
30
-
31
-
32
-
33
-
34
-
35
-
36
-
37
-
38
-
39
-
40
-
41
-
42
-
43
-
44
-
45
-
46
-
47
-
48
-
49
-
50
-
51
-
52
-
53
-
54
-
55
-
56
-
57
-
58
-
59
-
60
-
61
-
62
-
63
-
64
-
65
-
66
-
67
-
68
-
69
-
70
-
71
-
72
-
73
-
74
-
75
-
76
-
77
-
78
-
79
-
80
-
81
-
82
-
83
-
84
-
85
-
86
-
87
-
88
-
89
-
90
-
91
-
92
-
93
-
94
-
95
-
96
 |
 |

Safe Operation Practices • Assembly • Operation • Product Care
O
PERATOR
’
S
M
ANUAL
Steering Wheel
Zero-Turn Tractor
NOTE:
This Operator’s Manual covers several models. Features may vary by model. Not all features in this manual are
applicable to all models and the model depicted may differ from yours.
WARNING
Read and follow all safety rules and instructions in this manual before attempting to operate
this machine.
Failure to comply with these instructions may result in personal injury - SAVE THESE INSTRUCTIONS.
WARNING
CALIFORNIA PROPOSITION 65
Engine Exhaust, some of its constituents and certain vehicle components contain or emit chemicals
known to the State of California to cause cancer and birth defects or other reproductive harm.
Battery posts, terminals, and related accessories contain lead and lead compounds, chemicals
known to the State of California to cause cancer and reproductive harm. Wash hands after handling.
www.p65warnings.ca.gov
Record Product Information
Before setting up and operating your new equipment, please
locate the model plate on the equipment and record the
information in the provided area to the right. You can locate
the model plate by lifting up the seat and looking under the
seat pan. This information will be necessary, should you seek
technical support via our web site or with your local authorized
service dealer.
Model Number
Serial Number
English
......................................................................................................................................
Page 1
Spanish (Español)
....................................................................................................................
Page 32
French (Français)
......................................................................................................................
Page 65
Form No. 769-26093
(October 7, 2021)