Cub Cadet ZTS1 42 Operation Manual - Page 23
Storing the Tractor, Maintenance
 |
View all Cub Cadet ZTS1 42 manuals
Add to My Manuals
Save this manual to your list of manuals |
Page 23 highlights
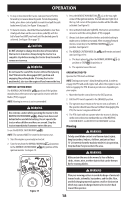
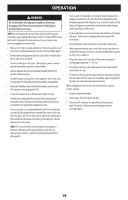
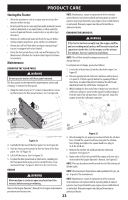
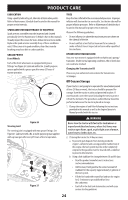
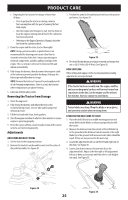
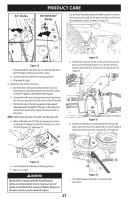
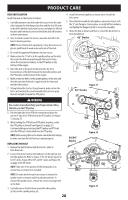
PRODUCT CARE Storing the Tractor • Allow the machine to cool in an open area for at least five minutes before storing. • Do not park the tractor near any flammable materials (wood, cloth or chemicals) or any open flames or other potential source of ignition (furnace, water heater or any other type of heater). • Remove all combustible materials from the tractor before storing. Empty cargo boxes, grass catchers or containers. • Always shut off fuel flow when storing or transporting if tractor is equipped with a fuel shutoff. • Check the fuel system (lines, tank, cap and fittings) per the Maintenance Schedule for cracks or leaks. Repair and clean as necessary. Maintenance REMOVING THE FLOOR PANEL WARNING Do not operate tractor with floor panel removed. The floor panel can be removed for maintenance, service and cleaning. To remove the floor panel: 1. Using the multi-tool or a 1/2" socket, remove the hex screw (a) that secures the floor panel in place. See 1 in Figure 24. NOTE: Maintenance, repair or replacement of the emission control devices and systems which are being done at owner's expense may be performed by any engine repair establishment or individual. Warranty repairs must be performed by an authorized dealer. CHANGING THE ENGINE OIL WARNING If the tractor has been recently run, the engine, muffler, and surrounding metal surfaces will be very hot and can cause burns to the skin. Let the engine cool for at least five minutes. Exercise caution to avoid burns. NOTE: The oil filter should be changed at every oil change interval. To complete an oil change, proceed as follows: 1. Locate the oil drain hose (a) on the side of the engine. See Figure 25. 2. Place an appropriate oil collection container with at least a 2.5 quart (2.37 liter) capacity below the opening of the oil drain hose, to collect the used oil. Remove the oil fill cap/ dipstick (b) from the oil fill tube. See Figure 25. 3. While holding the free end of the oil drain hose over the oil collection container, unscrew the square head hose plug (c) from the end of the oil drain hose. See Figure 25. Drain the engine oil into the collection container. 4 1 (a) (b) (d) 2 3 (a) (c) Figure 25 Figure 24 2. Carefully lift the rear of the floor panel. See 2 in Figure 24. 3. Slide the floor panel rearward to free the front of the floor panel. See 3 in Figure 24. 4. Lift it off the tractor. See 4 in Figure 24. 5. To place the floor panel back on the tractor, carefully put the floor panel back in place and re-install the hex screw removed in Step 1. Torque to 108-132 in-lbs (12-15 N-m). 4. After draining the oil, wipe any residual oil from the oil drain hose. Thread the square head hose plug into the oil drain hose fitting and tighten the square head hose plug to 16 ft-lbs (22 N-m). 5. Remove the oil filter (d) and drain into the collection container. See Figure 25. 6. Replace the oil filter (d) and refill the engine with new oil as instructed in the Engine Operator's Manual. See Figure 25. NOTE: Place an absorbent towel beneath the oil filter to keep oil off the clutch. ENGINE NOTE: Observe proper disposal laws and regulations for gas, oil, WARNING Allow machine to cool in an open area for at least five minutes before storing or refueling. Refer to the Engine Operator's Manual for all engine maintenance procedures and instructions. etc. to protect the environment. NOTE: Maintenance, repair or replacement of the emission control devices and systems which are being done at owner's expense may be performed by any engine repair establishment or individual. Warranty repairs must be performed by an authorized dealer. 23
-
 1
1 -
2
-
3
-
4
-
5
-
6
-
7
-
8
-
9
-
10
-
11
-
12
-
13
-
14
-
15
-
16
-
17
-
 18
18 -
 19
19 -
 20
20 -
 21
21 -
 22
22 -
 23
23 -
 24
24 -
 25
25 -
 26
26 -
 27
27 -
 28
28 -
29
-
30
-
31
-
32
-
33
-
34
-
35
-
36
-
37
-
38
-
39
-
40
-
41
-
42
-
43
-
44
-
45
-
46
-
47
-
48
-
49
-
50
-
51
-
52
-
53
-
54
-
55
-
56
-
57
-
58
-
59
-
60
-
61
-
62
-
63
-
64
-
65
-
66
-
67
-
68
-
69
-
70
-
71
-
72
-
73
-
74
-
75
-
76
-
77
-
78
-
79
-
80
-
81
-
82
-
83
-
84
-
85
-
86
-
87
-
88
-
89
-
90
-
91
-
92
-
93
-
94
-
95
-
96
 |
 |