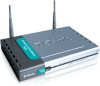
D-Link DI-764 Product Manual
D-Link DI-764 Manual
 |
View all D-Link DI-764 manuals
Add to My Manuals
Save this manual to your list of manuals |
D-Link DI-764 manual content summary:
- D-Link DI-764 | Product Manual - Page 1
D-LINK AirPro DI-764 2.4 GHz / 5 GHz Multimode Wireless Broadband Router Manual Building Networks for People - D-Link DI-764 | Product Manual - Page 2
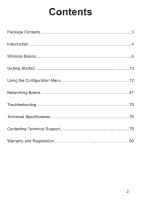
Contents Package Contents 3 Introduction 4 Wireless Basics 6 Getting Started 10 Using the Configuration Menu 12 Networking Basics 41 Troubleshooting 70 Technical Specifications 76 Contacting Technical Support 79 Warranty and Registration 80 2 - D-Link DI-764 | Product Manual - Page 3
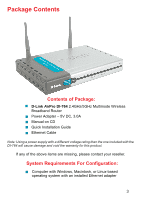
Contents of Package: ! D-Link AirPro DI-764 2.4GHz/5GHz Multimode Wireless Broadband Router ! Power Adapter - 5V DC, 3.0A ! Manual on CD ! Quick Installation Guide ! Ethernet Cable Note: Using a power supply with a different voltage rating than the one included with the DI-764 will cause damage and - D-Link DI-764 | Product Manual - Page 4
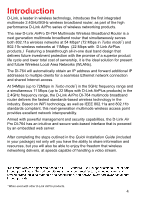
first integrated multimode 2.4GHz/5GHz wireless broadband router, as part of the high performance D-Link AirPro series of wireless networking products. The new D-Link AirPro DI-764 Multimode Wireless Broadband Router is a next generation multimode broadband router that simultaneously serves both 802 - D-Link DI-764 | Product Manual - Page 5
D-Link 2.4GHz AirPlus or 5GHz AirPro Wireless Adapters into an existing network. Please take a look at the Getting Started section in this manual to see an example of an Infrastructure network using the DI-764. Connections Pressing the Reset Button restores the router to its original factory default - D-Link DI-764 | Product Manual - Page 6
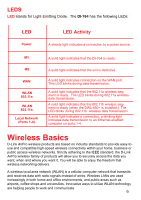
are based on industry standards to provide easy-touse and compatible high-speed wireless connectivity within your home, business or public access wireless networks. Strictly adhering to the IEEE standard, the D-Link AirPro wireless family of products will allow you to securely access the data you - D-Link DI-764 | Product Manual - Page 7
and desktop systems support the same protocols as Ethernet adapter cards. Under many circumstances, it may be desirable for mobile network devices to link to a conventional Ethernet LAN in order to use servers, printers or an Internet connection supplied through the wired LAN. A Wireless Router is - D-Link DI-764 | Product Manual - Page 8
The DI-764 is compatible with other D-Link AirPro 802.11a products, which include: ♦ 5GHz Wireless Cardbus Adapters used with laptop computers (DWL-A650) ♦ 5GHz Wireless PCI Adapters used with desktop computers (DWL-A520) The DI-764 is also compatible with the D-Link AirPlus 802.11b wireless family - D-Link DI-764 | Product Manual - Page 9
these basic guidelines: 1. Keep the number of walls and ceilings between the DI-764 and your receiving device (e.g., the DWL-A650 or the DWL-650+) to a minimum each wall or ceiling can reduce your D-Link AirPro Wireless product's range from 3-90 feet (1-30 meters.) Position your receiving devices so - D-Link DI-764 | Product Manual - Page 10
Network example, shown here, contains the following D-Link network devices: A wireless Broadband Router - D-Link AirPro DI-764 A laptop computer with a wireless adapter - D-Link AirPro DWL-A650 or AirPlus DWL-650+ A desktop computer with a wireless adapter - D-Link AirPro DWL-A520 or AirPlus DWL-520 - D-Link DI-764 | Product Manual - Page 11
the modem Connect the modem to the DI-764 multimode wireless broadband router (see the Quick Installation Guide included with the DI-764.) If you are connecting a desktop computer to your network, you can install the D-Link AirPro DWL-A520 (or the DWL-520+) wireless PCI adapter into an available PCI - D-Link DI-764 | Product Manual - Page 12
changed the default IP Address assigned to the DI-764, make sure to enter the correct IP Address. ! Type admin in the User Name field ! Leave the Password blank ! Click Next Connect to 192.168.0.1 admin The Home>Wizard screen will appear. Please refer to the Quick Installation Guide for - D-Link DI-764 | Product Manual - Page 13
must share the same channel. Turbo Mode- select ON or OFF. The default setting is OFF. If you enable Turbo mode on the DI-764, make sure to also enable Turbo mode on all 802.11a wireless clients or a wireless connection will not be established. WEP- select Enabled or Disabled. Disabled is - D-Link DI-764 | Product Manual - Page 14
or Disabled. Disabled is the default setting. WEP Encryption- select the level of encryption desired: 64, 128 or 256-bit WEP (Wired Equivalent Privacy) If you enable encryption on the DI-764 make sure to also enable encryption on all 802.11b wireless clients or wireless connection will not be - D-Link DI-764 | Product Manual - Page 15
MAC Address- Apply- most Cable modem users will select this option to obtain an IP Address automatically from their ISP (Internet Service Provider). this is optional, but may be required by some ISPs. The host name is the device name of the Router. the default MAC Address is set to the WAN - D-Link DI-764 | Product Manual - Page 16
Using the Configuration Menu Home > WAN > Static IP Address Static IP Address- select this option to set static IP information provided to you by your ISP. IP Address- input the IP Address provided by your ISP Subnet Mask- input your Subnet mask. (All devices in the network must have the same - D-Link DI-764 | Product Manual - Page 17
DSL users will select this option.) Dynamic PPPoE- receive an IP Address automatically from your ISP. or Static PPPoE-you have an assigned (static) IP Address. your PPPoE username provided by your ISP. your PPPoE password provided by your ISP. Retype Password- re-enter the PPPoE password Service - D-Link DI-764 | Product Manual - Page 18
disable this feature, enter zero or enable Auto-reconnect. MTU- Maximum Transmission Unit-1472 is default-you may need to change the MTU to conform with your ISP. Auto-reconnect- if enabled, the DI-764 will automatically connect to your ISP after your system is restarted or if the connection is - D-Link DI-764 | Product Manual - Page 19
"Obtain an IP Address Automatically." When you turn your computers on, they will automatically load the proper TCP/IP settings provided by the DI-764. The DHCP Server will automatically allocate an unused IP address from the IP address pool to the requesting computer. You must specify the starting - D-Link DI-764 | Product Manual - Page 20
Menu Advanced > Virtual Server The DI-764 can be configured as a virtual server so that remote users accessing Web or FTP services via the public IP address can be automatically redirected to local servers in the LAN (Local Area Network). The DI-764 firewall feature filters out unrecognized packets - D-Link DI-764 | Product Manual - Page 21
Using the Configuration Menu Advanced > Virtual Server continued The DI-764 is also capable of port-redirection meaning incoming traffic to a particular port may be redirected to a different port on the server computer. Each virtual service that is created will be listed at the bottom of the screen - D-Link DI-764 | Product Manual - Page 22
the Configuration Menu Advanced > Virtual Server continued Click on this icon to edit the virtual service Click on this icon to delete the virtual service Example #2: If you have an FTP server that you wanted Internet users to access by WAN port 2100 and only during the weekends, you would need to - D-Link DI-764 | Product Manual - Page 23
Applications makes some of these applications work with the DI-764. If you need to run applications that require multiple public ports associated with the trigger port to open them for inbound traffic. The DI-764 provides some predefined applications in the table on the bottom of the web page. - D-Link DI-764 | Product Manual - Page 24
are used to deny or allow LAN (Local Area Network) computers from accessing the Internet. The DI-764 can be setup to deny internal computers by their IP or MAC addresses. The DI-764 can also block users from accessing restricted web sites. IP Filters Use IP Filters to deny LAN IP addresses from - D-Link DI-764 | Product Manual - Page 25
Using the Configuration Menu Advanced > Filters > URL Blocking URL Blocking is used to deny LAN computers from accessing specific web sites by its URL. A URL is a specially formatted text string that defines a location on the Internet. If any part of the URL contains the blocked word, the site will - D-Link DI-764 | Product Manual - Page 26
Area Network) computers by their MAC addresses from accessing the Internet. You can either manually add a MAC address or select the MAC address from the list of clients that are currently connected to the Broadband Router. Filters- select the filter you wish to use; in this case, MAC filters was - D-Link DI-764 | Product Manual - Page 27
you wish to use; in this case, Domain Blocking was chosen. select Disabled to disable Domain Blocking allows users to access all domains except Blocked Domains denies users access to all domains except Permitted Domains enter the Permitted Domains in this field Blocked Domains- enter the Blocked - D-Link DI-764 | Product Manual - Page 28
. It works in the same way as IP Filters with additional settings. You can create more detailed access rules for the DI-764. When virtual services are created and enabled, it will also display in Firewall Rules. Firewall Rules contains all network firewall rules pertaining to IP (Internet Protocol - D-Link DI-764 | Product Manual - Page 29
Using the Configuration Menu Advanced > DMZ If you have a client PC that cannot run Internet applications properly from behind the DI-764, then you can set the client up to unrestricted Internet access. It allows a computer to be exposed to the Internet. This feature is useful for - D-Link DI-764 | Product Manual - Page 30
- beacons are packets sent by the DI-764 to synchronize a wireless network. Specify a value. 100 is the default setting and is recommended. RTS Threshold- this value should remain at its default setting of 2342. If inconsistent data flow is a problem, only a minor modification should be made - D-Link DI-764 | Product Manual - Page 31
Point portion of the DI-764. beacons are packets sent by the DI-764 to synchronize a wireless network. Specify a value. 100 is the default setting and is recommended. this value should remain at its default setting of 2342. If inconsistent data flow is a problem, only a minor modification should - D-Link DI-764 | Product Manual - Page 32
the DI-764 on the network, the device must be listed in the MAC Address Control List Apply- click Apply to save changes Tools> Admin Administrator Login Name User Login Name admin is the default login name for the Admin account user is the default login name for the User account Admin Password - D-Link DI-764 | Product Manual - Page 33
Management Remote Management allows the DI-764 to be configured from the Internet by a web browser. A username and password is still required to access computer allowed to configure the DI-764. Port: For security purposes, select a separate port number used to access the Router. (The following is an - D-Link DI-764 | Product Manual - Page 34
current settings to the local Hard Drive Load Settings from Local Hard Drive- click Browse to find the settings, then click Load Restore to Factory Default Settings- click Restore to restore the factory - D-Link DI-764 | Product Manual - Page 35
Menu Tools > Firmware Firmware Upgrade- click on the link in this screen to find out if there is an updated firmware; if so, download the new firmware to your hard drive. Browse- after you have downloaded the new firmware, click Browse in this window to locate the firmware update on your - D-Link DI-764 | Product Manual - Page 36
click Enabled to block the WAN ping the DI-764 supports VPN (Virtual Private Network) pass-through for both PPTP (Point-to-Point Tunneling Protocol) and IPSec (IP Security). Once VPN pass-through is enabled, there is no need to open up virtual services. Multiple VPN connections can be made through - D-Link DI-764 | Product Manual - Page 37
Using the Configuration Menu Status > Device Info Device Information- This screen displays information about the DI-764 37 - D-Link DI-764 | Product Manual - Page 38
Using the Configuration Menu Status > Log View LogLog Settings- this screen displays the activity on the DI-764 for advanced features, click on Log Settings 38 - D-Link DI-764 | Product Manual - Page 39
Traffic Statistics- displays the receive and transmit packets that are passing through the DI-764. Click on Refresh or Reset, for the most recent information. Status > Wireless Connected Wireless Client List- displays the wireless clients that are connected to the Access Point function of the - D-Link DI-764 | Product Manual - Page 40
Using the Configuration Menu Help Help- displays the complete Help menu. For help at anytime, click the Help tab in the Configuration menu. 40 - D-Link DI-764 | Product Manual - Page 41
Networking Basics Using the Network Setup Wizard in Windows XP In this section you will learn how to establish a network at home or work, using Microsoft Windows XP. Note: Please refer - D-Link DI-764 | Product Manual - Page 42
Networking Basics Please follow all the instructions in this window: Click Next In the following window, select the best description of your computer. If your computer connects to the internet through a gateway/router, select the second option as shown. Click Next 42 - D-Link DI-764 | Product Manual - Page 43
Networking Basics Enter a Computer description and a Computer name (optional.) Click Next Enter a Workgroup name. All computers on your network should have the same Workgroup name. Click Next 43 - D-Link DI-764 | Product Manual - Page 44
Networking Basics Please wait while the Network Setup Wizard applies the changes. When the changes are complete, click Next. Please wait while the Network Setup Wizard configures the computer. This may take a few minutes. 44 - D-Link DI-764 | Product Manual - Page 45
Networking Basics In the window below, select the option that fits your needs. In this example, Create a Network Setup Disk has been selected. You will run this disk on each of the computers on your network. Click Next. Insert a disk into the Floppy Disk Drive, in this case drive A. 45 - D-Link DI-764 | Product Manual - Page 46
Networking Basics Please read the information under Here's how in the screen below. After you complete the Network Setup Wizard you will use the Network Setup Disk to run the Network Setup Wizard once on each of the computers on your network. To continue click Next. 46 - D-Link DI-764 | Product Manual - Page 47
the computer. Click Yes to restart the computer. You have completed configuring this computer. Next, you will need to run the Network Setup Disk on all the other computers on your network. After running the Network Setup Disk on all your computers, your new wireless network will be ready to use. 47 - D-Link DI-764 | Product Manual - Page 48
Networking Basics Naming your Computer To name your computer, please follow these directions:In Windows XP: ! Click Start (in the lower left corner of the screen) ! Right-click on My Computer ! Select Properties and click ! Select the Computer Name Tab in the System Properties window. ! You may - D-Link DI-764 | Product Manual - Page 49
must have the same Workgroup name. ! Click OK Checking the IP Address in Windows XP The wireless adapter-equipped computers in your network must be in the same IP Address range (see Getting Started in this manual for a definition of IP Address Range.) To check on the IP Address of the adapter - D-Link DI-764 | Product Manual - Page 50
Protocol) technology. If you are using a DHCP-capable Gateway/Router you will not need to assign Static IP Addresses. If you are not using a DHCP capable Gateway/Router, or you need to assign a Static IP Address, please follow these instructions: ! Go to Start ! Double-click on Control Panel 50 - D-Link DI-764 | Product Manual - Page 51
Networking Basics Assigning a Static IP Address in Windows XP/2000 ! Double-click on Network Connections ! Right-click on Local Area Connections ! Double-click on Properties 51 - D-Link DI-764 | Product Manual - Page 52
all the computers on the network. ! Enter the IP Address of the Default Gateway (in this case it is 192.168.0.1 for the DI-764) ! Input your DNS server address. The DNS server address will be supplied by your ISP (Internet Service Provider). If the DNS Server address is not available from your ISP - D-Link DI-764 | Product Manual - Page 53
Ethernet in the Show pull-down menu ! Select Manually in the Configure pull-down menu ! Input the Static IP Address, the Subnet Mask and the Router IP Address in the appropriate fields ! Input the Domain Name Server address. Your ISP (Internet Service Provider) will provide the IP address of the - D-Link DI-764 | Product Manual - Page 54
in the Show pull-down menu ! Select Using DHCP in the Configure pull-down menu ! Click Apply Now ! The IP Address, Subnet mask, and the Router's IP Address will appear in a few seconds 54 - D-Link DI-764 | Product Manual - Page 55
. Type ping xxx.xxx.xxx.xxx, where xxx is the IP Address of the Wireless Router or Access Point. A good wireless connection will show four replies from the Wireless Router or Acess Point, as shown. Checking the Wireless Connection by Pinging in Windows Me and 98 ! Go to Start > Run > type command - D-Link DI-764 | Product Manual - Page 56
connected to your network through a Gateway/Router,) use the Add Printer Wizard. Please follow the directions below: First, make sure that you have run the Network Setup Wizard on all of the computers on your and Sharing files and folders in the Help and Support Center in Microsoft Windows XP. 56 - D-Link DI-764 | Product Manual - Page 57
Networking Basics Adding a local printer (a printer connected directly to a computer) A printer that is not shared on the network and is connected directly to one computer is called a local printer. If you do not need to share your printer on a network, follow these directions to add the printer to - D-Link DI-764 | Product Manual - Page 58
Networking Basics Adding a local printer ! Click Next ! Select Local printer attached to this computer ! (Deselect Automati- cally detect and install my Plug and Play printer if it has been selected.) ! Click Next ! Select Use the following port: ! From the pull-down menu select the correct port for - D-Link DI-764 | Product Manual - Page 59
Networking Basics Adding a local printer ! Select and highlight the correct driver for your printer. ! Click Next (If the correct driver is not displayed, insert the CD or floppy disk that came with your printer and click Have Disk.) ! At this screen, you can change the name of the printer (optional - D-Link DI-764 | Product Manual - Page 60
Networking Basics Adding a local printer This screen gives you information about your printer. Click Finish When the test page has printed, Click OK 60 - D-Link DI-764 | Product Manual - Page 61
will display the printer icon as shown at right. You have successfully added a local printer. Sharing a network printer After you have run the Network Setup Wizard on all the computers on your network, you can run the Add Printer Wizard on all the computers on your network. Please follow these - D-Link DI-764 | Product Manual - Page 62
Networking Basics Sharing a network printer ! Click on Add a printer ! Click Next ! Select Network Printer ! Click Next 62 - D-Link DI-764 | Product Manual - Page 63
Networking Basics Sharing a network printer ! Select Browse for a printer ! Click Next Select the printer you would like to share ! Click Next ! Click Finish 63 - D-Link DI-764 | Product Manual - Page 64
network: ! Remember the printer name ! Run the Add Printer Wizard on all the computers on your network ! Make sure you have already run the Network Setup Wizard on all the network computers After you run the Add Printer Wizard on all the computers in the network, you can share the printer - D-Link DI-764 | Product Manual - Page 65
an LPR printer (using a print server,) you will need a Print Server such as the DP-101P+. Please make sure that you have run the Network Setup Wizard on all the computers on your network. To share an LPR printer, please follow these directions: ! Go to Start > Printers and Faxes ! Click on - D-Link DI-764 | Product Manual - Page 66
Networking Basics Sharing an LPR printer ! Select Create a new port ! From the pull-down menu, select Standard TCP/IP Port, as shown. ! Click Next ! Please read the instructions on this screen ! Click Next ! Enter the Printer IP Address and the Port Name, as shown. ! Click Next 66 - D-Link DI-764 | Product Manual - Page 67
Networking Basics Sharing an LPR printer ! In this screen, select Custom ! Click Settings ! Enter the Port Name and the Printer Name or IP Address. ! Select LPR ! Enter a Queue Name (if your PrintServer/ Gateway has more than one port, you will need a Queue name.) ! Click OK 67 - D-Link DI-764 | Product Manual - Page 68
Networking Basics Sharing an LPR printer ! This screen will show you information about your printer. ! Click Finish ! Select the printer you are adding from the list of Printers. ! Insert the printer driver disk that came with your printer. ! Click Have Disk If the printer driver is already - D-Link DI-764 | Product Manual - Page 69
. ! Please run the Add Printer Wizard on all the computers on your network in order to share the printer. Note: You must run the Network Setup Wizard on all the computers on your network before you run the Add Printer Wizard. 69 - D-Link DI-764 | Product Manual - Page 70
Troubleshooting This Chapter provides solutions to problems that can occur during the installation and operation of the DI-764 Wireless Broadband Router. We cover various aspects of the network setup, including the network adapters. Please read the following if you are having problems. Note: It is - D-Link DI-764 | Product Manual - Page 71
available network, as shown in the illustrations below. default ! Check that the IP Address assigned to the wireless adapter is within the same IP Address range as the access point and gateway. (Since the DI-764 has an IP Address of 192.168.0.1, wireless adapters must have an IP Address in the same - D-Link DI-764 | Product Manual - Page 72
Troubleshooting 3. Check that the drivers for the network adapters are installed properly. You may be using different network adapters than those illustrated here, but this procedure - D-Link DI-764 | Product Manual - Page 73
Troubleshooting ! Double-click on Network Adapters ! Right-click on D-Link AirPro DWL-A650 Wireless Cardbus Adapter ! Select Properties to check that the drivers are installed properly ! Look under Device Status to check that the device is working properly ! Click OK 73 - D-Link DI-764 | Product Manual - Page 74
Considerations in the Wireless Basics section of this manual for further information about the most advantageous placement of your D-Link wireless products. 5. Why does my wireless connection keep dropping? ! Antenna Orientation- Try different antenna orientations for the DI-764. Try to keep - D-Link DI-764 | Product Manual - Page 75
other methods for troubleshooting your network, you may choose to Reset the DI-764 to the factory default settings. Remember that D-Link AirPro products network together, out of the box, at the factory default settings. To hard-reset the D-Link AirPro DI-764 to Factory Default Settings, please do - D-Link DI-764 | Product Manual - Page 76
WAN Port (1) Power - 5V DC, 3A Network Management • Web-Based Interface Network Architecture • .. Diagnostic LED .• • Range • Supports Infrastructure Mode Power 100M Link/Act 10M Link/Act 11a WLAN 11b WLAN Indoors - up to 328 feet (100 meters) Temperature • • Operating: 0ºC to 40ºC (32ºF to - D-Link DI-764 | Product Manual - Page 77
• 5.150 - 5.350 GHz Modulation Technology: • Orthogonal Frequency Division Multiplexing (OFDM) Antenna Type: • 5dBi dipole antenna with diversity *Maximum wireless signal rate based on IEEE Standard 802.11a specifications. Actual data throughput will vary. Network conditions and environmental - D-Link DI-764 | Product Manual - Page 78
802.11a Specifications (continued) Modulation Techniques: • BPSK • QPSK • 16 QAM • 64 QAM 802.11b Specifications Data Rates: • 1, 2, 5.5, 11, 22 Mbps (with Automatic Fallback) Data Security: • 64, 128, 256-bit WEP (Wired Equivalent Privacy) Encryption Available Channels: • Eleven - D-Link DI-764 | Product Manual - Page 79
over the Telephone: (877) 453-5465 24 hours a day, seven days a week. D-Link Technical Support over the Internet: http://support.dlink.com When contacting technical support, please provide the following information: • Serial number of the unit • Model number or product name • Software type and - D-Link DI-764 | Product Manual - Page 80
defective Hardware during the Warranty Period at no charge to the original owner or to refund at D-Link's sole discretion. Such repair or replacement will be rendered by D-Link at an Authorized D-Link Service Office. The replacement Hardware need not be new or have an identical make, model or part - D-Link DI-764 | Product Manual - Page 81
package. Do not include any manuals or accessories in the shipping package. D-Link will only replace the defective firmware or other products or services provided by anyone other than DLink; Products that have been purchased from inventory clearance or liquidation sales or other sales in which D-Link - D-Link DI-764 | Product Manual - Page 82
not installed and used in accordance with the instructions, may cause harmful interference to radio communication be determined by turning the equipment off and on, the user is encouraged to try to correct the interference by one Link prod(u02c/t1a0/t0h3t)tp://support.dlink.com/register/ 02/10/03 82
-
 1
1 -
 2
2 -
 3
3 -
 4
4 -
 5
5 -
 6
6 -
 7
7 -
8
-
9
-
10
-
11
-
12
-
13
-
14
-
15
-
16
-
17
-
18
-
19
-
20
-
21
-
22
-
23
-
24
-
25
-
26
-
27
-
28
-
29
-
30
-
31
-
32
-
33
-
34
-
35
-
36
-
37
-
38
-
39
-
40
-
41
-
42
-
43
-
44
-
45
-
46
-
47
-
48
-
49
-
50
-
51
-
52
-
53
-
54
-
55
-
56
-
57
-
58
-
59
-
60
-
61
-
62
-
63
-
64
-
65
-
66
-
67
-
68
-
69
-
70
-
71
-
72
-
73
-
74
-
75
-
76
-
77
-
78
-
79
-
80
-
81
-
82
 |
 |

2.4 GHz / 5 GHz Multimode
Manual
Building Networks for People
Air
Pro DI-764
Wireless Broadband Router
D-LINK