D-Link DNR-2020-04P User Manual - Page 14
drive has been inserted correctly, the HDD LED will light up.
 |
View all D-Link DNR-2020-04P manuals
Add to My Manuals
Save this manual to your list of manuals |
Page 14 highlights
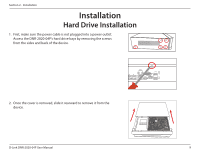
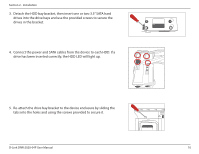
Section 2 - Installation 3. Detach the HDD bay bracket, then insert one or two 3.5" SATA hard drives into the drive bays and use the provided screws to secure the drives in the bracket. 4. Connect the power and SATA cables from the device to each HDD. If a drive has been inserted correctly, the HDD LED will light up. 5. Re-attach the drive bay bracket to the device enclosure by sliding the tabs into the holes and using the screws provided to secure it. D-Link DNR-2020-04P User Manual 10
-
 1
1 -
2
-
3
-
4
-
5
-
6
-
7
-
8
-
 9
9 -
 10
10 -
 11
11 -
 12
12 -
 13
13 -
 14
14 -
 15
15 -
 16
16 -
 17
17 -
 18
18 -
 19
19 -
20
-
21
-
22
-
23
-
24
-
25
-
26
-
27
-
28
-
29
-
30
-
31
-
32
-
33
-
34
-
35
-
36
-
37
-
38
-
39
-
40
-
41
-
42
-
43
-
44
-
45
-
46
-
47
-
48
-
49
-
50
-
51
-
52
-
53
-
54
-
55
-
56
-
57
-
58
-
59
-
60
-
61
-
62
-
63
-
64
-
65
-
66
-
67
-
68
-
69
-
70
-
71
-
72
-
73
-
74
-
75
-
76
-
77
-
78
-
79
-
80
 |
 |

10
D-Link DNR-2020-04P User Manual
Section 2 - Installation
3. Detach the HDD bay bracket, then insert one or two 3.5” SATA hard
drives into the drive bays and use the provided screws to secure the
drives in the bracket.
4. Connect the power and SATA cables from the device to each HDD. If a
drive has been inserted correctly, the HDD LED will light up.
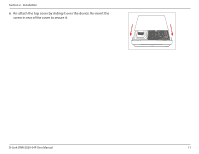
5. Re-attach the drive bay bracket to the device enclosure by sliding the
tabs into the holes and using the screws provided to secure it.