D-Link DSM-750 Product Manual - Page 27
Wireless Setup
 |
UPC - 790069288975
View all D-Link DSM-750 manuals
Add to My Manuals
Save this manual to your list of manuals |
Page 27 highlights
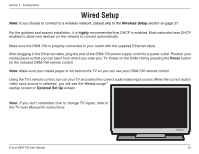
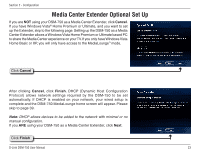
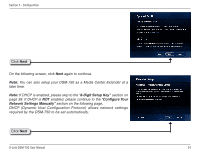
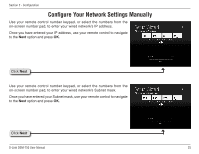
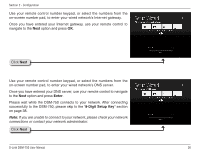
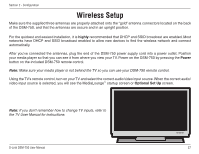
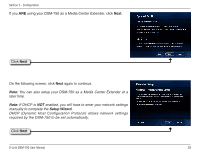
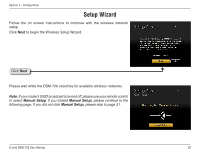
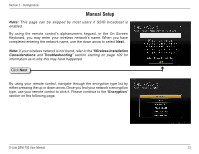
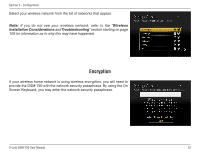
Section 2 - Configuration Wireless Setup Make sure the supplied three antennas are properly attached onto the "gold" antenna connectors located on the back of the DSM-750, and that the antennas are secure and in an upright position. For the quickest and easiest installation, it is highly recommended that DHCP and SSID broadcast are enabled. Most networks have DHCP and SSID broadcast enabled to allow new devices to find the wireless network and connect automatically. After you've connected the antennas, plug the end of the DSM-750 power supply cord into a power outlet. Position your media player so that you can see it from where you view your TV. Power on the DSM-750 by pressing the Power button on the included DSM-750 remote control. Note: Make sure your media player is not behind the TV so you can use your DSM-750 remote control. Using the TV's remote control, turn on your TV and select the correct audio/video input source. When the correct audio/ video input source is selected, you will see the MediaLounge™ startup screen or Optional Set Up screen. Note: If you don't remember how to change TV inputs, refer to the TV User Manual for instructions. D-Link DSM-750 User Manual 27
-
 1
1 -
2
-
3
-
4
-
5
-
6
-
7
-
8
-
9
-
10
-
11
-
12
-
13
-
14
-
15
-
16
-
17
-
18
-
19
-
20
-
21
-
 22
22 -
 23
23 -
 24
24 -
 25
25 -
 26
26 -
 27
27 -
 28
28 -
 29
29 -
 30
30 -
 31
31 -
 32
32 -
33
-
34
-
35
-
36
-
37
-
38
-
39
-
40
-
41
-
42
-
43
-
44
-
45
-
46
-
47
-
48
-
49
-
50
-
51
-
52
-
53
-
54
-
55
-
56
-
57
-
58
-
59
-
60
-
61
-
62
-
63
-
64
-
65
-
66
-
67
-
68
-
69
-
70
-
71
-
72
-
73
-
74
-
75
-
76
-
77
-
78
-
79
-
80
-
81
-
82
-
83
-
84
-
85
-
86
-
87
-
88
-
89
-
90
-
91
-
92
-
93
-
94
-
95
-
96
-
97
-
98
-
99
-
100
-
101
-
102
-
103
-
104
-
105
-
106
-
107
-
108
-
109
-
110
-
111
-
112
-
113
-
114
-
115
-
116
-
117
-
118
-
119
-
120
-
121
-
122
-
123
-
124
-
125
-
126
-
127
-
128
-
129
-
130
-
131
-
132
-
133
-
134
-
135
-
136
-
137
-
138
 |
 |
