Dacor RNHE48 Installation Instructions - Page 14
Rotating the Blowers for Rear, Exhaust, Installing the Holding Brackets, cont.
 |
View all Dacor RNHE48 manuals
Add to My Manuals
Save this manual to your list of manuals |
Page 14 highlights
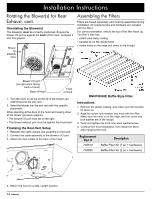
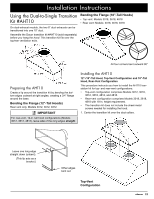
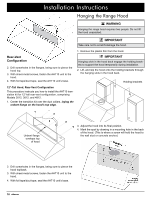
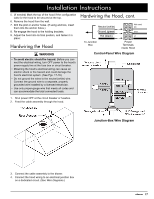
Installation Instructions Installing the Holding Brackets, cont. Holding-Bracket Centerline Distance Models RNHP, RNHE A 3012, 3018 12 1/2 in (31.8 cm) 3612, 3618 7 1/8 in (18.1 cm) 4812, 4818 17 in (43.2 cm) Rotating the Blower(s) for Rear Exhaust Perform this procedure before you hang the hood. WARNING • Only install the hood if the electrical service provided meets the hood's specifications. • Observe all governing codes and ordinances during installation. Contact your local building department for details. • Only a qualified technician may install this built-in appliance. Multiple persons are needed to lift the hood into place. The owner shall verify proper installation. Top Exhaust Rear Exhaust Marking the Centerlines and Brackets Attaching the Brackets to the Wall The blowers (fans) can be rotated so air vents out the back of the hood. The hood comes from the factory in the top-exhaust configuration; if you intend to use that configuration, you do not need to alter the blower's position. If, however, the hood will be installed in a rear-exhaust configuration, the blowers must be rotated so the exhaust vents through the rear of the hood. Tools Needed 5/16" Nut driver Cable ties • AHT10 Transition kit (option), metal screws, foil tape • 10" ducts, ducting material 8" Duct and ducting materials Phillips screwdriver 12
-
 1
1 -
2
-
3
-
4
-
5
-
6
-
7
-
8
-
 9
9 -
 10
10 -
 11
11 -
 12
12 -
 13
13 -
 14
14 -
 15
15 -
 16
16 -
 17
17 -
 18
18 -
 19
19 -
20
-
21
-
22
-
23
-
24
-
25
 |
 |
