Dacor RNHE48 Installation Instructions - Page 15
Rotating the Blowers for Rear, Exhaust, cont.
 |
View all Dacor RNHE48 manuals
Add to My Manuals
Save this manual to your list of manuals |
Page 15 highlights
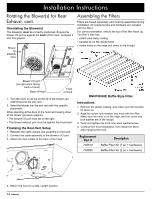
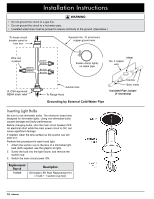
Installation Instructions Rotating the Blower(s) for Rear Exhaust, cont. The images in this section were chosen to illustrate the intended information and may not exactly represent the hood being installed. Disassembling Parts 1. Unhook and remove the grease channel. 3. Unscrew the cable clamp(s), and remove the hardware that holds the blower and L-bracket (previous graphic). 4. Detach the blower and plate, and place them nearby. Orientating the Blower/Vent L-Brackets 1. Unscrew, and remove the L-bracket that is in the default top-venting orientation. Top of Hood Grease Channel 2. (Taking care not to scratch the hood) Place the hood assembly on a large, flat surface. Duct Collar Back of Hood Blower/Vent L-Bracket Default Orientation: Top Vent Open Rear Vent Closed Back of Hood 2. Turn and align the L-bracket so the hole is in back of the hood, allowing a rear-venting configuration. 3. Remove the duct collar from the hood top. (Save the collar and screws.) Removing the Blower(s) 1. Carefully set the hood on its back to access the bottom. Top of Hood blower plate L-Bracket 2. Find the end of the cable assembly plugged into the bottom left of the blower, then squeeze and unplug the connector. (To avoid damaging the cable assembly contacts and wires, always pull by the connector.) Back of Hood Blower/Vent L-Bracket Rotated Blower Orientation: Top Vent Closed Rear Vent Open 13
-
 1
1 -
2
-
3
-
4
-
5
-
6
-
7
-
8
-
9
-
 10
10 -
 11
11 -
 12
12 -
 13
13 -
 14
14 -
 15
15 -
 16
16 -
 17
17 -
 18
18 -
 19
19 -
 20
20 -
21
-
22
-
23
-
24
-
25
 |
 |
