Dacor RNHE48 Installation Instructions - Page 17
Using the Dual-to-Single Transition, Kit #AHT10
 |
View all Dacor RNHE48 manuals
Add to My Manuals
Save this manual to your list of manuals |
Page 17 highlights
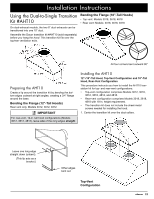
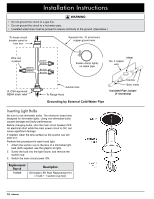
Installation Instructions Using the Dual-to-Single Transition Kit #AHT10 On dual-exhaust models, the two 8" duct exhausts can be transitioned into one 10" duct. Assemble the Dacor transition kit #AHT10 (sold separately) before you hang the hood. This transition kit fits over the top/rear ventilation exits. Bending the Flange (18"-Tall Hoods) • Top vent: Models 3018, 3618, 4818 • Rear vent: Models: 3018, 3618, 4818 All four corners bent outward 90° Preparing the AHT10 Create a lip around the transition kit by bending the bottom edges outward at right angles, creating a 3/4" flange around the base. Bending the Flange (12"-Tall Hoods) Rear vent only, Models 3012, 3612, 4812 IMPORTANT For rear-vent, 12-in. tall hood configurations (Models 3012, 3612, 4812), leave one of the long edges straight. Installing the AHT10 12"-/18"-Tall Hood, Top-Vent Configuration and 18"-Tall Hood, Rear-Vent Configuration This procedure instructs you how to install the AHT10 transistion kit for top- and rear-vent configurations. • Top-vent configuration comprises Models 3012, 3018, 3612, 3618, 4812, and 4818. • Rear-vent configuration comprises Models 3018, 3618, 4818 with 18-in. height requirement. • The transition kit does not include the sheet-metal screws needed for installing the hood. 1. Center the transition kit over the duct collars. Leave one long edge straight down (unbent). (This lip acts as a bracket.) Other edges bent out Top-Vent Configuration 15
-
 1
1 -
2
-
3
-
4
-
5
-
6
-
7
-
8
-
9
-
10
-
11
-
 12
12 -
 13
13 -
 14
14 -
 15
15 -
 16
16 -
 17
17 -
 18
18 -
 19
19 -
 20
20 -
 21
21 -
 22
22 -
23
-
24
-
25
 |
 |
