Dacor RNHE48 Installation Instructions - Page 19
Hardwiring the Hood, Hardwiring the Hood, cont.
 |
View all Dacor RNHE48 manuals
Add to My Manuals
Save this manual to your list of manuals |
Page 19 highlights
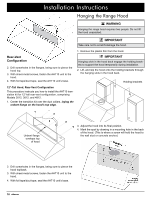
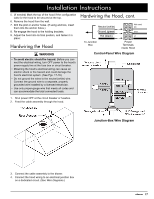
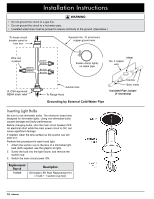
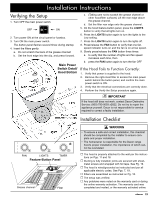
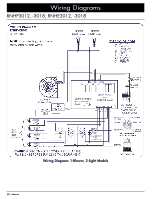
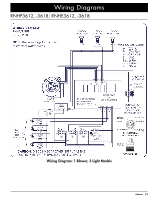
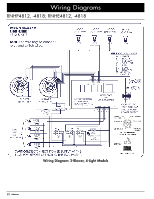
Installation Instructions 5. (If needed) Mark the top of the hood if the configuration calls for the hood to be secured at the top. 6. Remove the hood from the wall. 7. Drill the pilot or anchor holes. (If using anchors, insert them into the anchor holes.) 8. Re-engage the hood to the holding brackets. 9. Adjust the hood into its final position, and fasten it in place: Hardwiring the Hood WARNING • To avoid electric shock/fire hazard: Before you connect the electrical wiring, turn OFF power to the hood's power-supply line at the fuse box or circuit breaker. • Miswiring the hood's electrical wiring can cause an electric shock or fire hazard and could damage the hood's electrical system. (See Pgs. 17-19.) • Do not ground the wires to the neutral (white) wire. Connect the ground wire to a separate, properly grounded wire installed by a licensed electrician. • Use only proper-gauge wire that meets all codes and can accommodate the total connected loads. Hardwiring the Hood, cont. Neutral (white) Ground (green) Hot (black) Not used N1 Gnd L1 To Junction Box Power Terminals inside Hood Control-Panel Wire Diagram 1. Shut power OFF at the circuit breaker or fusebox. 2. Feed the cable assembly through the hood. Junction-Box Wire Diagram 3. Connect the cable assembly to the blower. 4. Connect the hood wiring to an electrical junction box on a dedicated circuit. (See Wire Diagrams.) 17
-
 1
1 -
2
-
3
-
4
-
5
-
6
-
7
-
8
-
9
-
10
-
11
-
12
-
13
-
 14
14 -
 15
15 -
 16
16 -
 17
17 -
 18
18 -
 19
19 -
 20
20 -
 21
21 -
 22
22 -
 23
23 -
 24
24 -
25
 |
 |
