Dell A960 Owner's Manual - Page 47
Dell All-In-One Center, Dell AIO Printer
 |
View all Dell A960 manuals
Add to My Manuals
Save this manual to your list of manuals |
Page 47 highlights
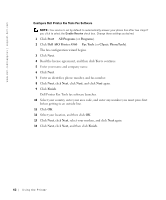
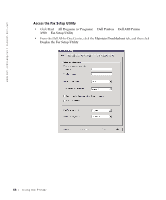
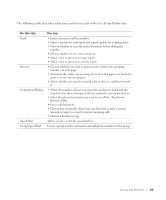
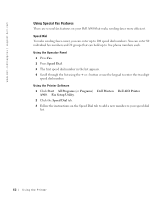
Using Dell Printer Fax Tools Fax Software 1 Make sure your printer and computer are on. 2 Load your document on the scanner glass or into the ADF. For help, see page 28 or page 30. 3 Make sure your printer is connected to a computer with a data/fax modem and the modem is connected to an active telephone line. 4 Click Start → All Programs (or Programs) → Dell Printers, → Dell AIO Printer A960 → Dell All-In-One Center. 5 Place the document you want to fax face down under the lid of the printer. 6 From the Productivity Tools section, select Fax an image or document. 7 Select the correct option for your document under What is being scanned. 8 Select No under Is there more than one page. 9 Click Next. The document is scanned and Dell Printer Fax Tools launches. Send Multiple Page Faxes You can send multiple page faxes using the printer operator panel or the printer software. Using the Operator Panel 1 Make sure your printer is on and connected to a computer with a data/fax modem and the modem is connected to an active telephone line. 2 Load your document into the ADF. For help, see page 30. 3 Press Fax. 4 Enter the fax number using the numbers on the keypad. 5 Press Black or Color. NOTE: In order to send a color fax from your printer, the machine to which you are sending the fax must also support color faxes. Using the Printer 47
-
 1
1 -
2
-
3
-
4
-
5
-
6
-
7
-
8
-
9
-
10
-
11
-
12
-
13
-
14
-
15
-
16
-
17
-
18
-
19
-
20
-
21
-
22
-
23
-
24
-
25
-
26
-
27
-
28
-
29
-
30
-
31
-
32
-
33
-
34
-
35
-
36
-
37
-
38
-
39
-
40
-
41
-
 42
42 -
 43
43 -
 44
44 -
 45
45 -
 46
46 -
 47
47 -
 48
48 -
 49
49 -
 50
50 -
 51
51 -
 52
52 -
53
-
54
-
55
-
56
-
57
-
58
-
59
-
60
-
61
-
62
-
63
-
64
-
65
-
66
-
67
-
68
-
69
-
70
-
71
-
72
-
73
-
74
-
75
-
76
-
77
-
78
-
79
-
80
-
81
-
82
-
83
-
84
-
85
-
86
-
87
-
88
-
89
-
90
-
91
-
92
-
93
-
94
-
95
-
96
-
97
-
98
-
99
-
100
-
101
-
102
-
103
-
104
-
105
-
106
-
107
-
108
-
109
-
110
-
111
-
112
-
113
-
114
-
115
-
116
-
117
-
118
-
119
-
120
-
121
 |
 |