Dell Dimension 4200 Dell Dimension 4200 Solutions Guide - Page 53
Adding Other Drives, 5.25-Inch Devices
 |
View all Dell Dimension 4200 manuals
Add to My Manuals
Save this manual to your list of manuals |
Page 53 highlights
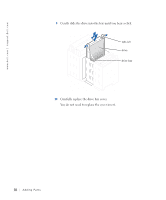
CAUTION: Before you begin any of the procedures in this section, follow the safety instructions on page 7. NOTICE: To avoid possibly damaging the drive by electrostatic discharge (ESD), ground yourself by periodically touching an unpainted metal surface on the back of the computer. Your computer includes a floppy drive and a CD or DVD drive. You can add other devices, such as a Zip drive, a CD-RW drive, or a tape drive. 5.25-Inch Devices CAUTION: Before you begin any of the procedures in this section, follow the safety instructions on page 7. 1 Turn off the computer and any attached devices, and disconnect them from their electrical outlets. NOTICE: To disconnect a network cable, first unplug the cable from your computer and then unplug it from the network wall jack. 2 Press the power button. 3 Unpack the drive and prepare it for installation. See the drive documentation to ensure that the drive is set up for your computer. 4 Remove the two short, green plastic rails from the inside of the computer cover. These rails are not attached to the computer cover with screws. To remove the rails, gently ease the rails up and down. 5 Attach the rails to the drive using the two screws supplied with the drive. Ensure that the rail tabs are positioned at the back of the drive. 6 Open the computer cover (see page 40). HINT: Tape drives sold by Dell come with their own operating software and documentation. After you install a tape drive, refer to the documentation that came with the drive for instructions on installing and using the tape drive software. Adding Parts 53
-
 1
1 -
2
-
3
-
4
-
5
-
6
-
7
-
8
-
9
-
10
-
11
-
12
-
13
-
14
-
15
-
16
-
17
-
18
-
19
-
20
-
21
-
22
-
23
-
24
-
25
-
26
-
27
-
28
-
29
-
30
-
31
-
32
-
33
-
34
-
35
-
36
-
37
-
38
-
39
-
40
-
41
-
42
-
43
-
44
-
45
-
46
-
47
-
 48
48 -
 49
49 -
 50
50 -
 51
51 -
 52
52 -
 53
53 -
 54
54 -
 55
55 -
 56
56 -
 57
57 -
 58
58 -
59
-
60
-
61
-
62
-
63
-
64
-
65
-
66
-
67
-
68
-
69
-
70
-
71
-
72
-
73
-
74
-
75
-
76
-
77
-
78
-
79
-
80
-
81
-
82
-
83
-
84
-
85
-
86
-
87
-
88
-
89
-
90
-
91
-
92
-
93
-
94
-
95
-
96
-
97
-
98
-
99
-
100
-
101
-
102
-
103
-
104
-
105
-
106
-
107
-
108
-
109
-
110
-
111
-
112
-
113
-
114
 |
 |
