Dell Force10 S5000 Installation Guide - Page 10
Hardware Installation Overview, S5000 I/O and Utility Panels
 |
View all Dell Force10 S5000 manuals
Add to My Manuals
Save this manual to your list of manuals |
Page 10 highlights
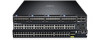
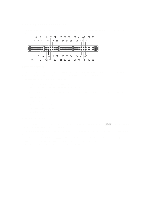
Figure 1. S5000 I/O and Utility Panels 1. I/O panel 2. Utility panel 3. Four 40GbE QSFP+ ports (each port ALSO supports 4 × 10GbE mode) Hardware Installation Overview To install the S5000, follow these steps: 1. Attach the mounting brackets. 2. Install the S5000 chassis into a 4-post rack or cabinet. 3. Ground the rack. 4. Install the Ethernet and/or Fibre Channel modules (Fibre Channel module must be installed only in slot 0). 5. Install the power supplies. 6. Secure the power cables. 7. Install the fan modules. 8. Install the SFP+ and QSFP+ optics. 9. Supply power and power up the system. 10
-
 1
1 -
2
-
3
-
4
-
 5
5 -
 6
6 -
 7
7 -
 8
8 -
 9
9 -
 10
10 -
 11
11 -
 12
12 -
 13
13 -
 14
14 -
 15
15 -
16
-
17
-
18
-
19
-
20
-
21
-
22
-
23
-
24
-
25
-
26
-
27
-
28
-
29
-
30
-
31
-
32
-
33
-
34
-
35
-
36
-
37
-
38
-
39
-
40
-
41
-
42
-
43
-
44
-
45
-
46
-
47
-
48
-
49
-
50
 |
 |

Figure 1. S5000 I/O and Utility Panels
1. I/O panel
2. Utility panel
3. Four 40GbE QSFP+ ports (each port ALSO supports 4 × 10GbE mode)
Hardware Installation Overview
To install the S5000, follow these steps:
1.
Attach the mounting brackets.
2.
Install the S5000 chassis into a 4–post rack or cabinet.
3.
Ground the rack.
4.
Install the Ethernet and/or Fibre Channel modules (Fibre Channel module must be installed only in slot 0).
5.
Install the power supplies.
6.
Secure the power cables.
7.
Install the fan modules.
8.
Install the SFP+ and QSFP+ optics.
9.
Supply power and power up the system.
10