Dell Force10 S5000 Installation Guide - Page 24
Installing the S5000 Chassis into a 4-Post Rack or Cabinet, Rack Grounding
 |
View all Dell Force10 S5000 manuals
Add to My Manuals
Save this manual to your list of manuals |
Page 24 highlights
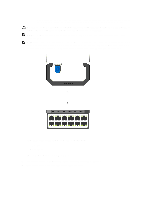
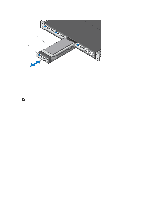
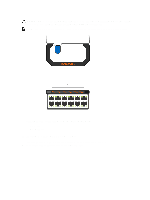
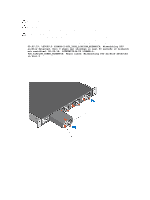
Installing the S5000 Chassis into a 4-Post Rack or Cabinet NOTE: Dell Networking recommends that one person hold the S5000 chassis in place while a second person attaches the brackets to the posts. Attach the bracket "ears" to the rack or cabinet posts, using two screws for each bracket. Ensure the screws are tightened firmly. Figure 10. Front Rack Installation 1. Screws 2. 4-Post Rack or Cabinet 3. Mounting Bracket Rack Grounding When you prepare your equipment rack, ensure that the rack is earth ground. You must ground the equipment rack to the same ground point the power service uses in your area. The ground path must be permanent. Important Points to Remember for Installing an Ethernet Module • Installing and swapping of Ethernet modules must be done BEFORE power up. If you need to install or replace a module, power down the system before you install or replace it. If you install or replace a module when the system is powered up, the system does not recognize the module. Online insertion of modules can result in a catastrophic failure. • Although the handle and port numbering may appear differently on an Ethernet module, there is no functional difference. A module may have: - A larger handle that covers the entire front of the module and has the part number written on top of the handle. Port numbering is written on the front of the handle. 24
-
 1
1 -
2
-
3
-
4
-
5
-
6
-
7
-
8
-
9
-
10
-
11
-
12
-
13
-
14
-
15
-
16
-
17
-
18
-
 19
19 -
 20
20 -
 21
21 -
 22
22 -
 23
23 -
 24
24 -
 25
25 -
 26
26 -
 27
27 -
 28
28 -
 29
29 -
30
-
31
-
32
-
33
-
34
-
35
-
36
-
37
-
38
-
39
-
40
-
41
-
42
-
43
-
44
-
45
-
46
-
47
-
48
-
49
-
50
 |
 |
