Dell Inspiron Mini 10 1010 Service Manual - Page 37
Replacing the System Board, Entering the Service Tag in the BIOS, Setting the Keyboard Matrix
 |
View all Dell Inspiron Mini 10 1010 manuals
Add to My Manuals
Save this manual to your list of manuals |
Page 37 highlights
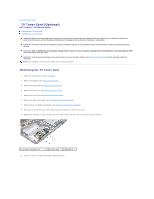
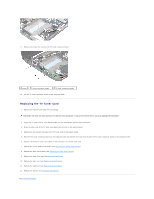
Replacing the System Board 1. Place the system board on the computer base. 2. Replace the two screws that secure the system board to the computer base. 3. Replace the 3-in-1 Media Card Reader (see Replacing the Media Card Reader). 4. Replace the TV tuner card (see Replacing the TV Tuner Card). 5. Replace the Mini-Cards (see Replacing the Mini-Card). 6. Replace the 2-in-1 processor and memory board (see Replacing the 2-in-1 Memory and Processor Board). 7. Replace the coin-cell battery (see Replacing the Coin-Cell Battery). 8. Replace the palm rest bracket (see Replacing the Palm Rest Bracket). 9. Replace the hard drive (see Replacing the Hard Drive). 10. Replace the palm rest (see Replacing the Palm Rest). 11. Replace the keyboard (see Replacing the Keyboard). 12. Replace the battery (see Replacing the Battery). CAUTION: Before turning on the computer, replace all screws and ensure that no stray screws remain inside the computer. Failure to do so may result in damage to the computer. 13. Turn on the computer. NOTE: After you have replaced the system board, enter the computer's Service Tag into the BIOS of the replacement system board. 14. Enter the service tag (see Entering the Service Tag in the BIOS). 15. The keyboard matrix may change after you replace the system board. To set the keyboard matrix according to your country, see Setting the Keyboard Matrix. Entering the Service Tag in the BIOS 1. Ensure that the AC adapter is plugged in and that the main battery is installed properly. 2. Press during POST to enter the system setup program. 3. Navigate to the security tab and enter the service tag in the Set Service Tag field. Setting the Keyboard Matrix 1. Turn off your computer (see Turning Off Your Computer). 2. If your computer is connected to the AC adapter, disconnect the AC adapter from the computer. 3. Press and hold the following key combination for the desired keyboard matrix: ¡ All countries except Brazil: ¡ Brazil only: 4. Connect the AC adapter to the computer and then plug it into a wall outlet or surge protector.
-
 1
1 -
2
-
3
-
4
-
5
-
6
-
7
-
8
-
9
-
10
-
11
-
12
-
13
-
14
-
15
-
16
-
17
-
18
-
19
-
20
-
21
-
22
-
23
-
24
-
25
-
26
-
27
-
28
-
29
-
30
-
31
-
 32
32 -
 33
33 -
 34
34 -
 35
35 -
 36
36 -
 37
37 -
 38
38 -
 39
39 -
 40
40 -
 41
41 -
 42
42 -
43
-
44
 |
 |