Dell Inspiron Mini 9 910 Inspiron Mini 9 Service Manual - Page 37
Replacing the System Board, Setting the Keyboard Matrix
 |
View all Dell Inspiron Mini 9 910 manuals
Add to My Manuals
Save this manual to your list of manuals |
Page 37 highlights
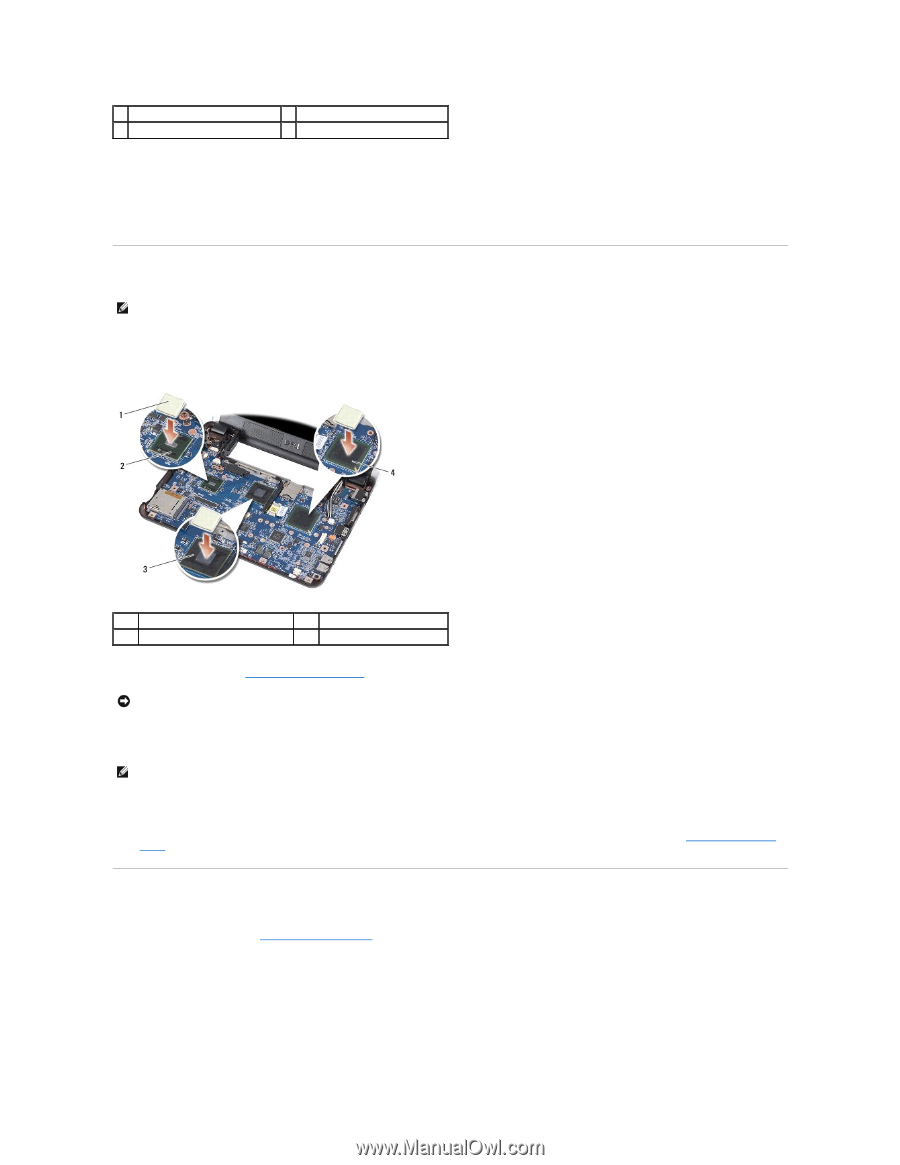
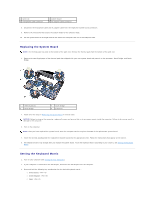
1 screw (2) 3 microphone cable connector 2 system board 4 AC adapter cable connector 8. Disconnect the microphone cable and AC adapter cable from the respective system board connectors. 9. Remove the two screws that secure the system board to the computer base. 10. Lift the system board at an angle towards the side of the computer and out of the computer base. Replacing the System Board NOTE: The thermal pads may stick to the bottom of the palm rest. Remove the thermal pads from the bottom of the palm rest. 1. Remove the centrifugal paper of the thermal pads that shipped with your new system board and paste it on the processor, North Bridge, and South Bridge. 1 thermal pad (3) 3 north bridge 2 south bridge 4 processor 2. Follow all of the steps in Removing the System Board in reverse order. NOTICE: Before turning on the computer, replace all screws and ensure that no stray screws remain inside the computer. Failure to do so may result in damage to the computer. 3. Turn on the computer. NOTE: After you have replaced the system board, enter the computer Service Tag into the BIOS of the replacement system board. 4. Insert the CD that accompanied the replacement system board into the appropriate drive. Follow the instructions that appear on the screen. 5. The keyboard matrix may change after you replace the system board. To set the keyboard matrix according to your country, see Setting the Keyboard Matrix. Setting the Keyboard Matrix 1. Turn off your computer (see Turning Off Your Computer). 2. If your computer is connected to the AC adapter, disconnect the AC adapter from the computer. 3. Press and hold the following key combination for the desired keyboard matrix:- ¡ United States: ¡ United Kingdom: ¡ Japan:
-
 1
1 -
2
-
3
-
4
-
5
-
6
-
7
-
8
-
9
-
10
-
11
-
12
-
13
-
14
-
15
-
16
-
17
-
18
-
19
-
20
-
21
-
22
-
23
-
24
-
25
-
26
-
27
-
28
-
29
-
30
-
31
-
 32
32 -
 33
33 -
 34
34 -
 35
35 -
 36
36 -
 37
37 -
 38
38
 |
 |