Dell M410HD User Guide
Dell M410HD Manual
 |
UPC - 884116026440
View all Dell M410HD manuals
Add to My Manuals
Save this manual to your list of manuals |
Dell M410HD manual content summary:
- Dell M410HD | User Guide - Page 1
Dell™ M410HD Projector User's Guide - Dell M410HD | User Guide - Page 2
use of your projector. NOTICE: A NOTICE indicates either potential damage to hardware or loss of data and tells you how to avoid the problem. CAUTION: A CAUTION of Dell Inc. is strictly forbidden. Trademarks used in this text: Dell and the DELL logo are trademarks of Dell Inc.; DLP and DLP logo are - Dell M410HD | User Guide - Page 3
Your Dell Projector 5 About Your Projector 6 2 Connecting Your Projector 8 Projector 14 Turning Your Projector On 14 Turning Your Projector Off 14 Adjusting the Projected Image 15 Raising the Projector Height 15 Lowering the Projector Height 15 Adjusting the Projector Zoom and Focus - Dell M410HD | User Guide - Page 4
Remote Control 25 Using the On-Screen Display 26 Main Menu 26 AUTO-ADJUST 26 INPUT SELECT 27 PICTURE (in PC Mode 28 PICTURE (in Video Mode 28 DISPLAY (in PC Mode 30 DISPLAY (in Video Mode 31 LAMP 32 SET UP 32 INFORMATION 34 OTHERS 34 4 Troubleshooting Your Projector 41 Guiding Signals - Dell M410HD | User Guide - Page 5
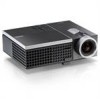
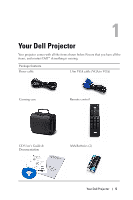
Dell Projector Your projector comes with all the items shown below. Ensure that you have all the items, and contact Dell™ if anything is missing. Package Contents Power cable 1.8m VGA cable (VGA to VGA) Carrying case Remote control CD User's Guide & Documentation AAA Batteries (2) Your Dell - Dell M410HD | User Guide - Page 6
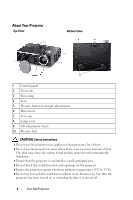
Your Projector Top View 1 6 Bottom View 8 10 2 3 7 5 4 9 1 Control panel 2 Zoom tab 3 Focus ring 4 Lens 5 Elevator button for height adjustments 6 IR receivers 7 Lens cap 8 Lamp cover 9 Tilt adjustment wheel 10 Elevator foot CAUTION: Safety Instructions 1 Do not use the projector near - Dell M410HD | User Guide - Page 7
on as it may cause injury to your eyes. 8 Do not place any objects near or in front of the projector or cover its lens while the projector is on as the heat may cause the object to melt or burn. NOTE: For more information, see the Safety Information that is shipped with - Dell M410HD | User Guide - Page 8
2 Connecting Your Projector 1 2 3 4 56 7 9 1 USB remote connector 2 VGA input (D-sub) connector 3 HDMI connector 4 S-video connector 5 Composite video connector 8 begin any of the procedures in this section, follow the Safety Instructions as described on page 6. 8 Connecting Your Projector - Dell M410HD | User Guide - Page 9
a Computer Connecting a Computer Using a VGA Cable 1 2 3 1 Power cord 2 VGA to VGA cable 3 USB-A to USB-B cable NOTE: The USB cable is not provided with your projector. NOTE: The USB cable must be connected if you want to use the Page Up and Page Down features on the remote control. Connecting Your - Dell M410HD | User Guide - Page 10
Connecting a DVD Player Connecting a DVD Player Using an S-video Cable 1 2 1 Power cord 2 S-video cable NOTE: The S-video cable is not shipped with your projector. You can purchase the S-Video extension (50 ft/100 ft) cable on the Dell website at dell.com. 10 Connecting Your Projector - Dell M410HD | User Guide - Page 11
Connecting a DVD Player Using a Composite Video Cable 1 2 1 Power cord 2 Composite video cable NOTE: The Composite Video cable is not shipped with your projector. You can purchase the Composite Video Extension (50 ft/100 ft) cable on the Dell website at dell.com. Connecting Your Projector 11 - Dell M410HD | User Guide - Page 12
a DVD Player Using a Component Video Cable 1 2 1 Power cord 2 VGA to Component Video cable NOTE: The VGA to Component Video cable is not shipped with your projector. You can purchase the VGA to Component Video Extension (50 ft/100 ft) cable on the Dell website at dell.com. 12 Connecting Your - Dell M410HD | User Guide - Page 13
Connecting a DVD Player Using an HDMI Cable 1 2 1 Power cord 2 HDMI cable NOTE: The HDMI cable is not shipped with your projector. Connecting Your Projector 13 - Dell M410HD | User Guide - Page 14
8 for instructions to connect your source to the projector. 6 By default, the input source of projector is set to VGA-In. Change the input source of projector if necessary. 7 If you have multiple sources connected to the projector, press the Source button on the remote control or control panel to - Dell M410HD | User Guide - Page 15
hold for 1 second while the projector's cooling fans are still running. NOTE: Before you turn on the projector again, wait for 60 seconds to allow the internal temperature to stabilize. 4 Disconnect the power cord from the electrical outlet and the projector. Adjusting the Projected Image Raising - Dell M410HD | User Guide - Page 16
damaging the projector, ensure that the zoom lens and elevator foot are fully retracted before moving the projector or placing the projector in its carrying case. 1 Rotate the zoom tab to zoom in and out. 2 Rotate the focus ring until the image is clear. The projector focuses at distances ranging - Dell M410HD | User Guide - Page 17
Adjusting Projection Image Size 361"(916.94 cm) Projector to screen distance 39.37'(12.0m) 29.53'(9.0m) 22.97'(7.0m) 16.40'(5.0m) 9.84'(3.0m) (833238.1"2 cm) 270"(685.80 381.00 cm) (314377.9"8 cm) (20882."28 cm) 90"(288.60cm) 30"(76.20 cm) 27.2" (69.09 cm) 3.28'(1.0m) Using Your Projector 17 - Dell M410HD | User Guide - Page 18
cm) (496 cm) Distance 3.28' (1.0m) 9.84' (3.0m) 16.40' (5.0m) 22.97' (7.0m) 29.53' (9.0m) 39.37' (12.0m) * This graph is for user reference only. Using the Control Panel 1 2 3 10 9 8 4 5 6 7 18 Using Your Projector - Dell M410HD | User Guide - Page 19
blinking, one of the following problems could be occurring: • Lamp is reaching its end of usable life • Lamp module is not properly installed • Lamp driver failure • Color wheel failure For more information, see "Troubleshooting Your Projector" on page 41 and "Guiding Signals" on page 45. 2 TEMP - Dell M410HD | User Guide - Page 20
Left / Source 10 Enter Press to navigate through the On-Screen Display (OSD) Menu items. Press to adjust image distortion caused by tilting the projector (+40/-35 degrees). Press to activate the OSD. Use the directional keys and the Menu button to navigate through the OSD. Press to navigate through - Dell M410HD | User Guide - Page 21
Using the Remote Control 1 11 2 12 3 4 13 5 14 6 15 7 16 8 17 18 9 19 10 20 1 Power 2 Enter 3 Right 4 Down Turns the projector on or off. For more information, see "Turning Your Projector On" on page 14 and "Turning Your Projector Off" on page 14. Press to confirm the selection. - Dell M410HD | User Guide - Page 22
Down feature. 9 Video mode The projector has preset configurations that are optimized for displaying data (presentation slides) or video (movies, 14 Volume up Press to increase the volume. 15 Laser Point the remote control at the screen, press and hold the laser button to activate the laser - Dell M410HD | User Guide - Page 23
19 Auto adjust Press to synchronize the projector with the input source. Auto adjust does not operate if the OSD is displayed. 20 Keystone adjustment Press to adjust image distortion caused by tilting the projector (+40/-35 degrees). Using Your Projector 23 - Dell M410HD | User Guide - Page 24
Batteries NOTE: Remove the batteries from the remote control when not in use. 1 Press the tab to lift the battery compartment cover. 1 2 Check the polarity (+/-) marking on the of batteries or using new and old batteries together. 4 Slip the battery cover back. 4 24 Using Your Projector - Dell M410HD | User Guide - Page 25
Range With Remote Control Distance Angle Operating range Angle ±45° Distance 10m/32.8feet Angle Distance NOTE: Actual operating range may slightly differ from the diagram. Weak batteries will also prevent the remote control from properly operating the projector. Using Your Projector 25 - Dell M410HD | User Guide - Page 26
Menu, press the or buttons on your projector's control panel or remote control. • To select a submenu, press the button on your projector's control panel or remote control. • To select an option, press the or buttons on your projector's control panel or remote control. The color changes to dark blue - Dell M410HD | User Guide - Page 27
Source mode is set to Off, you can manually select the input signal. Select On to auto detect the available input signals. If you press the Source button when the projector is on, it automatically finds the next available input signal. VGA-Press to detect VGA signal. S-VIDEO-Press to detect S-Video - Dell M410HD | User Guide - Page 28
Menu. See "PICTURE ADVANCED" on page 29. PICTURE (in Video Mode) Using the Picture menu, you can adjust the display settings of your projector. The Picture menu provides the following options: VIDEO MODE-Allows you to optimize the display image: Presentation, Bright, Movie, sRGB (provides more - Dell M410HD | User Guide - Page 29
ADVANCED Using the Picture Advanced menu, you can adjust the display settings of your projector. The Picture Advanced menu provides the following options: WHITE INTENSITY-Use and to adjust mode. CUSTOM COLOR ADJUST-Allows you to manually adjust the colors red, green, and blue. Using Your Projector 29 - Dell M410HD | User Guide - Page 30
space, options are: RGB, YCbCr, and YPbPr. DISPLAY (in PC Mode) Using the Display menu, you can adjust the display settings of your projector. The Picture menu provides the following options: ASPECT RATIO-Allows you to select the aspect ratio to adjust how the image appears. • Original - Select - Dell M410HD | User Guide - Page 31
Allows you to change the display data clock frequency to match the frequency of your computer graphics card. If you see a vertical flickering wave, use Frequency control to minimize the bars. This is a coarse adjustment. TRACKING-Synchronize the phase of the display signal with the graphic card. If - Dell M410HD | User Guide - Page 32
, and dimmer luminance output on the screen. LAMP HOUR-Displays the operating hours since the last lamp timer reset. LAMP HOUR RESET-Select Yes to reset the lamp timer. SET UP The Set Up menu allows you to adjust settings for Language, Projector Mode, Keystone, and 3D Display. 32 Using Your - Dell M410HD | User Guide - Page 33
function. Default is Off. NOTE: To activate 3D Display function, ensure that 3D goggles, 3D video contents and 60Hz/120Hz signal output graphic card supported on PC/NB are ready. 3D Sync Invert-If you see a discrete or overlapping image while wearing DLP 3D goggles, you may need to execute 'Invert - Dell M410HD | User Guide - Page 34
INFORMATION The Information menu displays the current projector settings. OTHERS The Others menu allows you to change settings for Menu, Screen, Audio, Power, Security, and Closed Caption ( : MENU POSITION-Allows you to change the position of the OSD menu on the screen. 34 Using Your Projector - Dell M410HD | User Guide - Page 35
have the OSD disappear, press the Menu button on the control panel or remote control for 15 seconds, then disable the function. SCREEN SETTINGS-Select image, ensure the input signal that is connected to the projector is 1024 x 768 resolution. SCREEN-Select Dell to use the Dell logo as wallpaper. - Dell M410HD | User Guide - Page 36
, 90, or 120 minutes. If an input signal is not detected during the delay period, the projector turns off the lamp and goes into power saving mode. If an input signal is detected within the delay period, the projector automatically turns on. If an input signal is not detected within two hours during - Dell M410HD | User Guide - Page 37
Protect screen requesting you to enter a password will be displayed when the power plug is inserted into the electrical outlet and the power for the projector is first turned on. By default, this function is disabled. You can enable this feature by selecting Enabled. If the password has been set - Dell M410HD | User Guide - Page 38
incorrect password, you will be given another 2 chances. After the three invalid attempts, the projector will automatically turn off. NOTE: If you forget your password, contact DELL™ or qualified service personnel. 3 To disable the password function, select Off to disable the function. 4 To delete - Dell M410HD | User Guide - Page 39
CHANGE PASSWORD-Key in the original password, then enter the new password and confirm the new password again. CLOSED CAPTION-Select On to enable close caption and activate the closed caption menu. Select an appropriate closed captions option: CC1, CC2, CC3, and CC4. Using Your Projector 39 - Dell M410HD | User Guide - Page 40
focus and resolution. You can enable or disable the Test Pattern by selecting Off, 1 or 2. You can also invoke the Test Pattern 1 by pressing and holding down and buttons on the control by pressing and holding down and buttons on the control panel simultaneously for 2 seconds. Test Pattern 1: Test - Dell M410HD | User Guide - Page 41
the following troubleshooting tips. If the problem persists, contact Dell™. See Contacting Dell™ on page 53. Problem No image appears on the screen Missing Input Source. Cannot switch to particular Input Source. Possible Solution • Ensure that the lens cap is removed and the projector is turned - Dell M410HD | User Guide - Page 42
Others menu. Ensure that the colors of the test pattern are correct. Image is out of focus 1 Adjust the focus ring on the projector lens. 2 Ensure that the projection screen is within the required distance from the projector (3.28 ft [1 m] to 39.37 ft [12 m]). 42 Troubleshooting Your Projector - Dell M410HD | User Guide - Page 43
the LAMP light is solid amber, replace the lamp. If the LAMP light is blinking amber, Lamp module connection may be disrupted. Please check the lamp module and ensure that it is properly installed. If the LAMP light and the Power light are blinking amber, the lamp driver has failed and the projector - Dell M410HD | User Guide - Page 44
to unlock the OSD. Check the Menu Lock on page 35. The remote control is not operating smoothly or works only within a limited range The battery may be low. Check if the laser beam transmitted from the remote is too dim. If so, replace with 2 new AAA batteries. 44 Troubleshooting Your Projector - Dell M410HD | User Guide - Page 45
down. Turn the display on again after the projector cools down. If the problem persists, contact Dell. One of the fans has failed. The projector automatically shuts down. If the problem persists, contact Dell. The lamp driver has failed. The projector automatically shuts down. Unplug the power cord - Dell M410HD | User Guide - Page 46
connection failed Lamp is defective. Replace the lamp. Lamp module connection may be disrupted. Check the lamp module and ensure that it is properly installed. If the problem persists, contact Dell. OFF OFF OFF OFF OFF OFF OFF AMBER OFF AMBER Flashing 46 Troubleshooting Your Projector - Dell M410HD | User Guide - Page 47
under warranty to be returned to Dell™. Otherwise, contact your local waste disposal agency for the address of the nearest deposit site. 6 Replace with the new lamp. 7 Tighten the two screws that secure the lamp. 8 Replace the lamp cover and tighten the two screws. Troubleshooting Your Projector 47 - Dell M410HD | User Guide - Page 48
MERCURY AND MUST BE RECYCLED OR DISPOSED OF ACCORDING TO LOCAL, STATE OR FEDERAL LAWS. FOR MORE INFORMATION, GO TO WWW.DELL.COM/HG OR CONTACT THE ELECTRONIC INDUSTRIES ALLIANCE AT WWW.EIAE.ORG. FOR LAMP SPECIFIC DISPOSAL INFORMATION CHECK WWW.LAMPRECYCLE.ORG. 48 Troubleshooting Your Projector - Dell M410HD | User Guide - Page 49
5 Specifications Light Valve Brightness Contrast Ratio Uniformity Number of Pixels Displayable Color Color Wheel Speed Projection Lens Projection Screen Size Projection Distance Video Compatibility Power Supply Power Consumption Audio Noise Level Weight 0.65" WXGA S450 DMD, DarkChip3™ 2000 ANSI - Dell M410HD | User Guide - Page 50
for supporting HDMI 1.3. HDCP compliant. Analog Audio input: One 3.5 mm stereo mini phone jack (Blue). Variable audio output: One 3.5 mm stereo mini phone jack (Green). USB port: One USB slave for remote support. OSRAM 165 W user-replaceable lamp (up to 5000 hours in eco mode) 50 Specifications - Dell M410HD | User Guide - Page 51
NOTE: The lamp life rating for any projector is a measure of brightness degradation only, and is not a specification for the time it takes a lamp to fail and cease light output. Lamp life is defined as the time it takes for more than 50 percent of a lamp sample population to have brightness decrease - Dell M410HD | User Guide - Page 52
119.651 121.750 122.500 135.000 136.750 146.250 148.500 148.500 156.000 157.000 157.000 162.000 52 Specifications - Dell M410HD | User Guide - Page 53
or Dell product catalog. Dell™ provides several online and telephone-based support and service options. Availability varies by country and product, and some services may not be available in your area. To contact Dell for sales, technical support, or customer service issues: 1 Visit support.dell.com - Dell M410HD | User Guide - Page 54
unit for color temperature is Kelvin (K). Component Video - A method of delivering quality video in a format that consists of the luminance signal and two separate chrominance signals and are defined as Y'Pb'Pr' for analog component and Y'Cb'Cr' for digital component. Component video is available on - Dell M410HD | User Guide - Page 55
mirrors mounted on a hidden yoke. Focal Length - The distance from the surface of a lens to its focal point. Frequency - It is the rate of repetition in cycles per seconds of electrical signals. Measured in Hz (Hertz). HDCP - High-Bandwidth Digital-Content Protection - A specification developed - Dell M410HD | User Guide - Page 56
Green, Blue - typically used to describe a monitor that requires separate signals for each of the three colors. S-Video - A video transmission standard WXGA - Wide Extended Graphics Array - 1280 x 800 pixels count. Zoom Lens - Lens with a variable focal length that allows operator to move the view in - Dell M410HD | User Guide - Page 57
39 Connecting the Projector Composite video cable 11 Connecting with a Component Cable 12 Connecting with a Composite Cable 11 Connecting with an HDMI Cable 13 Connecting with an S-video D Dell contacting 53 M Main Unit 6 Control panel 6 Elevator button 6 Focus ring 6 IR receiver 6 Lens 6 Zoom tab - Dell M410HD | User Guide - Page 58
Settings 36 Powering On/Off the Projector Powering Off the Projector 14 Powering On the Projector 14 Q Quick Shutdown 36 58 Index R Remote Control 21 IR receiver 19 Reset 35 Reset, Factory 40 S Screen 35 Screen Settings 35 Security Settings 37 Specifications Audio 49 Brightness 49 Color Wheel - Dell M410HD | User Guide - Page 59
T telephone numbers 53 Test Pattern 40 Troubleshooting 41 Contact Dell 41 V Volume 36 Index 59
-
 1
1 -
 2
2 -
 3
3 -
 4
4 -
 5
5 -
 6
6 -
 7
7 -
8
-
9
-
10
-
11
-
12
-
13
-
14
-
15
-
16
-
17
-
18
-
19
-
20
-
21
-
22
-
23
-
24
-
25
-
26
-
27
-
28
-
29
-
30
-
31
-
32
-
33
-
34
-
35
-
36
-
37
-
38
-
39
-
40
-
41
-
42
-
43
-
44
-
45
-
46
-
47
-
48
-
49
-
50
-
51
-
52
-
53
-
54
-
55
-
56
-
57
-
58
-
59
 |
 |

Dell™ M410HD Projector
User’s Guide