Dell M410HD User Guide - Page 22
Video Mode, Presentation mode, Bright mode, Movie mode, Custom mode, Video, Caution - data projector
 |
UPC - 884116026440
View all Dell M410HD manuals
Add to My Manuals
Save this manual to your list of manuals |
Page 22 highlights
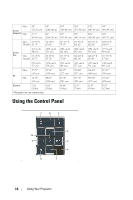
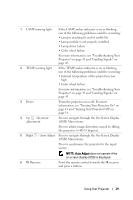
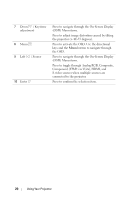
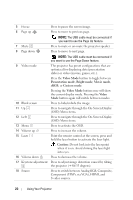
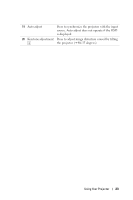
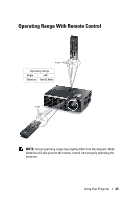
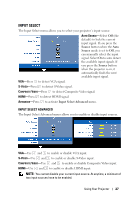
5 Freeze Press to pause the screen image. 6 Page up Press to move to previous page. NOTE: The USB cable must be connected if you want to use the Page Up feature. 7 Mute Press to mute or un-mute the projector speaker. 8 Page down Press to move to next page. NOTE: The USB cable must be connected if you want to use the Page Down feature. 9 Video mode The projector has preset configurations that are optimized for displaying data (presentation slides) or video (movies, games, etc.). Press the Video Mode button to toggle between Presentation mode, Bright mode, Movie mode, sRGB, or Custom mode. Pressing the Video Mode button once will show the current display mode. Pressing the Video Mode button again will switch between modes. 10 Blank screen Press to hide/unhide the image. 11 Up Press to navigate through the On-Screen Display (OSD) Menu items. 12 Left Press to navigate through the On-Screen Display (OSD) Menu items. 13 Menu Press to activate the OSD. 14 Volume up Press to increase the volume. 15 Laser Point the remote control at the screen, press and hold the laser button to activate the laser light. Caution: Do not look into the laser point when it is on. Avoid shining the laser light into eyes. 16 Volume down Press to decrease the volume. 17 Keystone adjustment Press to adjust image distortion caused by tilting the projector (+40/-35 degrees). 18 Source Press to switch between Analog RGB, Composite, Component (YPbPr, via VGA), HDMI, and S-video sources. 22 Using Your Projector
-
 1
1 -
2
-
3
-
4
-
5
-
6
-
7
-
8
-
9
-
10
-
11
-
12
-
13
-
14
-
15
-
16
-
 17
17 -
 18
18 -
 19
19 -
 20
20 -
 21
21 -
 22
22 -
 23
23 -
 24
24 -
 25
25 -
 26
26 -
 27
27 -
28
-
29
-
30
-
31
-
32
-
33
-
34
-
35
-
36
-
37
-
38
-
39
-
40
-
41
-
42
-
43
-
44
-
45
-
46
-
47
-
48
-
49
-
50
-
51
-
52
-
53
-
54
-
55
-
56
-
57
-
58
-
59
 |
 |