Dell M410HD User Guide - Page 29
PICTURE ADVANCED, Saturation, Sharpness, Advanced, Custom, Color Adjust - projector manual
 |
UPC - 884116026440
View all Dell M410HD manuals
Add to My Manuals
Save this manual to your list of manuals |
Page 29 highlights
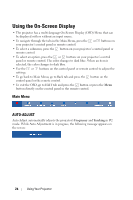
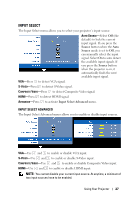
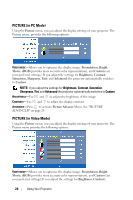
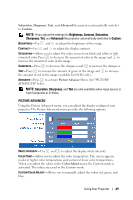
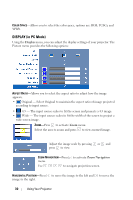
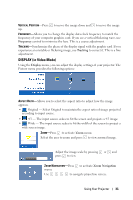
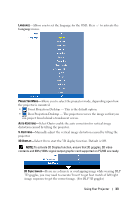
Saturation, Sharpness, Tint, and Advanced the projector automatically switches to Custom. NOTE: If you adjust the settings for Brightness, Contrast, Saturation, Sharpness, Tint, and Advanced the projector automatically switches to Custom. BRIGHTNESS-Use and to adjust the brightness of the image. CONTRAST-Use and to adjust the display contrast. SATURATION-Allows you to adjust the video source from black and white to fully saturated color. Press to decrease the amount of color in the image and to increase the amount of color in the image. SHARPNESS-Press to decrease the sharpness and to increase the sharpness. TINT-Press to increase the amount of green in the image and to increase the amount of red in the image (available for NTSC only). ADVANCED-Press to activate Picture Advance Menu. See "PICTURE ADVANCED" below. NOTE: Saturation, Sharpness, and Tint are only available when input source is from Composite or S-Video. PICTURE ADVANCED Using the Picture Advanced menu, you can adjust the display settings of your projector. The Picture Advanced menu provides the following options: WHITE INTENSITY-Use and to adjust the display white intensity. COLOR TEMP-Allows you to adjust the color temperature. The screen appears cooler at higher color temperatures and warmer at lower color temperatures. When you adjust the values in the Color Adjust menu, the Custom mode is activated. The values are saved in the Custom mode. CUSTOM COLOR ADJUST-Allows you to manually adjust the colors red, green, and blue. Using Your Projector 29
-
 1
1 -
2
-
3
-
4
-
5
-
6
-
7
-
8
-
9
-
10
-
11
-
12
-
13
-
14
-
15
-
16
-
17
-
18
-
19
-
20
-
21
-
22
-
23
-
 24
24 -
 25
25 -
 26
26 -
 27
27 -
 28
28 -
 29
29 -
 30
30 -
 31
31 -
 32
32 -
 33
33 -
 34
34 -
35
-
36
-
37
-
38
-
39
-
40
-
41
-
42
-
43
-
44
-
45
-
46
-
47
-
48
-
49
-
50
-
51
-
52
-
53
-
54
-
55
-
56
-
57
-
58
-
59
 |
 |