Dell OptiPlex GX200 Service Manual - Page 22
Internal View, Front-Panel Inserts
 |
View all Dell OptiPlex GX200 manuals
Add to My Manuals
Save this manual to your list of manuals |
Page 22 highlights
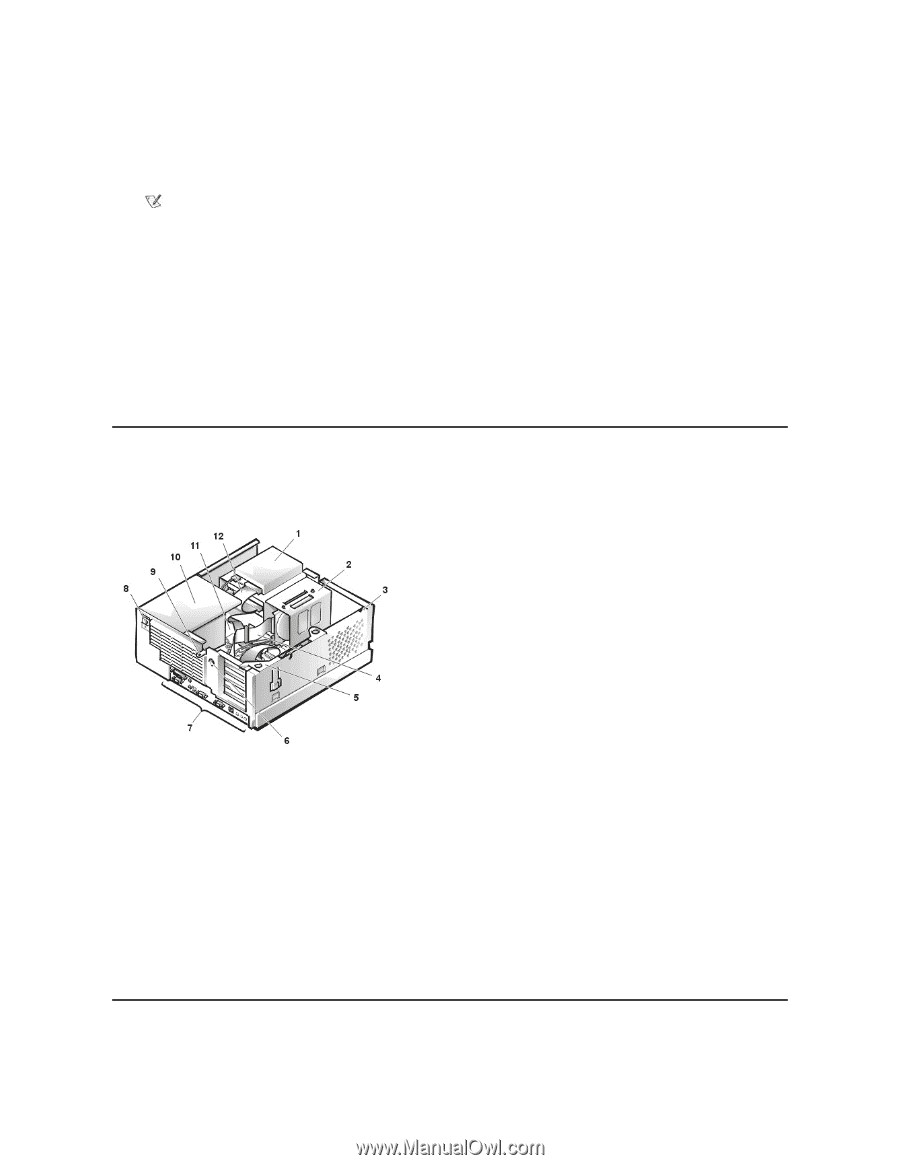
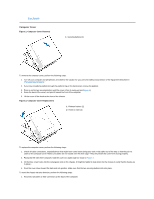
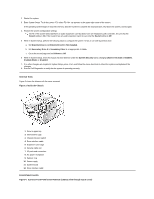
2. Restart the system. 3. Enter System Setup. To do this, press when F2=Setup appears in the upper-right corner of the screen. If the operating system begins to load into memory, allow the system to complete the load operation, shut down the system, and try again. 4. Restore the system configuration settings. NOTE: If the system does not have an audio expansion card but does have an integrated audio controller, be sure that the Sound setting is On. If the system has an audio expansion card, be sure that the Sound setting is Off. 5. While in System Setup, perform the following steps to configure the system if it has an LS-120 SuperDisk drive: a. Set Diskette Drive A and Diskette Drive B to Not Installed. b. Set Secondary Drive 0 or Secondary Drive 1, as appropriate, to Auto. c. Go to the second page and set Diskette to Off. 6. While in System Setup, reset the chassis intrusion detector under the System Security tab by changing Chassis Intrusion to Enabled, Enabled-Silent, or Disabled. 7. If no other changes are required in System Setup, press and follow the menu directions to reboot the system and implement the changes. 8. Run the Dell Diagnostics to verify that the system is operating correctly. Internal View Figure 3 shows the chassis with the cover removed. Figure 3. Inside the Chassis 1 Drive in upper bay 2 Internal drive cage 3 Chassis intrusion switch 4 Drive interface cable 5 Expansion-card cage 6 Security cable slot 7 I/O ports and connectors 8 AC power receptacle 9 Padlock ring 10 Power supply 11 System board 12 Drive interface cable Front-Panel Inserts Figure 4. 5.25-Inch Front-Panel Insert Removal (cutaway view through top of cover)
-
 1
1 -
2
-
3
-
4
-
5
-
6
-
7
-
8
-
9
-
10
-
11
-
12
-
13
-
14
-
15
-
16
-
 17
17 -
 18
18 -
 19
19 -
 20
20 -
 21
21 -
 22
22 -
 23
23 -
 24
24 -
 25
25 -
 26
26 -
 27
27 -
28
-
29
-
30
-
31
-
32
-
33
-
34
-
35
-
36
-
37
-
38
-
39
-
40
-
41
-
42
-
43
-
44
-
45
-
46
-
47
-
48
-
49
-
50
-
51
-
52
-
53
-
54
-
55
-
56
-
57
-
58
-
59
-
60
-
61
-
62
-
63
-
64
-
65
-
66
-
67
-
68
-
69
-
70
-
71
-
72
-
73
-
74
-
75
-
76
-
77
-
78
-
79
 |
 |