Dell PowerConnect W-6000 Installation Guide - Page 27
Removing a Power Supply
 |
View all Dell PowerConnect W-6000 manuals
Add to My Manuals
Save this manual to your list of manuals |
Page 27 highlights
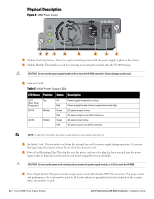
Depending on the W-6000's total power load, you may be required to increase the capacity of your site's electrical systems. See "Power Management" on page 25 for details. CAUTION: For safety reasons, verify the power outlets and plugs are within easy reach of the operator and can be quickly disconnected if necessary. NOTE: Use of a power line conditioner or Uninterruptable Power Supply (UPS) can decrease or mitigate problems caused by power service fluctuations. Verify that the output of any power shaping device is compatible with the W-6000 controller power supplies. Removing a Power Supply CAUTION: Many repairs may only be done by a certified service technician. You should only perform troubleshooting and simple repairs as authorized in your product documentation, or as directed by the online or telephone service and support team. Damage due to servicing that is not authorized by Dell is not covered by your warranty. Read and follow the safety instructions that came with the product. 1. Verify that you understand the procedure and all precautions. Before beginning, read the entire procedure. Verify that you understand all the precautions in these steps as well as those on page 10. 2. Verify that the power switch on the power supply to be removed is in the Off () position. CAUTION: Never insert or remove a power supply while its power switch is in the On (|) position. Verify the power switch is Off () first. 3. Unplug the power supply to be removed. If using the power cord retaining clip, first swing it to the left and free of the plug. Then remove the plug. 4. Remove the power supply. Use a #2 Phillips or cross-head screwdriver to turn the power supply's captive fastening screws counterclockwise until they are loose (they cannot be completely removed). Firmly grasp the handle of the power supply and carefully pull the module out of the chassis. 5. Cover blank slots. For safety considerations, as well as to promote proper air flow for cooling and to prevent dust from entering the chassis, cover any unoccupied slot with a blank cover plate. Dell PowerConnect W-6000 Controller | Installation Guide The W-6000 Power Supply Module | 27
-
 1
1 -
2
-
3
-
4
-
5
-
6
-
7
-
8
-
9
-
10
-
11
-
12
-
13
-
14
-
15
-
16
-
17
-
18
-
19
-
20
-
21
-
 22
22 -
 23
23 -
 24
24 -
 25
25 -
 26
26 -
 27
27 -
 28
28 -
 29
29 -
 30
30 -
 31
31 -
 32
32
 |
 |
