Dell PowerEdge M600 Web Tools Administrator’s Guide - Page 68
Viewing IP addresses, Switch configuration, Enabling and disabling a switch
 |
View all Dell PowerEdge M600 manuals
Add to My Manuals
Save this manual to your list of manuals |
Page 68 highlights
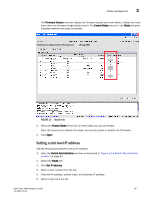
3 Switch configuration DRAFT: BROCADE CONFIDENTIAL 7. Click Add to add the new entry to the table. When you click Add, the values remain in the fields. The Clear Gateway and Clear IP buttons are available for clearing fields in the table. NOTE To remove a configuration, select a row in the table and click Delete. 8. Click Apply to save the values currently shown in the table or click Cancel to close the dialog box without saving any of your changes. 9. To update the switch with your changes, update the table using the Add and Delete buttons, and then click Apply. Viewing IP addresses If you want to view the IP addresses configured on the switch for the currently populated slots, use the Show IP Address button. Use this procedure to display the IP addresses. 1. Open the Switch Administration window as described in "Opening the Switch Administration window" on page 35. 2. Select the Blade tab. 3. Click Show IP Address. 4. Scroll through the list to view all the information. 5. When you are finished, click Close. Switch configuration Use the Switch tab of the Switch Administration window to perform basic switch configuration. Figure 14 on page 34 displays an example of the Switch tab. Enabling and disabling a switch You can identify whether a switch is enabled or disabled in the Switch Administration window by looking at the lower-right corner. If you rest the cursor over the icon, the system displays text that indicates the status of the switch. Use this procedure to enable or disable a switch. 1. Open the Switch Administration window as described in "Opening the Switch Administration window" on page 35. 2. Select the Switch tab. 3. In the Switch Status section, click Enable to enable the switch or Disable to disable the switch. 4. Click Apply. The system displays a confirmation window that asks if you want to save the changes to the switch. You must click Yes to save the changes. 40 Web Tools Administrator's Guide 53-1001772-01
-
 1
1 -
2
-
3
-
4
-
5
-
6
-
7
-
8
-
9
-
10
-
11
-
12
-
13
-
14
-
15
-
16
-
17
-
18
-
19
-
20
-
21
-
22
-
23
-
24
-
25
-
26
-
27
-
28
-
29
-
30
-
31
-
32
-
33
-
34
-
35
-
36
-
37
-
38
-
39
-
40
-
41
-
42
-
43
-
44
-
45
-
46
-
47
-
48
-
49
-
50
-
51
-
52
-
53
-
54
-
55
-
56
-
57
-
58
-
59
-
60
-
61
-
62
-
 63
63 -
 64
64 -
 65
65 -
 66
66 -
 67
67 -
 68
68 -
 69
69 -
 70
70 -
 71
71 -
 72
72 -
 73
73 -
74
-
75
-
76
-
77
-
78
-
79
-
80
-
81
-
82
-
83
-
84
-
85
-
86
-
87
-
88
-
89
-
90
-
91
-
92
-
93
-
94
-
95
-
96
-
97
-
98
-
99
-
100
-
101
-
102
-
103
-
104
-
105
-
106
-
107
-
108
-
109
-
110
-
111
-
112
-
113
-
114
-
115
-
116
-
117
-
118
-
119
-
120
-
121
-
122
-
123
-
124
-
125
-
126
-
127
-
128
-
129
-
130
-
131
-
132
-
133
-
134
-
135
-
136
-
137
-
138
-
139
-
140
-
141
-
142
-
143
-
144
-
145
-
146
-
147
-
148
-
149
-
150
-
151
-
152
-
153
-
154
-
155
-
156
-
157
-
158
-
159
-
160
-
161
-
162
-
163
-
164
-
165
-
166
-
167
-
168
-
169
-
170
-
171
-
172
-
173
-
174
-
175
-
176
-
177
-
178
-
179
-
180
-
181
-
182
-
183
-
184
-
185
-
186
-
187
-
188
-
189
-
190
-
191
-
192
-
193
-
194
-
195
-
196
-
197
-
198
-
199
-
200
-
201
-
202
-
203
-
204
-
205
-
206
-
207
-
208
-
209
-
210
-
211
-
212
-
213
-
214
-
215
-
216
-
217
-
218
-
219
-
220
-
221
-
222
-
223
-
224
-
225
-
226
-
227
-
228
-
229
-
230
-
231
-
232
-
233
-
234
-
235
-
236
-
237
-
238
-
239
-
240
-
241
-
242
-
243
-
244
-
245
-
246
-
247
-
248
-
249
-
250
-
251
-
252
-
253
-
254
-
255
-
256
-
257
-
258
-
259
-
260
-
261
-
262
-
263
-
264
-
265
-
266
-
267
-
268
-
269
-
270
-
271
-
272
-
273
-
274
-
275
-
276
-
277
-
278
-
279
-
280
-
281
-
282
-
283
-
284
-
285
-
286
-
287
-
288
-
289
-
290
-
291
-
292
-
293
-
294
-
295
-
296
-
297
-
298
-
299
-
300
-
301
-
302
-
303
-
304
-
305
-
306
-
307
-
308
-
309
-
310
 |
 |
