Dell PowerEdge SC1435 Rack Installation Guide - Page 16
Installing Chassis Static Rail Modules (Static Rail Kits Only)
 |
View all Dell PowerEdge SC1435 manuals
Add to My Manuals
Save this manual to your list of manuals |
Page 16 highlights
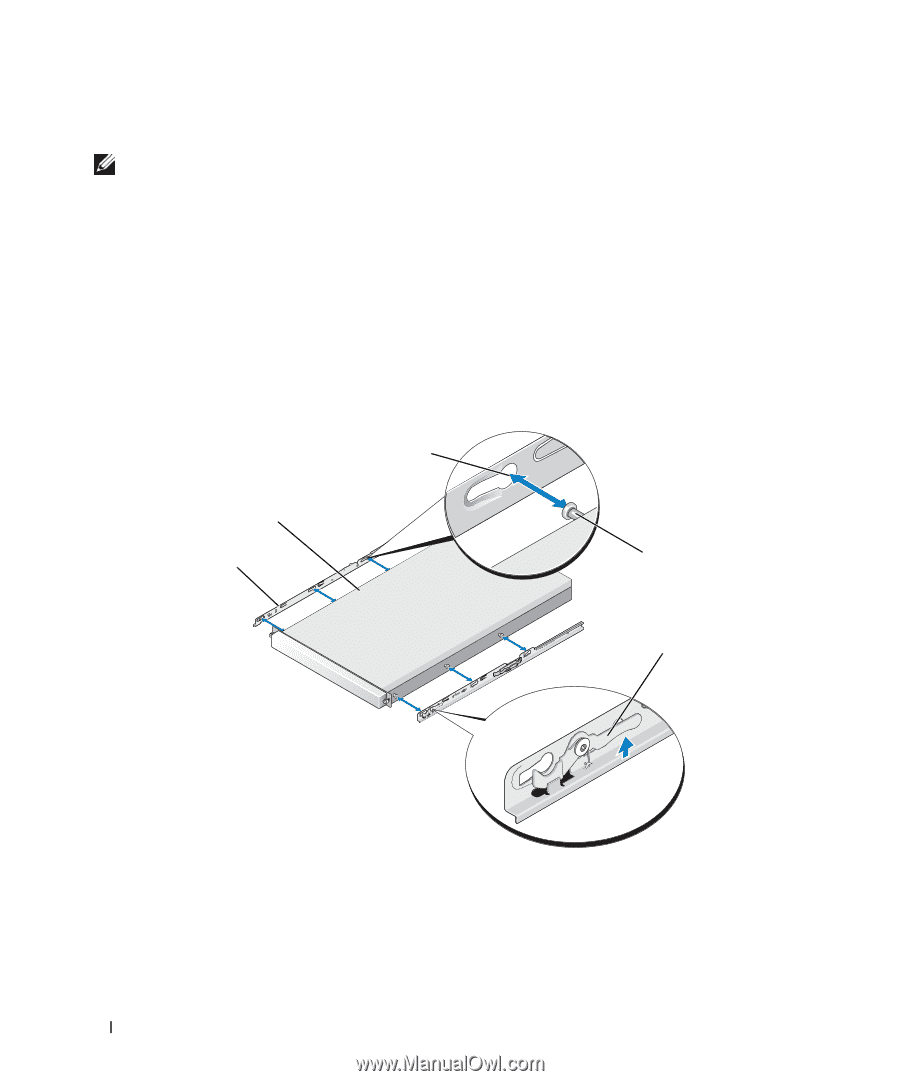
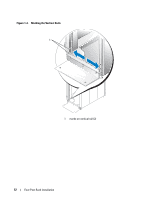
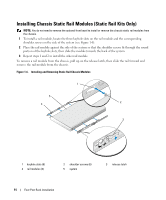
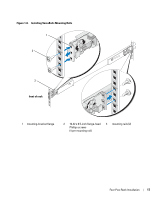
Installing Chassis Static Rail Modules (Static Rail Kits Only) NOTE: You do not need to remove the optional front bezel to install or remove the chassis static rail modules from the chassis. 1 To install a rail module, locate the three keyhole slots on the rail module and the corresponding shoulder screws on the side of the system (see Figure 1-6). 2 Place the rail module against the side of the system so that the shoulder screws fit through the round portion of the keyhole slots, then slide the module towards the back of the system. 3 Repeat steps 1 and 2 to install the other rail module. To remove a rail module from the chassis, pull up on the release latch, then slide the rail forward and remove the rail module from the chassis. Figure 1-6. Installing and Removing Static Rail Chassis Modules 1 5 2 4 3 1 keyhole slots (6) 4 rail modules (2) 2 shoulder screws (6) 5 system 3 release latch 14 Four-Post Rack Installation
-
 1
1 -
2
-
3
-
4
-
5
-
6
-
7
-
8
-
9
-
10
-
 11
11 -
 12
12 -
 13
13 -
 14
14 -
 15
15 -
 16
16 -
 17
17 -
 18
18 -
 19
19 -
 20
20 -
 21
21 -
22
-
23
-
24
-
25
-
26
-
27
-
28
-
29
-
30
-
31
-
32
-
33
-
34
-
35
-
36
-
37
-
38
-
39
-
40
-
41
-
42
-
43
-
44
-
45
-
46
-
47
-
48
-
49
-
50
-
51
-
52
-
53
-
54
-
55
-
56
-
57
-
58
-
59
-
60
-
61
-
62
-
63
-
64
-
65
-
66
-
67
-
68
-
69
-
70
-
71
-
72
-
73
-
74
-
75
-
76
-
77
-
78
-
79
-
80
-
81
-
82
-
83
-
84
-
85
-
86
-
87
-
88
-
89
-
90
-
91
-
92
-
93
-
94
-
95
-
96
-
97
-
98
-
99
-
100
-
101
-
102
-
103
-
104
-
105
-
106
-
107
-
108
-
109
-
110
-
111
-
112
-
113
-
114
-
115
-
116
-
117
-
118
-
119
-
120
-
121
-
122
-
123
-
124
-
125
-
126
-
127
-
128
-
129
-
130
-
131
-
132
-
133
-
134
-
135
-
136
-
137
-
138
-
139
-
140
-
141
-
142
-
143
-
144
-
145
-
146
-
147
-
148
-
149
-
150
-
151
-
152
-
153
-
154
-
155
-
156
-
157
-
158
-
159
-
160
-
161
-
162
-
163
-
164
-
165
-
166
-
167
-
168
-
169
-
170
-
171
-
172
-
173
-
174
-
175
-
176
-
177
-
178
-
179
-
180
-
181
-
182
-
183
-
184
-
185
-
186
-
187
-
188
-
189
-
190
-
191
-
192
-
193
-
194
-
195
-
196
-
197
-
198
-
199
-
200
-
201
-
202
 |
 |