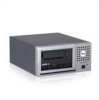
Dell PowerVault 110T LTO3 User Guide - Page 12
Preparing the Mounting Bay in Your System
 |
View all Dell PowerVault 110T LTO3 manuals
Add to My Manuals
Save this manual to your list of manuals |
Page 12 highlights
Step 2 - Removing Power from the System 1. Power-off the system. 2. Disconnect the power cord from both the electrical outlet and the system. Step 3 - Setting the SCSI ID Your tape drive is shipped with a default SCSI ID of 6, but it can be assigned any unused ID between 0 and 15. Do not use SCSI ID 7, which is reserved for the SCSI controller, or SCSI ID 0, which is typically assigned to the boot disk. We do not recommend installing the drive onto a narrow SCSI bus, as this will restrict performance. NOTICE: Static electricity can damage electronic components. Always wear an antistatic wriststrap if possible. If not, to equalize the electromagnetic charges, touch a bare metal part of the computer (such as the back plate) before you remove the tape drive from its bag. To set the SCSI ID: 1. Locate the SCSI ID connector (see number 2 in Figure 4 in the "Introduction"). The SCSI ID is set using jumpers on a set of pins at the rear of the drive. 2. Determine whether you need to change the SCSI ID from the default of 6. Make sure the ID is not used by another device. 3. Referring to Figure 2, find the ID number that you chose. Then, place jumpers on the connector pins as shown (use a pair of needle-nose pliers to connect the jumpers to the pins that are shaded). Spare jumpers will be on the pin array itself (but only attached to a single pin). Figure 2. SCSI Connector Pins Step 4 - Preparing the Mounting Bay in Your System CAUTION: To avoid personal injury or damage to the system or tape drive, ensure that the system power cord is disconnected before you install the drive. Refer to your system's documentation for instructions on how to prepare the mounting bay to receive the tape drive. Step 5 - Attaching Mounting Hardware If your system requires special rails or other hardware to install the tape drive, mount them on the tape drive in this step. If your system does not require special mounting hardware, proceed to step 6. Step 6 - Installing the Drive Slide the tape drive into the open bay, aligning the tray or rails with the slots in the bay, as shown in Figure 3. Figure 3. Install the Drive
-
 1
1 -
2
-
3
-
4
-
5
-
6
-
 7
7 -
 8
8 -
 9
9 -
 10
10 -
 11
11 -
 12
12 -
 13
13 -
 14
14 -
 15
15 -
 16
16 -
 17
17 -
18
-
19
-
20
-
21
-
22
-
23
-
24
-
25
-
26
-
27
-
28
-
29
-
30
-
31
 |
 |
