Dell PowerVault 110T LTO3 User Guide - Page 13
Step 7, Attaching Power and SCSI Cables, Step 8, Securing the Drive
 |
View all Dell PowerVault 110T LTO3 manuals
Add to My Manuals
Save this manual to your list of manuals |
Page 13 highlights
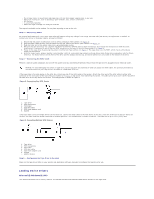
If your system does not use mounting hardware, check that the holes in the chassis are aligned with the holes in the side of the tape drive (see Figure 4). Figure 4. Mounting Holes on Tape Drive 1. M-3 mounting screw holes Do not secure the drive with screws at this point because you may have to move the drive to get the cables in place. Step 7 - Attaching Power and SCSI Cables Attach a spare power cable from the system's internal power supply to the power connector, as shown in Figure 5, number 1. Attach a spare SCSI cable on the system's SCSI ribbon cable to the SCSI connector, as shown on Figure 5, number 2. NOTE: If the drive is the last device on the SCSI chain, it must be terminated. Figure 5. Attach Power and SCSI Cables 1. Power cable 2. SCSI cable Step 8 - Securing the Drive The tape drive can be mounted several ways. Ensure that you have the proper mounting rails or drive mounting sled and the correct screws (M-3). Some systems require the drive to be inserted into a media bay and attached directly to the system. Figure 6. Secure the Drive
-
 1
1 -
2
-
3
-
4
-
5
-
6
-
7
-
 8
8 -
 9
9 -
 10
10 -
 11
11 -
 12
12 -
 13
13 -
 14
14 -
 15
15 -
 16
16 -
 17
17 -
 18
18 -
19
-
20
-
21
-
22
-
23
-
24
-
25
-
26
-
27
-
28
-
29
-
30
-
31
 |
 |
