Dell PowerVault 110T LTO3 User Guide - Page 22
General Guidelines - powervault lto 3 manual
 |
View all Dell PowerVault 110T LTO3 manuals
Add to My Manuals
Save this manual to your list of manuals |
Page 22 highlights
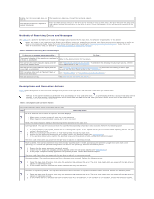
Attention: Data on the suspect tape will be overwritten. 1. Make sure that no cartridge is in the drive. 2. Within a 2-second interval, press the eject button three times. The status light becomes solid amber, which means that the drive is in maintenance mode. 3. Press the eject button once per second until it redisplays. appears in the single-character display. If you cycle past , continue to press the eject button until 4. To select the function, press and hold the eject button for 3 seconds. After you select the function, flashes. When flashes, the drive is waiting for a cartridge. Within 60 seconds, insert the suspect data cartridge (or the tape drive exits maintenance mode). After you insert the cartridge, flashes and the test begins. ¡ If no error is detected, the test begins again and runs for a maximum of ten times. Each loop takes approximately 3 minutes to run. After the tenth loop, the test stops and the drive automatically exits maintenance mode. ¡ If an error is detected, the tape drive displays an error code, unloads the tape cartridge, and exits maintenance mode. ¡ To halt the diagnostic at the end of the current 3-minute test loop, press the eject button once. The drive acknowledges the request by slowing the length of time that the currently displayed character flashes on the single-character display (from twice per second to once per second.) The diagnostic continues to the end of its loop and then stops. The tape drive then displays "0", rewinds and unloads the cartridge, and exits maintenance mode. ¡ To halt the diagnostic immediately and terminate the test that is running, press the eject button twice. The tape drive displays "0" , rewinds and unloads the cartridge, and exits maintenance mode. Function Code H - Test Head Causes the tape drive to perform the Head Resistance Measurements test and a Write/Read test (on the center of the tape). The drive runs these tests to ensure that the tape drive's head and tape-carriage mechanics are working correctly. The tape drive takes approximately 10 minutes to run the test. 1. Make sure that no cartridge is in the drive. 2. Within a 2-second interval, press the eject button three times. The status light becomes solid amber, which means that the drive is in maintenance mode. 3. Press the eject button once per second until it redisplays. appears in the single-character display. If you cycle past , continue to press the eject button until 4. To select the function, press and hold the eject button for 3 seconds. After you select the function, flashes. When flashes, the drive is waiting for a cartridge. Within 60 seconds, insert a scratch data cartridge (or the tape drive exits maintenance mode). After you insert the cartridge, flashes and the test begins: ¡ If no error is detected, the test begins again and runs for a maximum of ten times. Each loop takes approximately 10 minutes to run. After the tenth loop, the test stops and the drive automatically exits maintenance mode. ¡ If an error is detected, the tape drive displays "5", unloads the tape cartridge, and exits maintenance mode. ¡ To halt the diagnostic at the end of the current 10-minute test loop, press the eject button once. The drive acknowledges the request by slowing the length of time that the currently displayed character flashes on the single-character display (from twice per second to once per second.) The diagnostic continues to the end of its loop and then stops. The tape drive then displays "0", rewinds and unloads the cartridge, and exits maintenance mode. ¡ To halt the diagnostic immediately and terminate the test that is running, press the eject button twice. The tape drive displays "0" , rewinds and unloads the cartridge, and exits maintenance mode. Function Code L - Reserved for Future Use Reserved for future use. Function Code P or U - RESERVED (Service Function) General Guidelines If you encounter problems when running the Dell PowerVault 110T LTO-3 Tape Drive, refer to Table 2 for common problems. If the problem is not identified, refer to "Methods of Receiving Errors and Messages." The color and condition of the status light may also indicate a problem. Table 2. General Troubleshooting If the problem is this.... Do this.... A code displays on the singlecharacter display and the status light flashes amber. The tape drive detected an error or is directing you to an informational message. See "Methods of Receiving Errors and Messages." The status light or single-character display never turns on. The tape drive has no power. Check the power at the power source. Connect power to the tape drive. If the problem persists, contact Dell technical support. One of the following has occurred: The tape drive will not load a tape cartridge. l A tape cartridge is already loaded. To remove the cartridge, press the eject button. If the cartridge does not eject, turn off the power to the tape drive, then turn it back on. After the status light becomes solid green, press the eject button to eject the cartridge. l The tape cartridge was loaded incorrectly. To properly load a cartridge, see the Loading section in "Using the Tape Drive." l The tape cartridge may be defective. Load another tape cartridge. If the problem exists for multiple cartridges, the tape drive is defective. Contact Dell technical support. l The tape drive has no power. Connect power to the tape drive. The tape drive will not unload the tape cartridge. The tape cartridge is stuck or is broken. Press the eject button. If the cartridge does not eject, turn off the power to the tape drive, then turn it back on (note that the mid-tape recovery could take up to 10 minutes to complete). If the cartridge still does not eject, manually remove it (see "Manually Removing a Tape Cartridge"). The system received TapeAlert flags. See "TapeAlert Flags." The system reported SCSI problems (such as selection or command timeouts, or parity errors). See "Resolving Problems Reported by the System." Codes display on the single-character
-
 1
1 -
2
-
3
-
4
-
5
-
6
-
7
-
8
-
9
-
10
-
11
-
12
-
13
-
14
-
15
-
16
-
 17
17 -
 18
18 -
 19
19 -
 20
20 -
 21
21 -
 22
22 -
 23
23 -
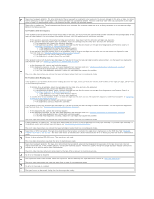 24
24 -
 25
25 -
 26
26 -
 27
27 -
28
-
29
-
30
-
31
 |
 |
