Dell PowerVault MD3220i Owner's Manual - Page 149
Creating a Snapshot Virtual Disk Using the Advanced Path, About the Advanced Path - management software
 |
View all Dell PowerVault MD3220i manuals
Add to My Manuals
Save this manual to your list of manuals |
Page 149 highlights
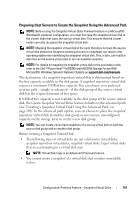
6 Enter the snapshot repository virtual disks capacity as a percentage of the source virtual disks capacity and click Next. The Preview window containing the summary of the snapshot virtual disk is displayed. 7 Click Finish. The Completed window is displayed. 8 Click OK. After creating one or more snapshot virtual disks, mount the source virtual disk, and restart the host application using that source virtual disk. 9 In the AMW, select the Mappings tab, assign mappings between the snapshot virtual disk and the host that accesses the snapshot virtual disk. NOTE: In some cases, conflicts might result from mapping the same host to both a source virtual disk and its associated snapshot virtual disk. This conflict depends on the host operating system and any virtual disk manager software in use. 10 To register the snapshot virtual disk with the host operating system, run the host-based hot_add utility. 11 To associate the mapping between the storage array name and the virtual disk name, run the host-based SMdevices utility. NOTE: If your operating system requires additional instructions, you can find those instructions in your operating system documentation. Creating a Snapshot Virtual Disk Using the Advanced Path About the Advanced Path Use the advanced path to choose whether to place the snapshot repository virtual disk on free capacity or unconfigured capacity and to change the snapshot repository virtual disk parameters. You can select the advanced path regardless of whether you use free capacity or unconfigured capacity for the snapshot virtual disk. Using the advanced path, you can specify the following parameters for your snapshot virtual disk: Configuration: Premium Feature-Snapshot Virtual Disks 149
-
 1
1 -
2
-
3
-
4
-
5
-
6
-
7
-
8
-
9
-
10
-
11
-
12
-
13
-
14
-
15
-
16
-
17
-
18
-
19
-
20
-
21
-
22
-
23
-
24
-
25
-
26
-
27
-
28
-
29
-
30
-
31
-
32
-
33
-
34
-
35
-
36
-
37
-
38
-
39
-
40
-
41
-
42
-
43
-
44
-
45
-
46
-
47
-
48
-
49
-
50
-
51
-
52
-
53
-
54
-
55
-
56
-
57
-
58
-
59
-
60
-
61
-
62
-
63
-
64
-
65
-
66
-
67
-
68
-
69
-
70
-
71
-
72
-
73
-
74
-
75
-
76
-
77
-
78
-
79
-
80
-
81
-
82
-
83
-
84
-
85
-
86
-
87
-
88
-
89
-
90
-
91
-
92
-
93
-
94
-
95
-
96
-
97
-
98
-
99
-
100
-
101
-
102
-
103
-
104
-
105
-
106
-
107
-
108
-
109
-
110
-
111
-
112
-
113
-
114
-
115
-
116
-
117
-
118
-
119
-
120
-
121
-
122
-
123
-
124
-
125
-
126
-
127
-
128
-
129
-
130
-
131
-
132
-
133
-
134
-
135
-
136
-
137
-
138
-
139
-
140
-
141
-
142
-
143
-
 144
144 -
 145
145 -
 146
146 -
 147
147 -
 148
148 -
 149
149 -
 150
150 -
 151
151 -
 152
152 -
 153
153 -
 154
154 -
155
-
156
-
157
-
158
-
159
-
160
-
161
-
162
-
163
-
164
-
165
-
166
-
167
-
168
-
169
-
170
-
171
-
172
-
173
-
174
-
175
-
176
-
177
-
178
-
179
-
180
-
181
-
182
-
183
-
184
-
185
-
186
-
187
-
188
-
189
-
190
-
191
-
192
-
193
-
194
-
195
-
196
-
197
-
198
-
199
-
200
-
201
-
202
-
203
-
204
-
205
-
206
-
207
-
208
-
209
-
210
-
211
-
212
-
213
-
214
-
215
-
216
-
217
-
218
-
219
-
220
-
221
-
222
-
223
-
224
-
225
-
226
-
227
-
228
-
229
-
230
-
231
-
232
-
233
-
234
-
235
-
236
-
237
-
238
-
239
-
240
-
241
-
242
-
243
-
244
-
245
-
246
-
247
-
248
-
249
-
250
-
251
-
252
-
253
-
254
-
255
-
256
-
257
-
258
-
259
-
260
-
261
-
262
-
263
-
264
-
265
-
266
-
267
-
268
 |
 |
