Dell S300WI User Guide - Page 38
PICTURE (in Video Mode), Presentation, Bright, Movie, Custom, Picture Advance, Picture
 |
UPC - 884116050148
View all Dell S300WI manuals
Add to My Manuals
Save this manual to your list of manuals |
Page 38 highlights
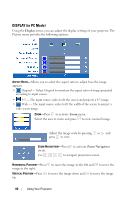
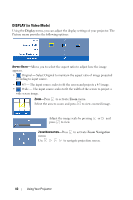
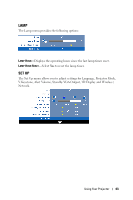
VIDEO MODE-Allows you to optimize the display image: Presentation, Bright, Movie, sRGB (provides more accurate color representation), and Custom (set your preferred settings). NOTE: If you adjust the settings for Brightness, Contrast, Saturation, Sharpness, Tint, and Advanced the projector automatically switches to Custom. BRIGHTNESS-Use and to adjust the brightness of the image. CONTRAST-Use and to adjust the display contrast. ADVANCED-Press to activate Picture Advance Menu. See "PICTURE ADVANCED" on page 39. PICTURE (in Video Mode) Using the Picture menu, you can adjust the display settings of your projectors. The Picture menu provides the following options: VIDEO MODE-Allows you to optimize the display image: Presentation, Bright, Movie, sRGB (provides more accurate color representation), and Custom (set your preferred settings). NOTE: If you adjust the settings for Brightness, Contrast, Saturation, Sharpness, Tint, and Advanced, the projector automatically switches to Custom. BRIGHTNESS-Use and to adjust the brightness of the image. CONTRAST-Use and to adjust the display contrast. SATURATION-Allows you to adjust the video source from black and white to fully saturated color. Press to decrease the amount of color in the image and to increase the amount of color in the image. SHARPNESS-Press to decrease the sharpness and to increase the sharpness. 38 Using Your Projector
-
 1
1 -
2
-
3
-
4
-
5
-
6
-
7
-
8
-
9
-
10
-
11
-
12
-
13
-
14
-
15
-
16
-
17
-
18
-
19
-
20
-
21
-
22
-
23
-
24
-
25
-
26
-
27
-
28
-
29
-
30
-
31
-
32
-
 33
33 -
 34
34 -
 35
35 -
 36
36 -
 37
37 -
 38
38 -
 39
39 -
 40
40 -
 41
41 -
 42
42 -
 43
43 -
44
-
45
-
46
-
47
-
48
-
49
-
50
-
51
-
52
-
53
-
54
-
55
-
56
-
57
-
58
-
59
-
60
-
61
-
62
-
63
-
64
-
65
-
66
-
67
-
68
-
69
-
70
-
71
-
72
-
73
-
74
-
75
-
76
-
77
-
78
-
79
-
80
-
81
-
82
-
83
-
84
-
85
-
86
-
87
-
88
-
89
-
90
-
91
-
92
-
93
-
94
-
95
-
96
-
97
-
98
-
99
-
100
-
101
-
102
-
103
-
104
-
105
-
106
-
107
-
108
-
109
 |
 |
