Dell S6000 Dell Networking Installation Guide - Page 14
Basic Installation Requirements, Site Location and Preparation, Install the S6000 - power supply
 |
View all Dell S6000 manuals
Add to My Manuals
Save this manual to your list of manuals |
Page 14 highlights
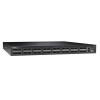
www.dell.com | support.dell.com Table 2-2. 40G QSFP+/ 4x10G SFP+ Ethernet Port LEDs Feature Detailed Description Link/Activity LED • Off - No Link. • Blinking green - Transmit/Receive is active. • Solid green - Link up at 40Gbps/10Gbps speed. Table 2-3. Management Ethernet Port LEDs Feature Detailed Description Link LED • Off - No Link. • Solid green - Link on 10/100M/1G speed. Activity LED • Off - No Link. • Blinking green - Transmit/Receive is active. Basic Installation Requirements Detailed installation instructions for the S6000 are provided in Chapter 3, Site Location and Preparation and Chapter 4, Install the S6000. However, here is an initial list of components required for a successful installation of the S6000: • S6000 chassis • If you ordered AC units, cables to connect the AC power source to each of the chassis' AC power supplies (country/regional configured) • If you ordered DC units, cables to connect the DC power source to each of the chassis' DC power supplies • Mounting brackets for rack installation (included) • Screws for rack installation and #1 and #2 Phillips screwdrivers (not included) • Ground cable (not included) • Ground cable screws (included) • Copper/fiber cables Optional components for installation: • Additional power supply units • Additional fan modules • Additional mounting brackets (if installing in a 4-post rack or cabinet) 14 | The S6000 System
-
 1
1 -
2
-
3
-
4
-
5
-
6
-
7
-
8
-
 9
9 -
 10
10 -
 11
11 -
 12
12 -
 13
13 -
 14
14 -
 15
15 -
 16
16 -
 17
17 -
 18
18 -
 19
19 -
20
-
21
-
22
-
23
-
24
-
25
-
26
-
27
-
28
-
29
-
30
-
31
-
32
-
33
-
34
-
35
-
36
-
37
-
38
-
39
-
40
-
41
-
42
-
43
-
44
-
45
-
46
-
47
-
48
-
49
-
50
-
51
-
52
-
53
-
54
-
55
-
56
 |
 |
