Dell S6000 Dell Networking Installation Guide - Page 21
Install the S6000, Unpack the S6000 System, Package Contents
 |
View all Dell S6000 manuals
Add to My Manuals
Save this manual to your list of manuals |
Page 21 highlights
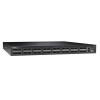
4 Install the S6000 To install the S6000 system, Dell Networking recommends completing the installation procedures in the order presented in this chapter. Always handle the S6000 and its components with care. Avoid dropping the system or its field replaceable units (FRUs). This chapter describes the installation procedures as follows: • Unpack the S6000 System • Install Rack or Cabinet Hardware • Installing the Dell ReadyRails System • Configuring a Two-Post Flush-Mount • Configuring a Two-Post Center-Mount • Configure a Four-Post Thread • Installing the S6000 System • Installing a 1U Front-Rack • Attaching the Ground Cable • Installing an AC or DC Power Supply • Installing QSFP+ Optics • Power Up the S6000 System WARNING: ESD damage can occur if components are mishandled. Always wear an ESD-preventive wrist or heel ground strap when handling the S6000 and its components. As with all electrical devices of this type, take all the necessary safety precautions to prevent injury when installing this system. Unpack the S6000 System NOTE: Before unpacking the system, inspect the container and immediately report any evidence of damage. Package Contents When unpacking each S6000 system, make sure that the following items are included: • One S6000 system • One RJ-45 to DB-9 female cable • Two sets of rail kits (no tools required) • Two PSUs Install the S6000 | 21
-
 1
1 -
2
-
3
-
4
-
5
-
6
-
7
-
8
-
9
-
10
-
11
-
12
-
13
-
14
-
15
-
 16
16 -
 17
17 -
 18
18 -
 19
19 -
 20
20 -
 21
21 -
 22
22 -
 23
23 -
 24
24 -
 25
25 -
 26
26 -
27
-
28
-
29
-
30
-
31
-
32
-
33
-
34
-
35
-
36
-
37
-
38
-
39
-
40
-
41
-
42
-
43
-
44
-
45
-
46
-
47
-
48
-
49
-
50
-
51
-
52
-
53
-
54
-
55
-
56
 |
 |
